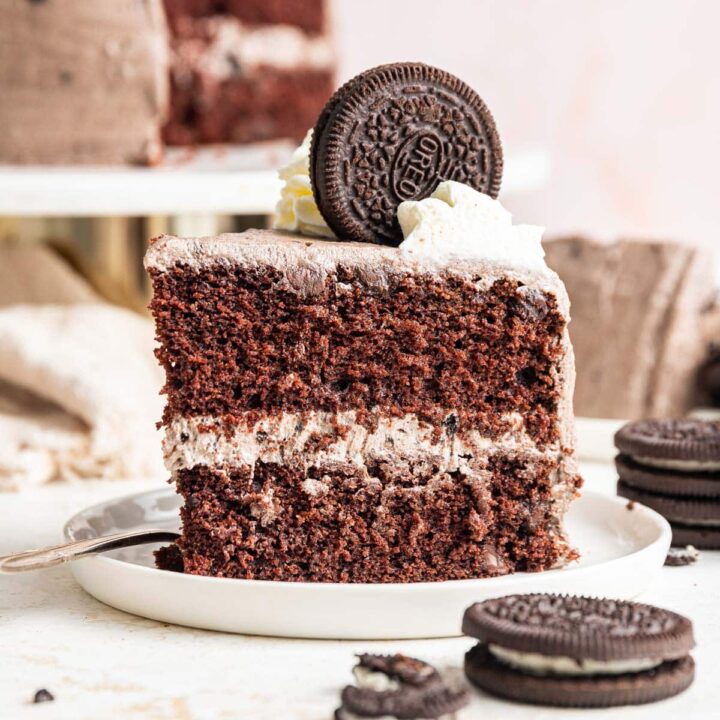
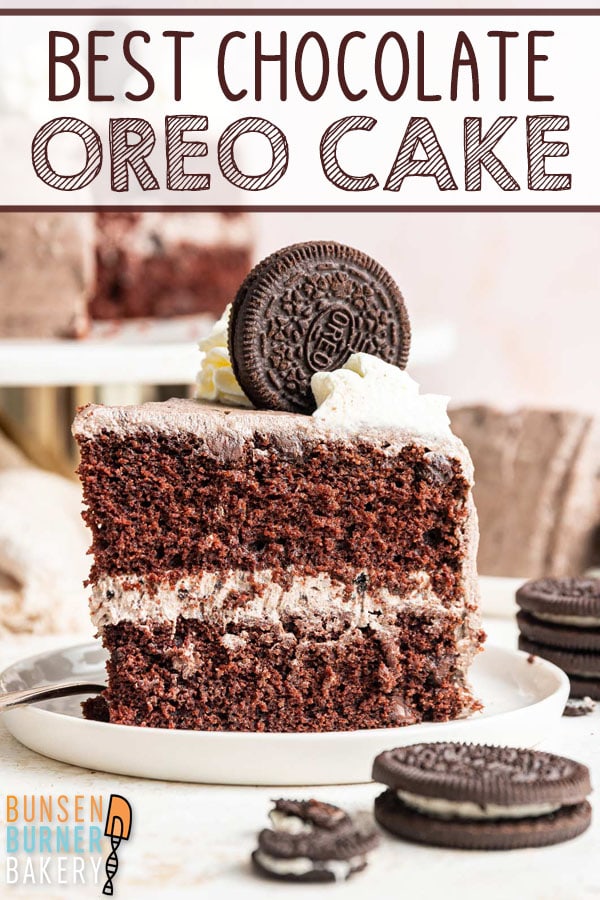
Chocolate Oreo Cake
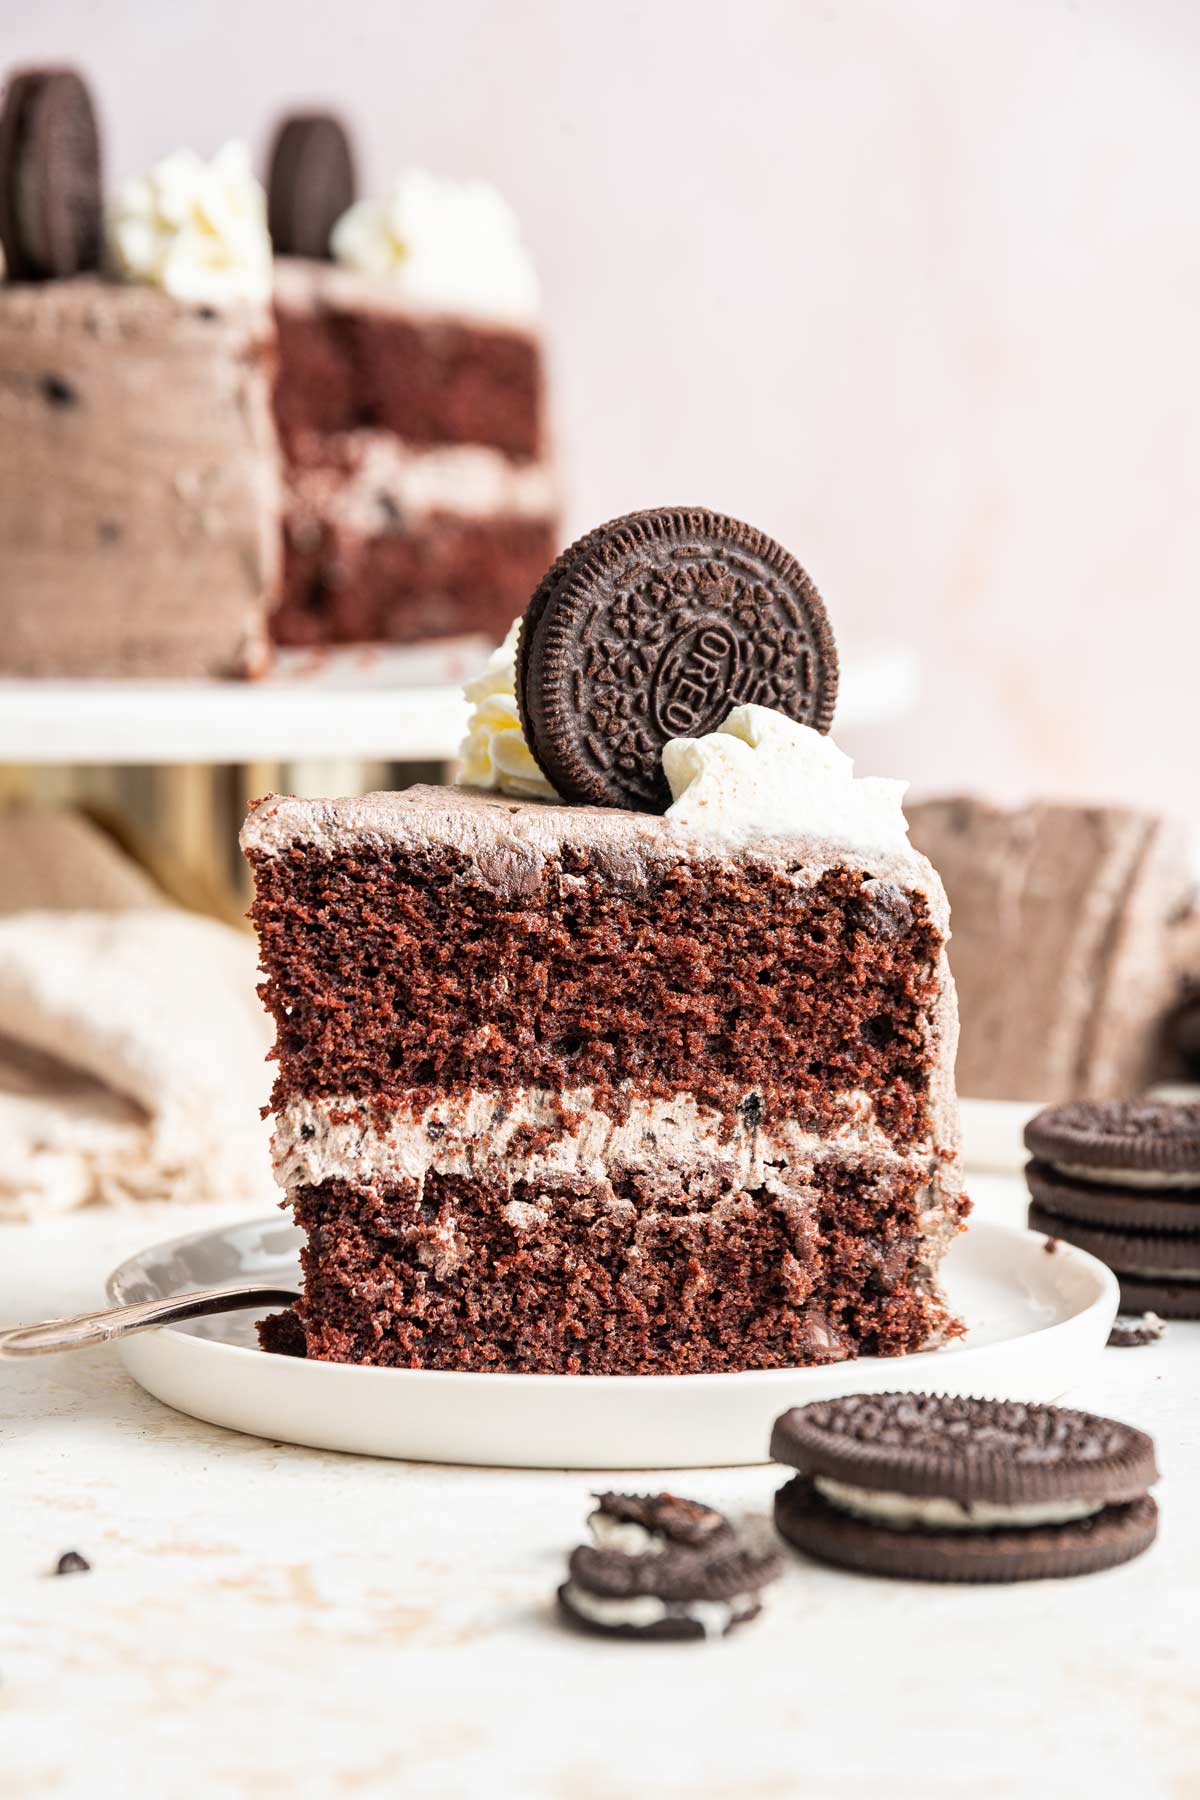
A rich buttermilk chocolate cake, dotted with chocolate chips, and sandwiched between thick layers of Oreo cream cheese frosting. Irresistible – this surprisingly easy Chocolate Oreo Cake is perfect for all your celebrations, with all the tips and tricks you need to make a beautiful cake, even for novices!
Let’s talk about cakes — more specifically, layer cakes.
I have a lot of layer cake recipes on my site – I even did a yearlong series of Layer Cake of the Month in 2021!
But I get a lot of questions about easy layer cakes, and how to get started.
I get it! Food blogs are full of towering, three (or four — or five!) layer cakes, perfectly smooth, decorated with stunning buttercream flowers and beautiful mirror glazes.
They’re also really intimidating — and as a result, I get a lot of emails from readers asking if I have recipes for easy layer cakes, like from a box mix, or layer cakes that don’t require decorating skills, or multiple round cake pans of the same size.
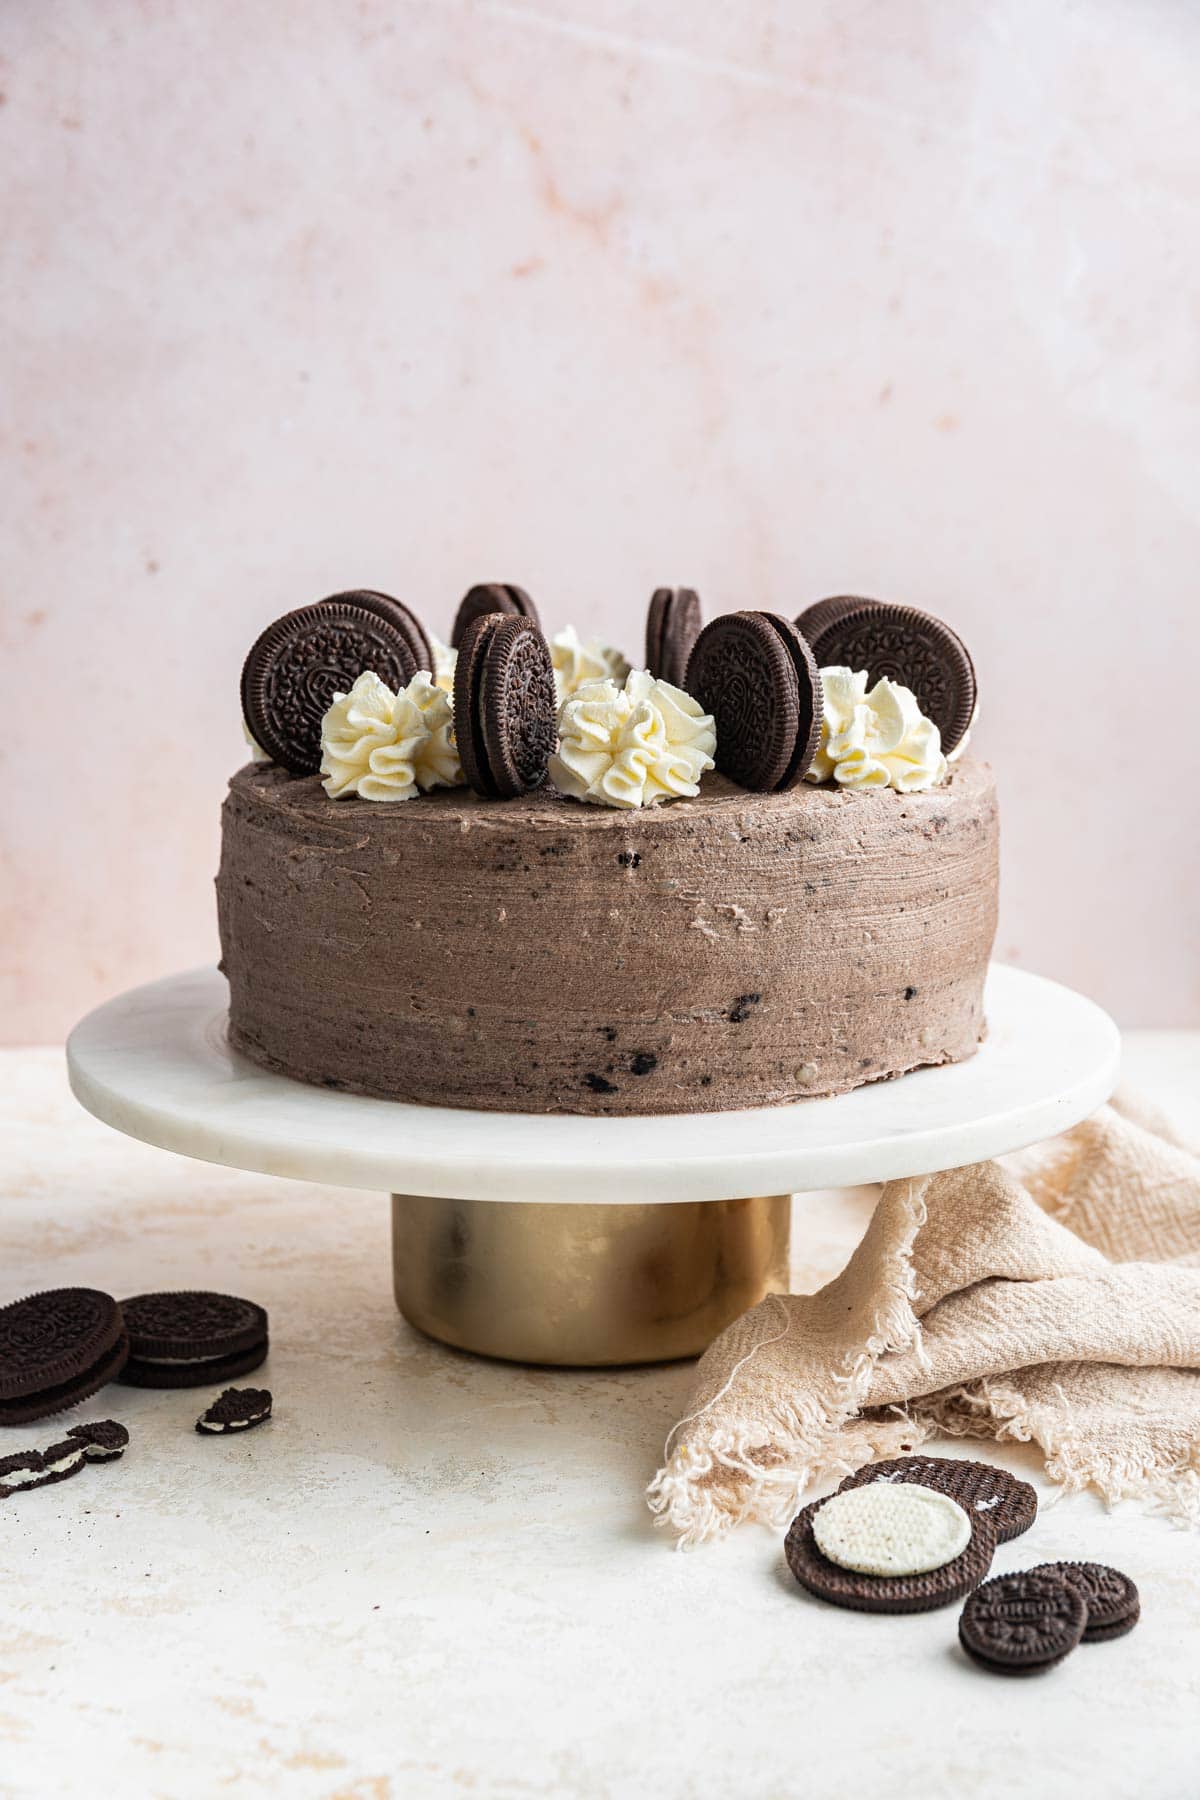
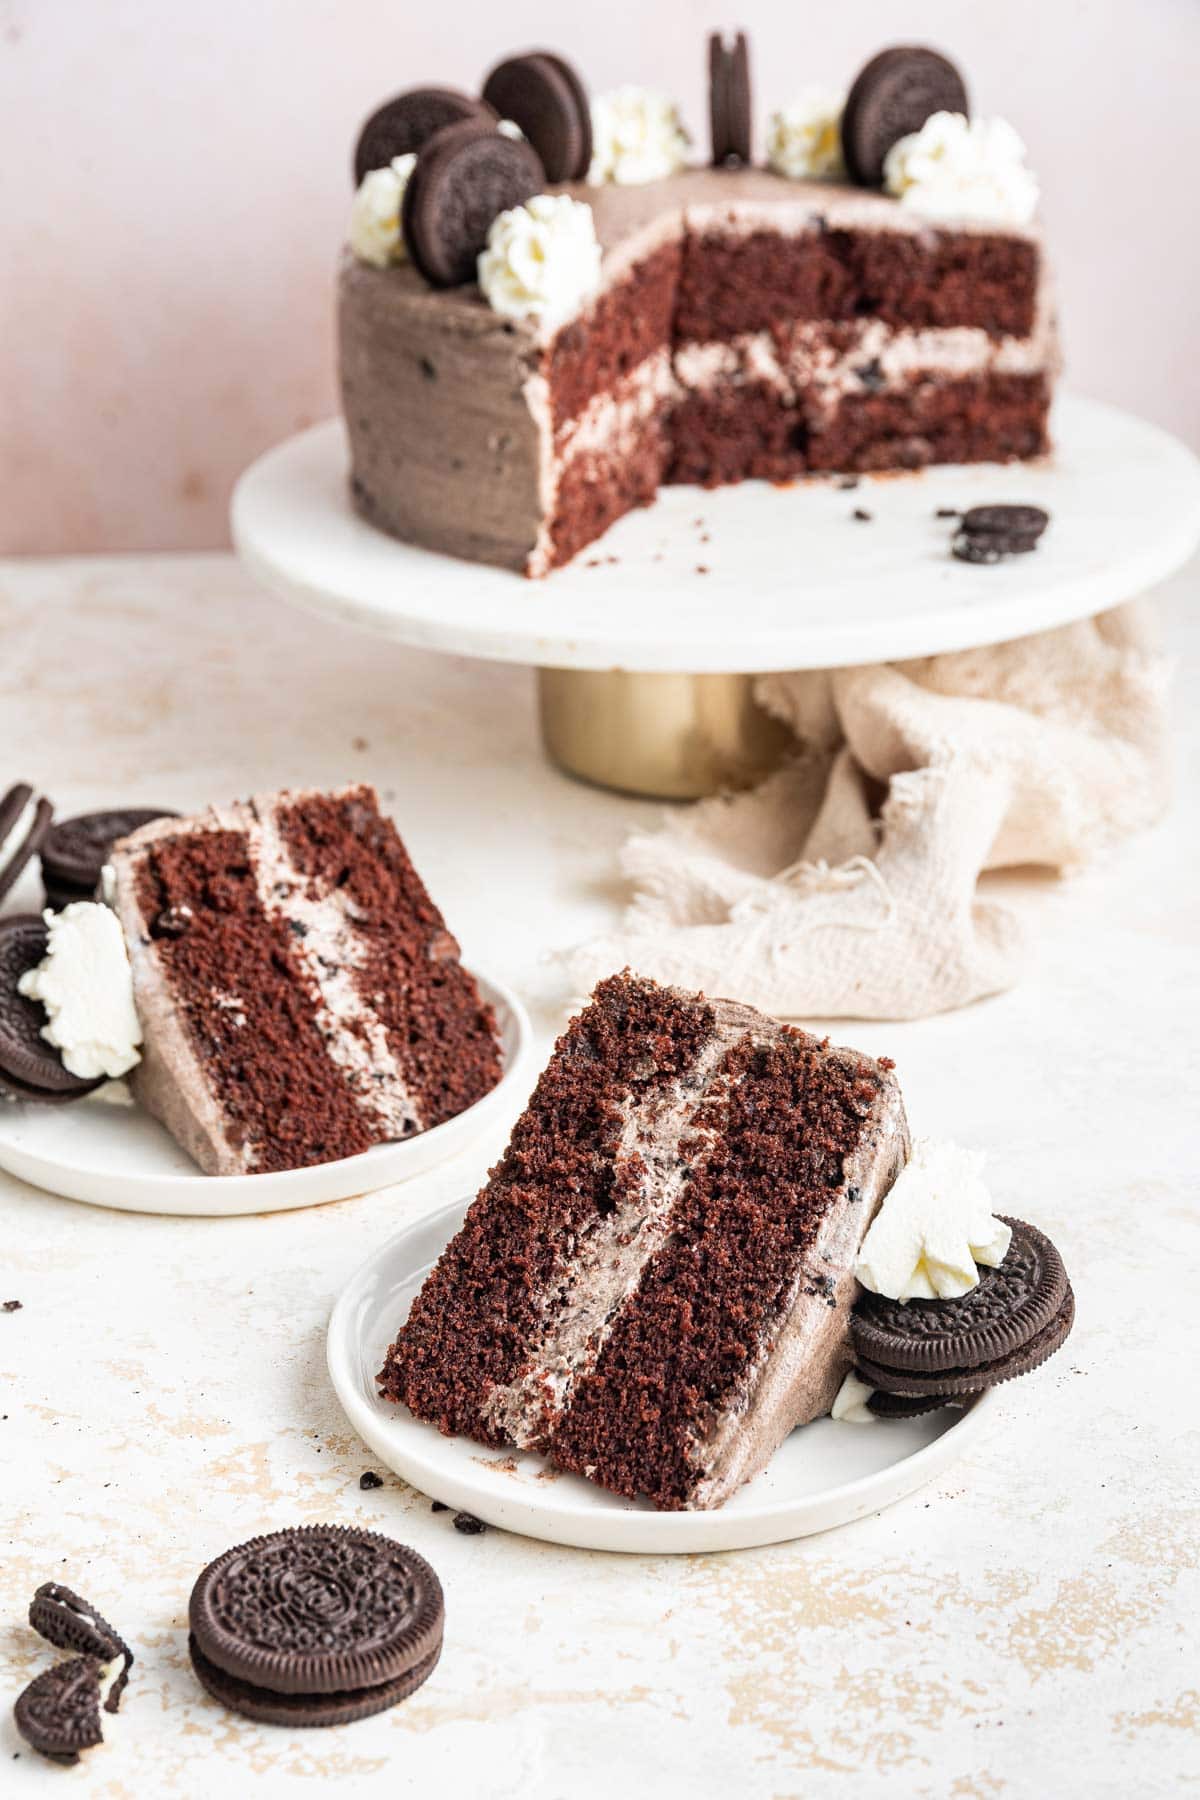
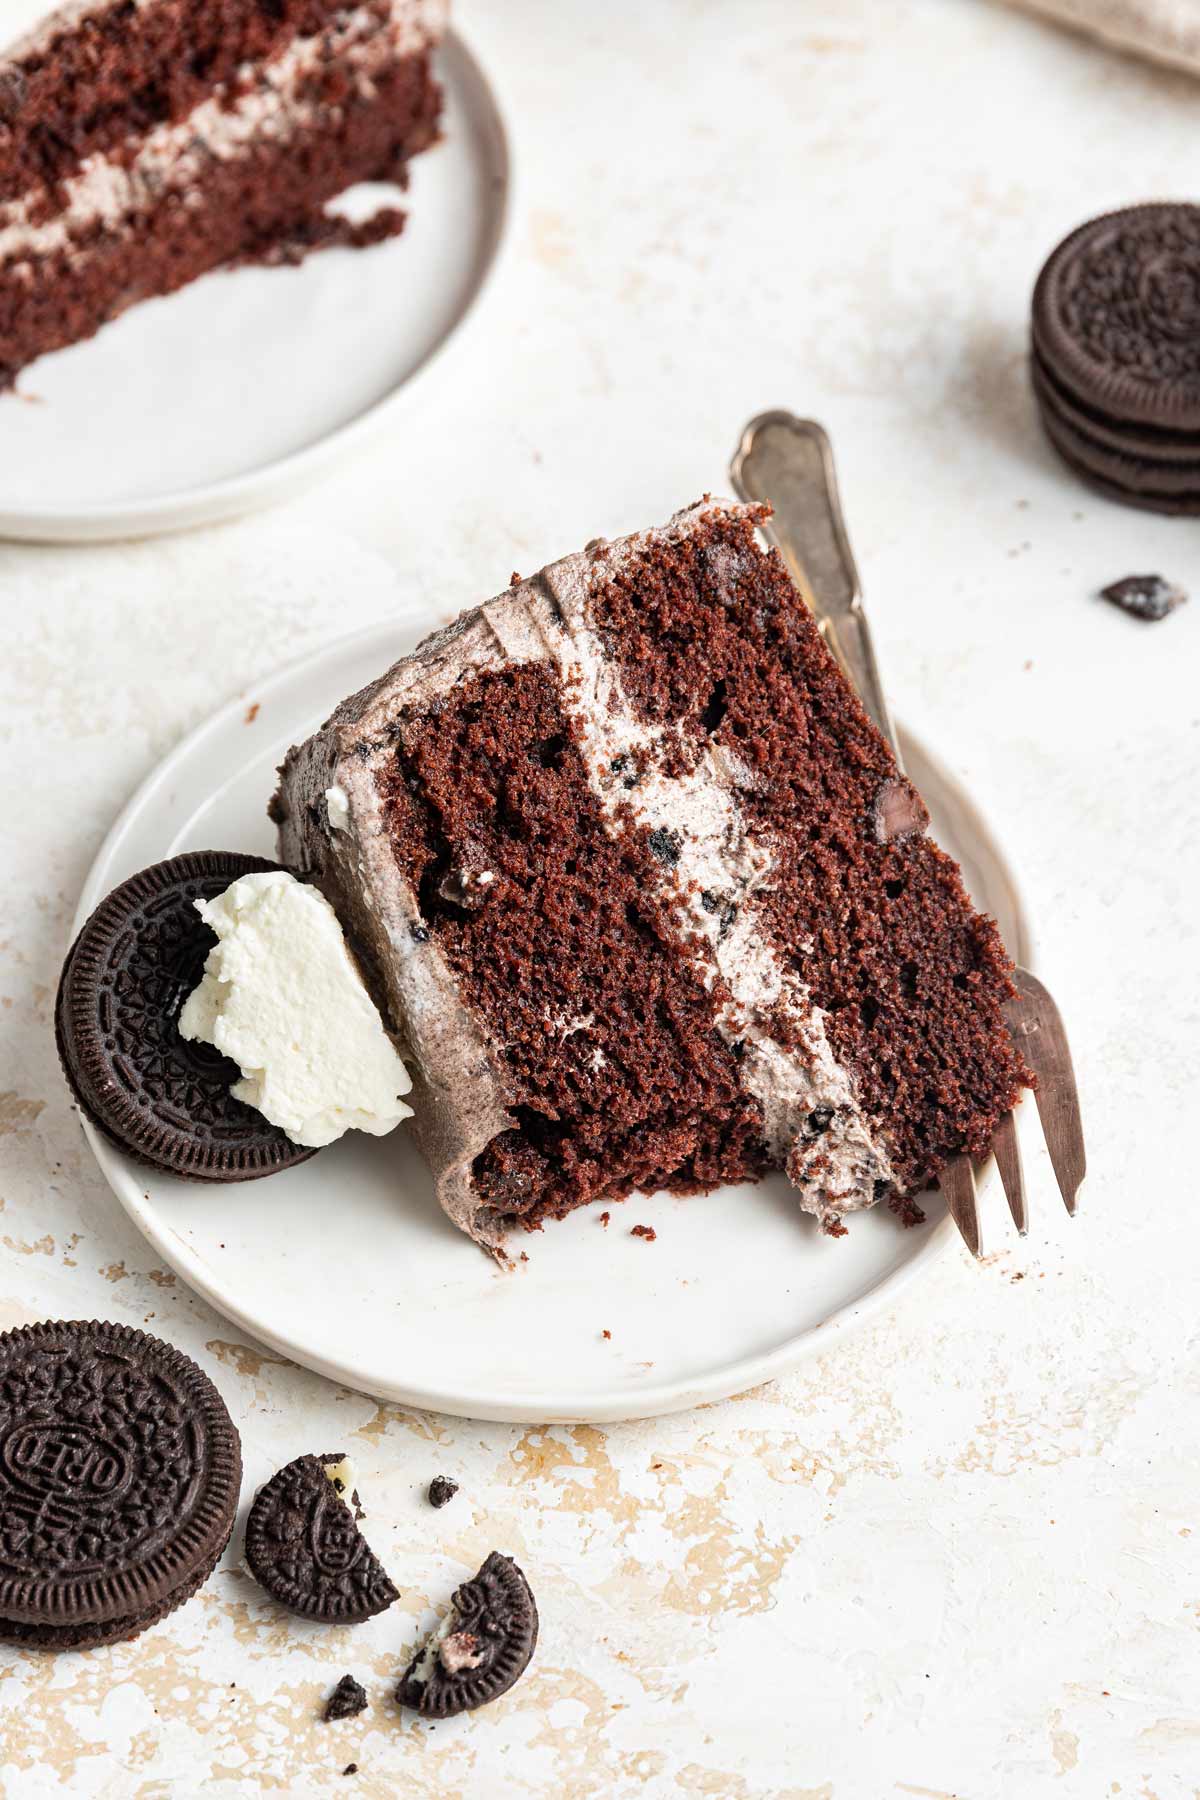
This chocolate oreo cake isn’t from a boxed mix, but it IS easy. And because the frosting is filled with chopped-up Oreos, it’s not supposed to be silky smooth. It is, however, always going to be delicious (which is the most important part of a cake!), only two layers, and it’s easy.
This is the perfect layer cake for people who don’t think they can bake layer cakes!
In fact, it’s one of the first layer cakes I ever made — and the very first one to appear on Bunsen Burner Bakery, all the way back in 2011! It’s about time for a little update with some new photos and new baking tips (but the same great recipe!).
What this cake is:
- chocolatey
- delicious
- heavy on the cream cheese oreo frosting
- easy-peasy
What this cake is not:
- complicated
- fancy-schmancy
- a work of art
- too hard for you to make
Are you ready? Yes, you are. Let’s go make this delicious two-layer chocolate Oreo cake!
Ingredients and Substitutions
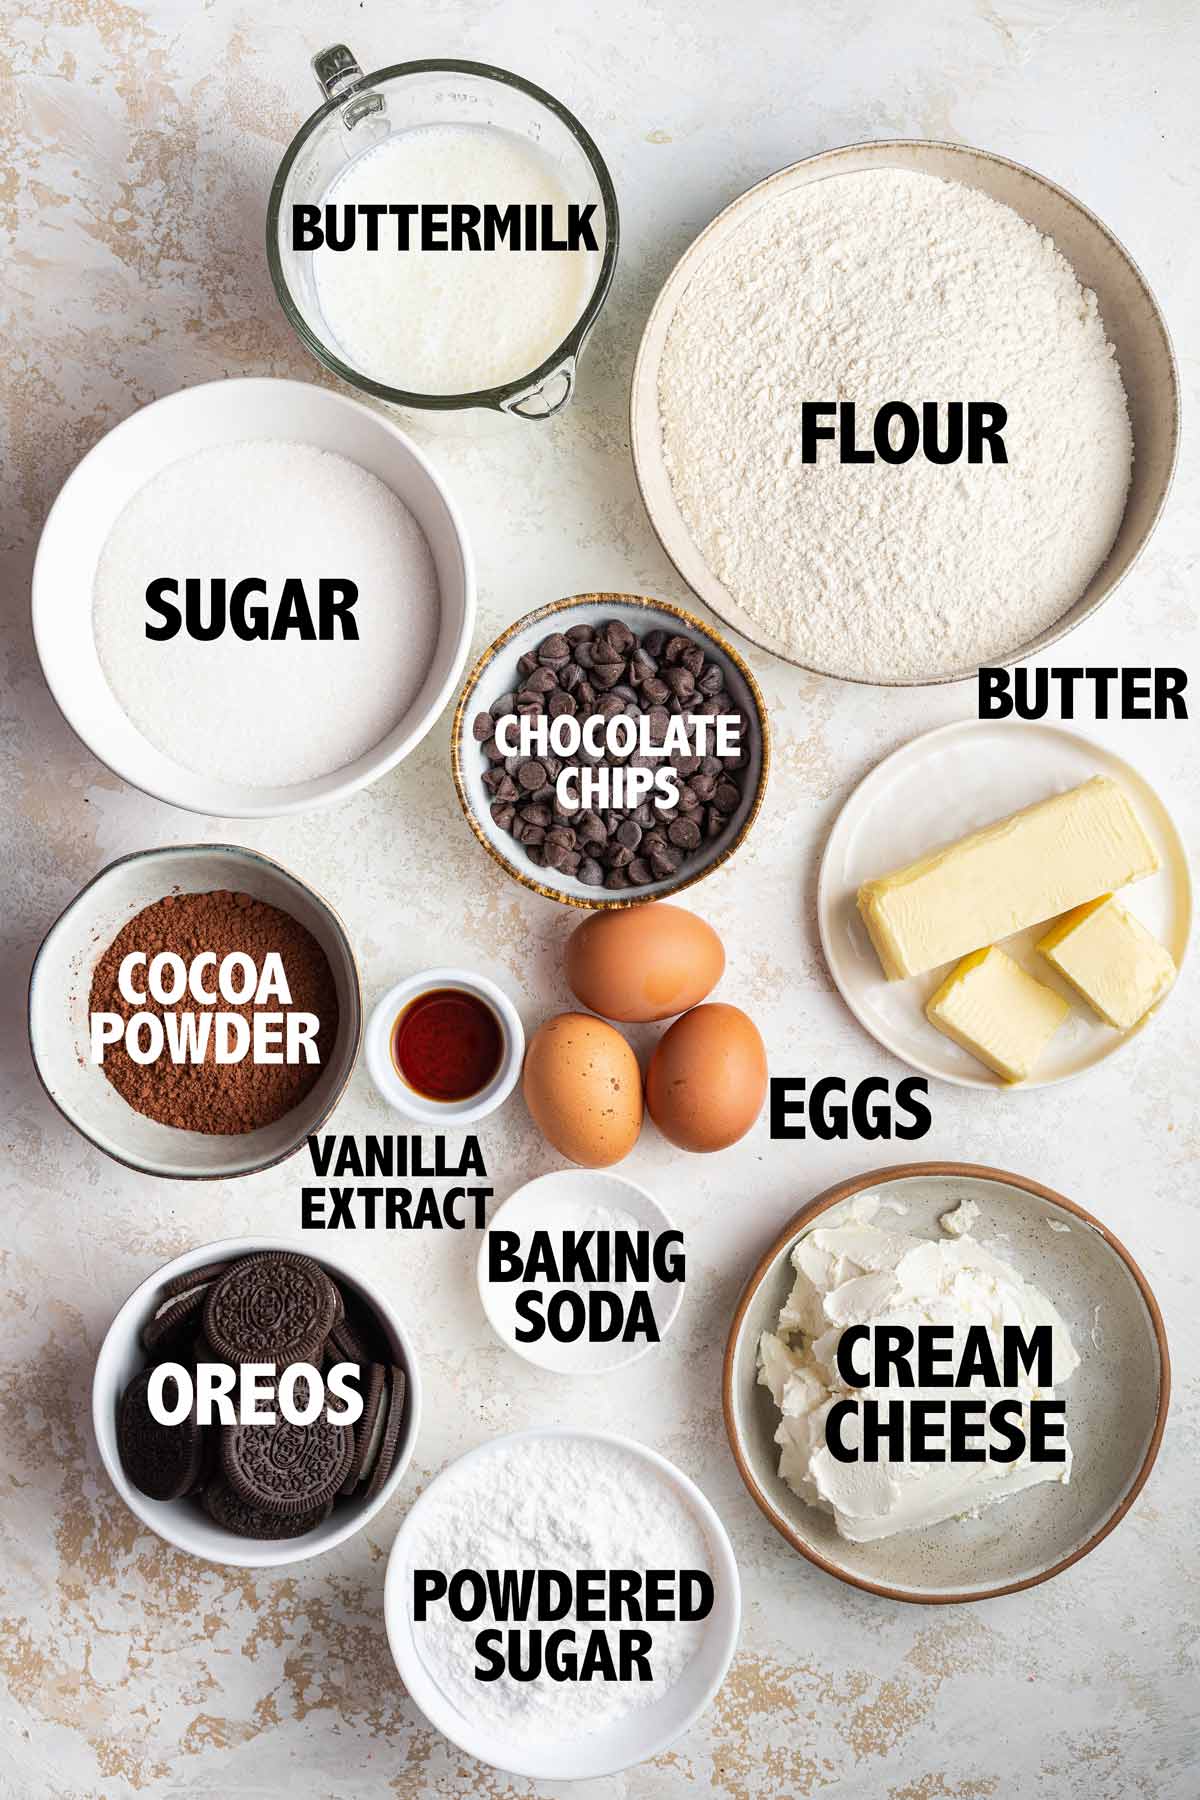
- Flour: Use all-purpose flour, or to make a gluten-free cake, use a 1:1 gluten-free baking mix containing xanthan gum.
- Cocoa Powder: This recipe is designed to use natural unsweetened cocoa powder.
- Baking Soda
- Salt
- Butter: Use unsalted butter at cool room temperature (65°F).
- Sugar
- Eggs: Eggs should be at room temperature before use.
- Vanilla Extract
- Buttermilk: This cake is best with real buttermilk (and even better if you can find full-fat buttermilk!), but in a pinch, add 2 tablespoons of lemon juice or vinegar to whole milk, let it sit for 5 minutes, and then use it in the recipe.
- Chocolate Chips
- Cream Cheese: Use full-fat cream cheese at room temperature.
- Confectioners’ Sugar
- Oreo Cookies: For a gluten-free option, use gluten-free Oreos, or try another flavor of Oreo (like peanut butter or funfetti) for a fun twist!
Chocolate Buttermilk Cake
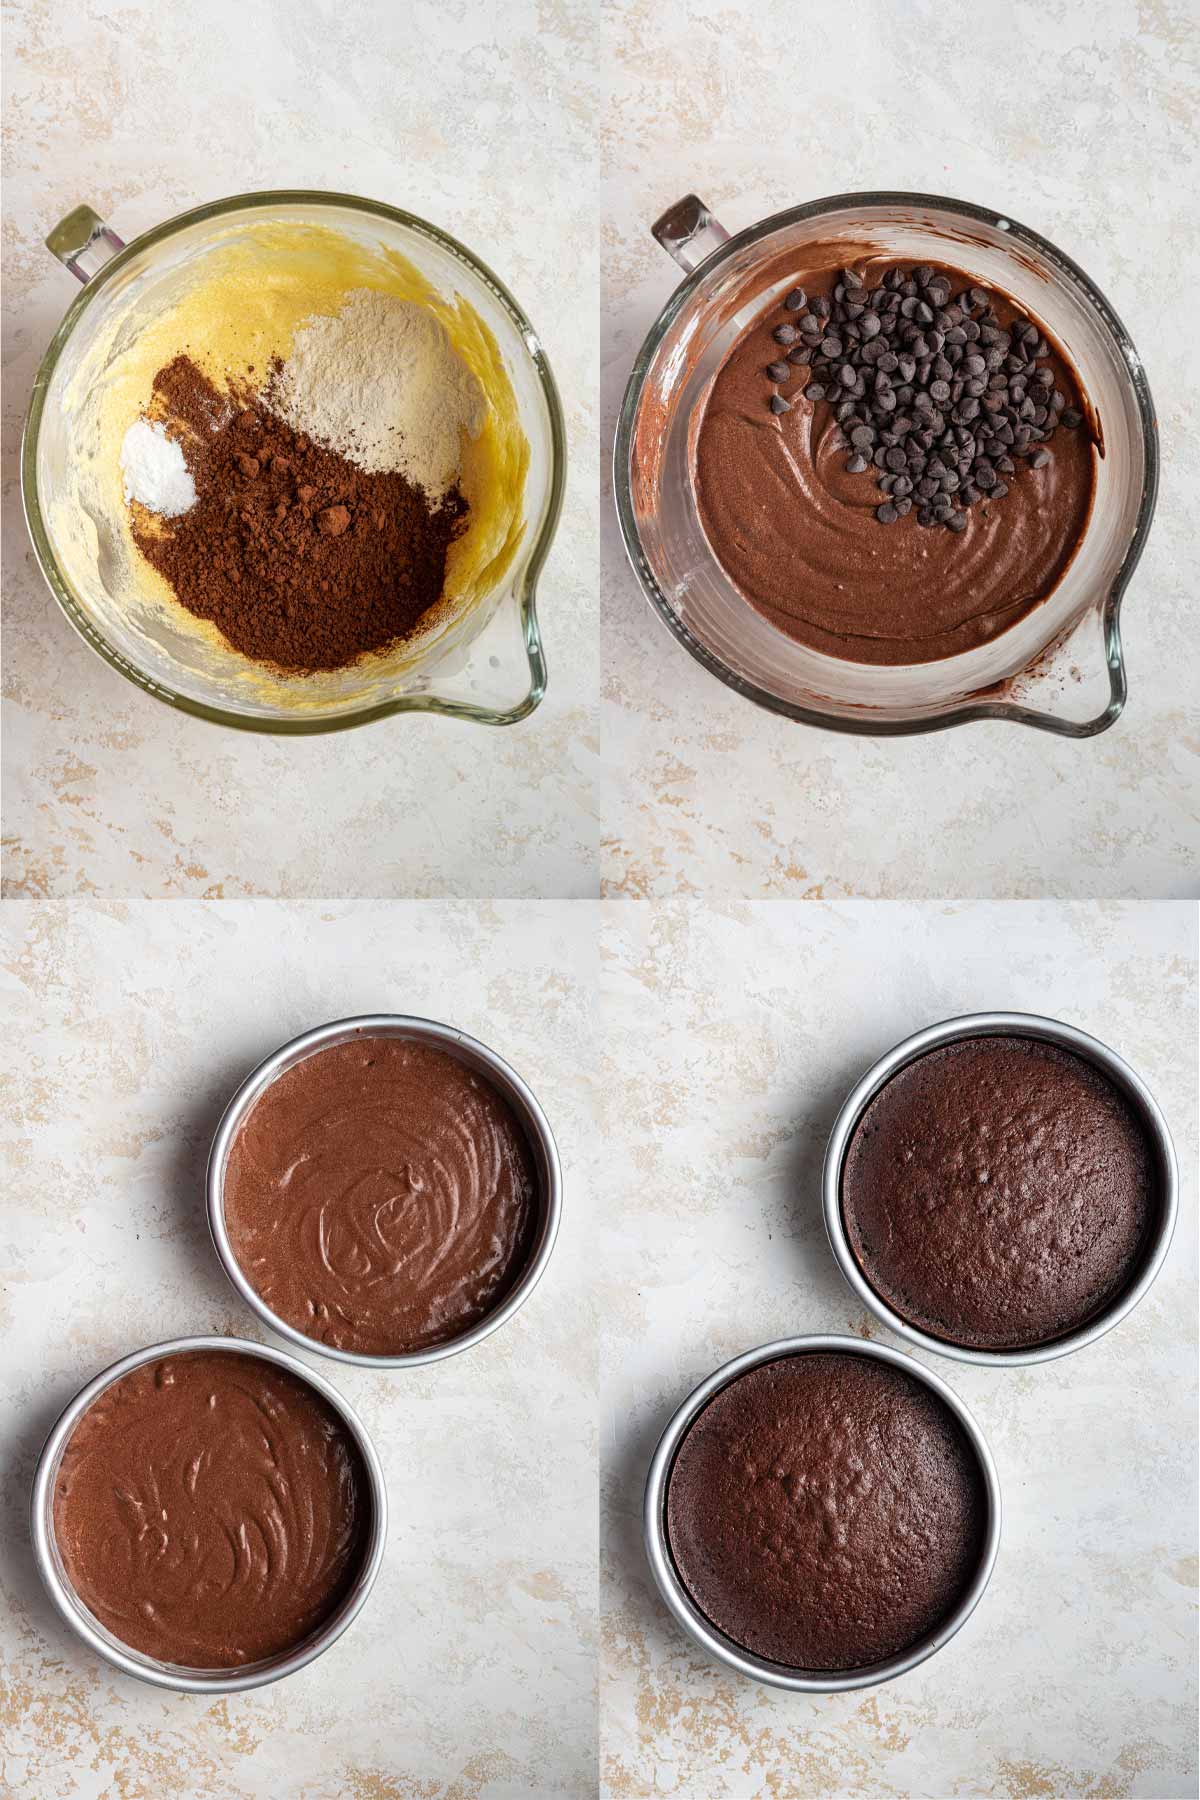
First up, we have to make the cake. To keep this cake extra moist and chocolatey, we’re using two key ingredients: natural unsweetened cocoa powder and buttermilk.
Natural unsweetened cocoa powder has the most concentrated chocolate flavor, which gives us a super chocolatey cake. We’re also going to toss in some chocolate chips, for some semi-sweet chocolate flavor and a little crunch.
The buttermilk also plays a crucial role, in both the texture and tenderness of the cake. Why is this? It’s time for my favorite subject… kitchen chemistry!
Kitchen Chemistry
Buttermilk is slightly acidic, and lowering the pH of the batter helps to break down the long strings of gluten from the flour. What happens when we break down gluten? We get a cake that is tender and more moist! Buttermilk also helps to produce carbon dioxide when paired with baking soda, which means… you guessed it… lighter and fluffier cakes.
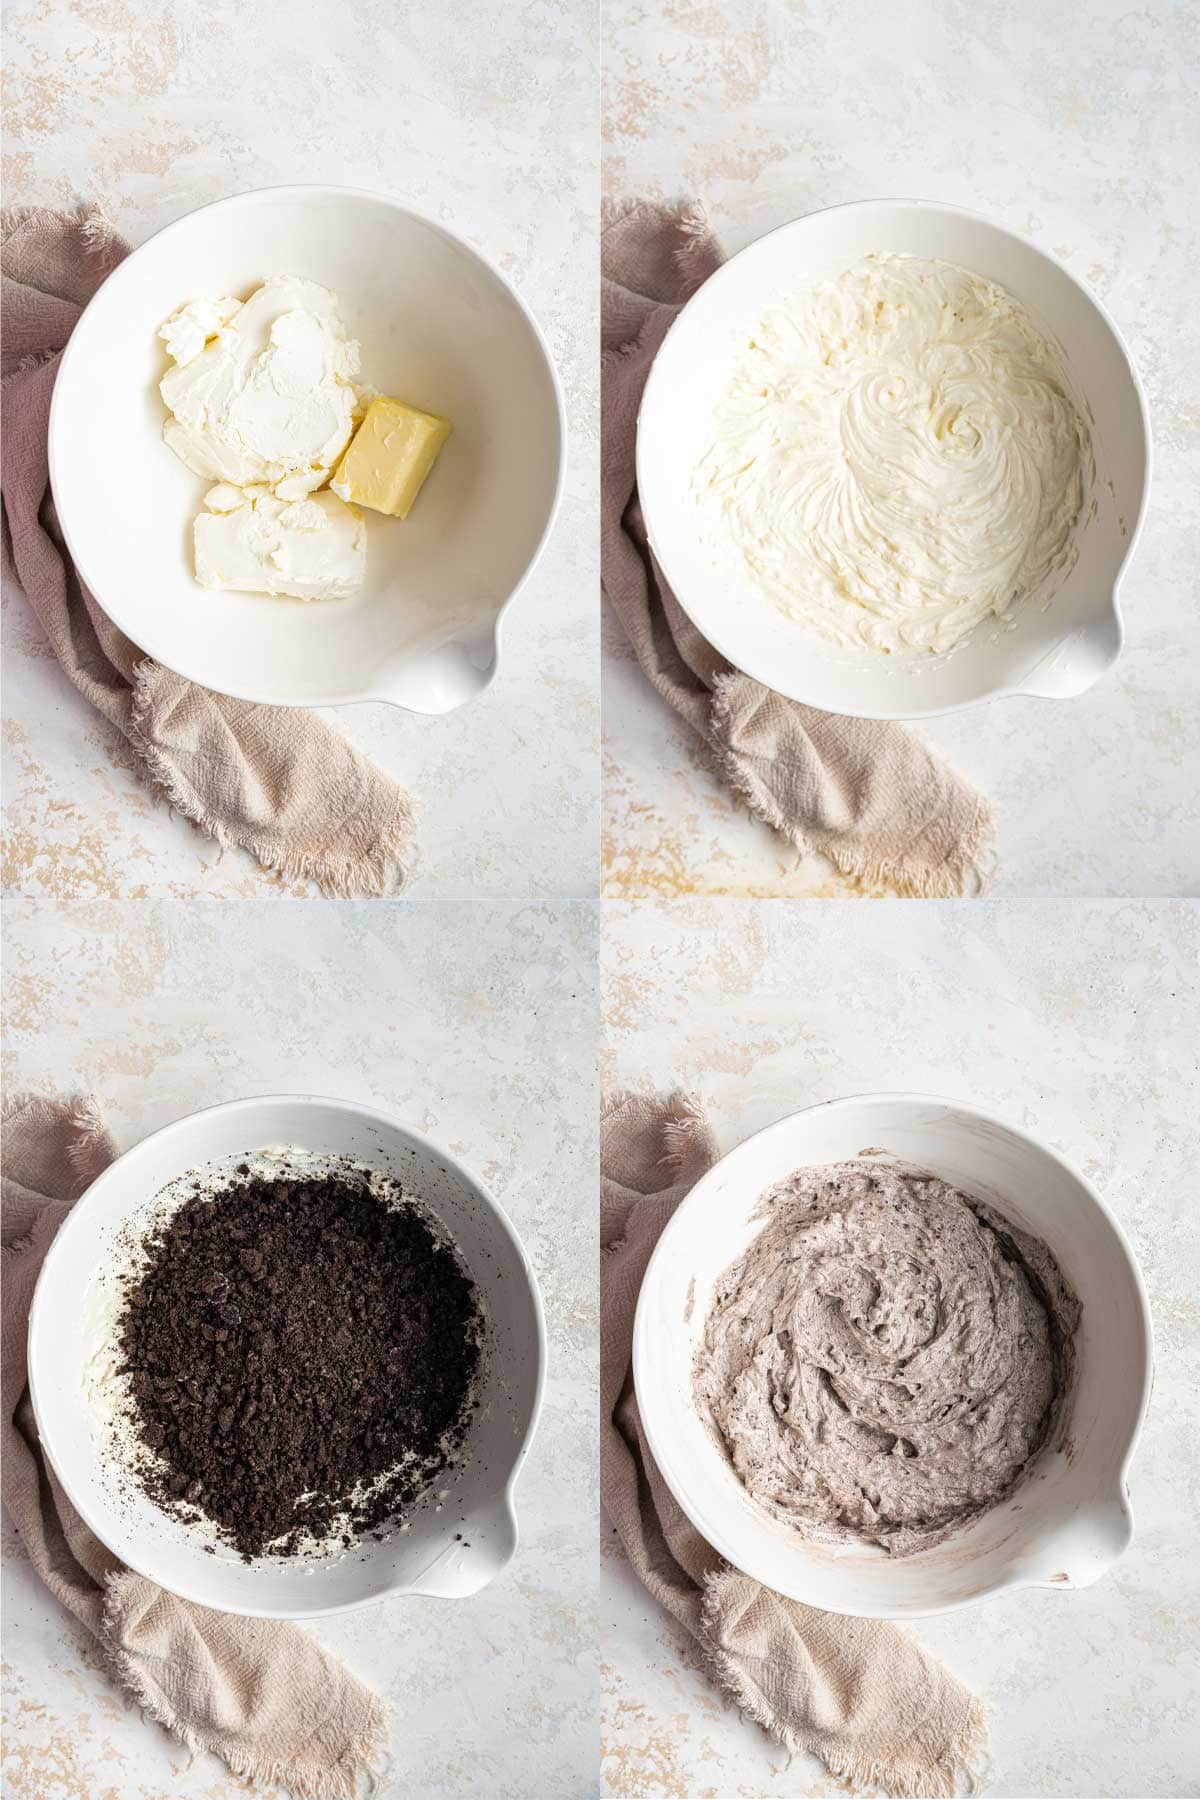
Cream Cheese Oreo Frosting
I really like pairing buttermilk-based cakes with cream cheese frosting, and who can resist crumbled Oreos? (Certainly not most chocolate lovers!) The added bonus to adding them to the frosting is eliminating any stress over decorating — there’s no need to fret over perfectly smooth frosting!
The Oreo frosting is super easy to make. Beat together the ingredients using a hand or stand mixer.
The crumbled Oreos make the frosting a little too thick to pipe, so this is the kind of cake that is perfect to just spread on with a spatula. Whip everything together with a mixer, spread it on the cake, and you’re good to go!
All the cake requires to look extra special are a few dollops of whipped cream and some whole Oreos – simple and easy.
How to Assemble a Layer Cake
First things first, wait until your cake is fully cooled! Trying to stack and frost a still-warm cake is a recipe for disaster, so wait until everything is fully cooled — several hours is good, waiting overnight is even better if you have the time!
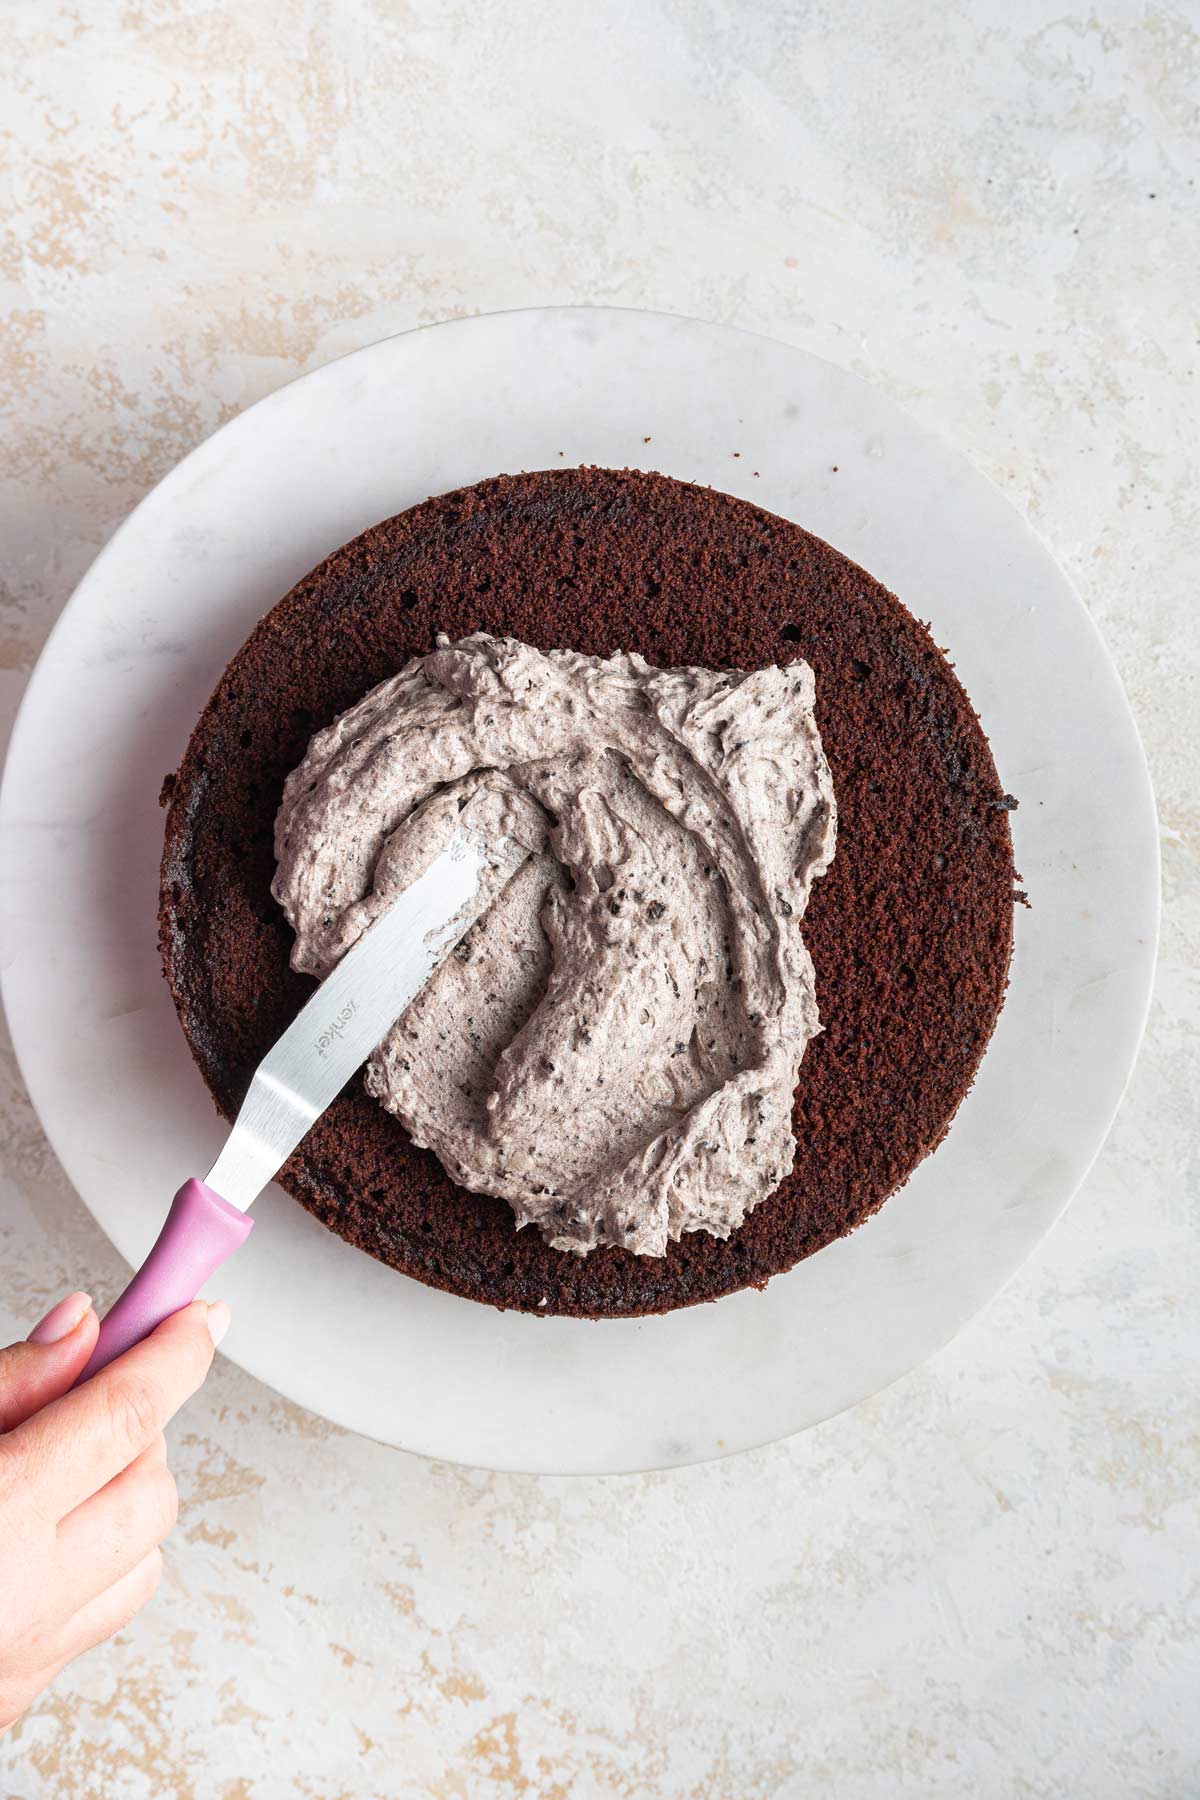
Once your cake layers are fully cooled, you’ll want to start with a crumb coat. This is a thin layer of frosting applied to the side of the cake to hold the cake crumbs down – preventing them from clumping up the frosting along the outside of the cake.
Because there are already cookie crumbs in this frosting it’s not as important, but sometimes cakes are crumbly and it’s frustrating when your cake falls apart into your frosting!
Spread a thick layer of frosting on top of one layer of cake and place the second layer on top. Then spread a thin layer of frosting along the sides of the cake — it’s okay if you can still see the cake peeking through — and a thin layer on top.
Refrigerate for 15 minutes, then add the rest of the frosting to the top and sides until fully covered.
Finish decorating how desired — with additional whole Oreos, whipped cream swirls, or drizzles of melted chocolate!
Making Cakes Ahead of Time
Another reason this is such a great cake? Everything can be made ahead of time! The layers of chocolate cake can be baked days (or even months!) in advance.
Bake the cake layers up to three days in advance and store them in an airtight container. For longer storage, wrap them in aluminum foil and store in a freezer bag in the freezer for up to three months before frosting.
The oreo cream cheese frosting can be made up to three days in advance and stored in the refrigerator. Bring to room temperature for 30 minutes and beat again with a mixer before spreading on the cake.
The entire cake can be assembled and decorated a day (or even two!) ahead of time before serving.
How to Store Chocolate Oreo Cake
Once assembled, the cake must be refrigerated due to the cream cheese in the frosting.
Leftover slices can be stored in the refrigerator for up to a week, ideally wrapped tightly in plastic wrap to help prevent the cake from taking on a stale flavor.
For longer-term storage, freeze individual slices of cake upright on a cookie sheet in the freezer. Once frozen solid, wrap the individual slice in a sheet of plastic wrap, followed by a sheet of aluminum foil, and store in a freezer bag for up to 3 months. To thaw, remove from freezer bag and unwrap, and thaw under refrigeration.
Tips and Tricks for the Best Chocolate Oreo Cake
- For perfectly flat, non-domed cakes, use Bake Even Strips (or wet cloths soaked in water and wrapped around the outside of the cake pans).
- Cool cake layers completely before frosting — the frosting will melt if the cakes are even a little warm!
- Short on time? All components of this cake can be made ahead of time. The cake layers can be baked and frozen for up to 3 months. The cream cheese oreo frosting can be made up to three days ahead of time. The cake can be assembled the day before.
- Start frosting the cake with a crumb coat — a thin layer of frosting — which will help hold any crumbs from the side of the cake in place. After 15 minutes in the refrigerator, add an additional thick final outer layer of frosting to the whole cake.
- Store the chocolate oreo cake in the refrigerator.
- To prevent the cut cake from getting stale, wrap leftover slices in plastic wrap or push wax paper against the exposed edge to minimize contact with air.
More Oreo Dessert Recipes:
- Cookies and Cream Oreo Bundt Cake
- Chocolate Oreo Peanut Butter Torte
- 3 Ingredient No Bake Oreo Truffles
- No Bake Oreo Peanut Butter Pie
- Best Oreo Cheesecake
- Oreo Cinnamon Rolls
Chocolate Oreo Cake
A rich buttermilk chocolate cake, dotted with chocolate chips, and sandwiched between thick layers of Oreo cream cheese frosting.
Ingredients
For the cake:
- 2 cups (240 grams) all-purpose flour
- 1/2 cup (42 grams) natural unsweetened cocoa powder
- 1 teaspoon baking soda
- 1/2 teaspoon salt
- 10 tablespoons (141 grams) unsalted butter, room temperature
- 1 1/2 cups (297 grams) granulated sugar
- 3 large eggs, room temperature
- 2 teaspoons vanilla extract
- 1 1/2 cup (340.5 grams) buttermilk
- 3/4 cup (127.5 grams) chocolate chips
FOR THE FROSTING:
- 4 tablespoons (56.5 grams) unsalted butter, room temperature
- 12 ounces (340.5 grams) cream cheese, room temperature
- 2 teaspoons vanilla extract
- 2 cups (227 grams) confectioners' sugar
- 20 oreo (or chocolate sandwich cookies), crushed
- optional: additional cookies and freshly whipped cream for decorating
Instructions
- Prepare the pans. Preheat oven to 350 °F. Line two 8-inch round cake pans with parchment paper and lightly grease.
- Make the cake batter. Using an electric mixer, cream together butter and sugar until light and fluffy. Beat in eggs, one at a time, followed by vanilla extract.
- Stir in half the flour, followed by half the buttermilk. Add the remaining dry ingredients (half the flour, cocoa powder, baking soda, and salt), followed by the rest of the buttermilk. Stir just until all dry ingredients are incorporated. Gently stir in chocolate chips.
- Bake the cake. Divide batter evenly between two pans. Bake for 30-35 minutes, or until a tester in the center of the cake comes out almost clean. Cool in pans for 15 minutes, then turn onto a wire rack to cool completely (1-2 hours) before frosting.
- Make the frosting. To make the frosting, use an electric mixer to beat together the butter and cream cheese until smooth. Add in the vanilla extract. Slowly add in the powdered sugar, 1/4 cup at a time. If the frosting is too stiff, add one tablespoon of milk. Beat in the crushed Oreos.
- Assemble the cake. If the tops of the cakes domed during baking, trim the top until the top of the cake is flat and level. To assemble the cake, spread a thin layer of the frosting on the bottom of a cake plate to help prevent the cake from sliding. Place a layer of cake on the bottom and spread a thick layer of frosting across the top of the cake. Place the second layer of cake on top.
- Spread a thin layer of frosting along the sides and top of the cake and refrigerate for 15 minutes. Use a spatula to cover the cake with the remaining frosting, ensuring no cake is visible through the frosting. Decorate with piped whipped cream and whole sandwich cookies, if desired. Refrigerate the cake until serving.
Notes
- Use Bake Even Strips (or wet cloths soaked in water and wrapped around the outside of the cake pans) to prevent cakes from doing during baking.
- Make sure to cool the layers completely before frosting.
- All components of this cake can be made ahead of time. The cake layers can be baked and frozen for up to 3 months. The cream cheese oreo frosting can be made up to three days ahead of time. The cake can be assembled the day before.
- The frosted cake should be stored in the refrigerator for up to 5 days in an airtight container. Remaining slices of cake can be frozen for up to 3 month.
Recommended Products
As an Amazon Associate and member of other affiliate programs, I earn from qualifying purchases.


This Chocolate Oreo Cake recipe was originally published in November 2011. It was republished in January 2023 with helpful new recipe tips and photographs.