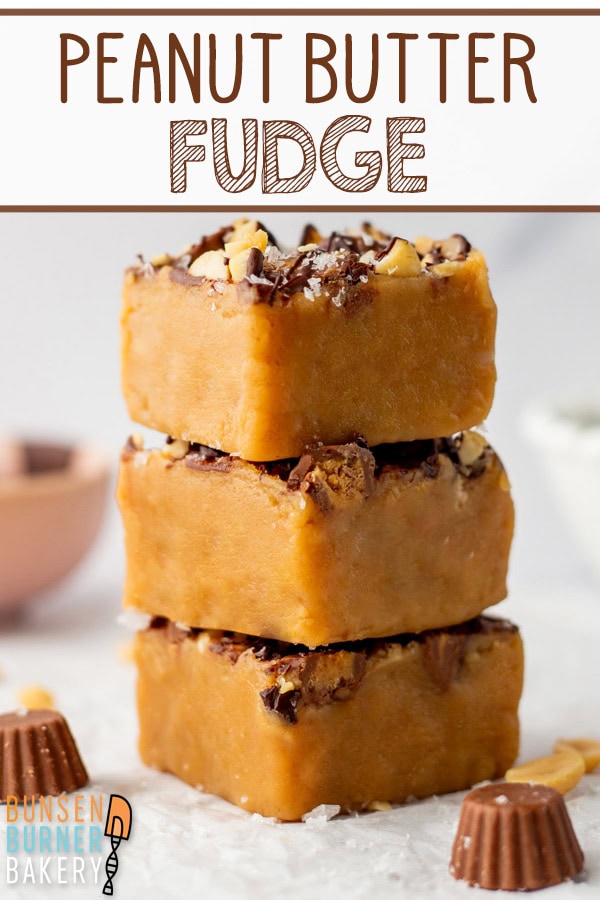
Peanut Butter Fudge
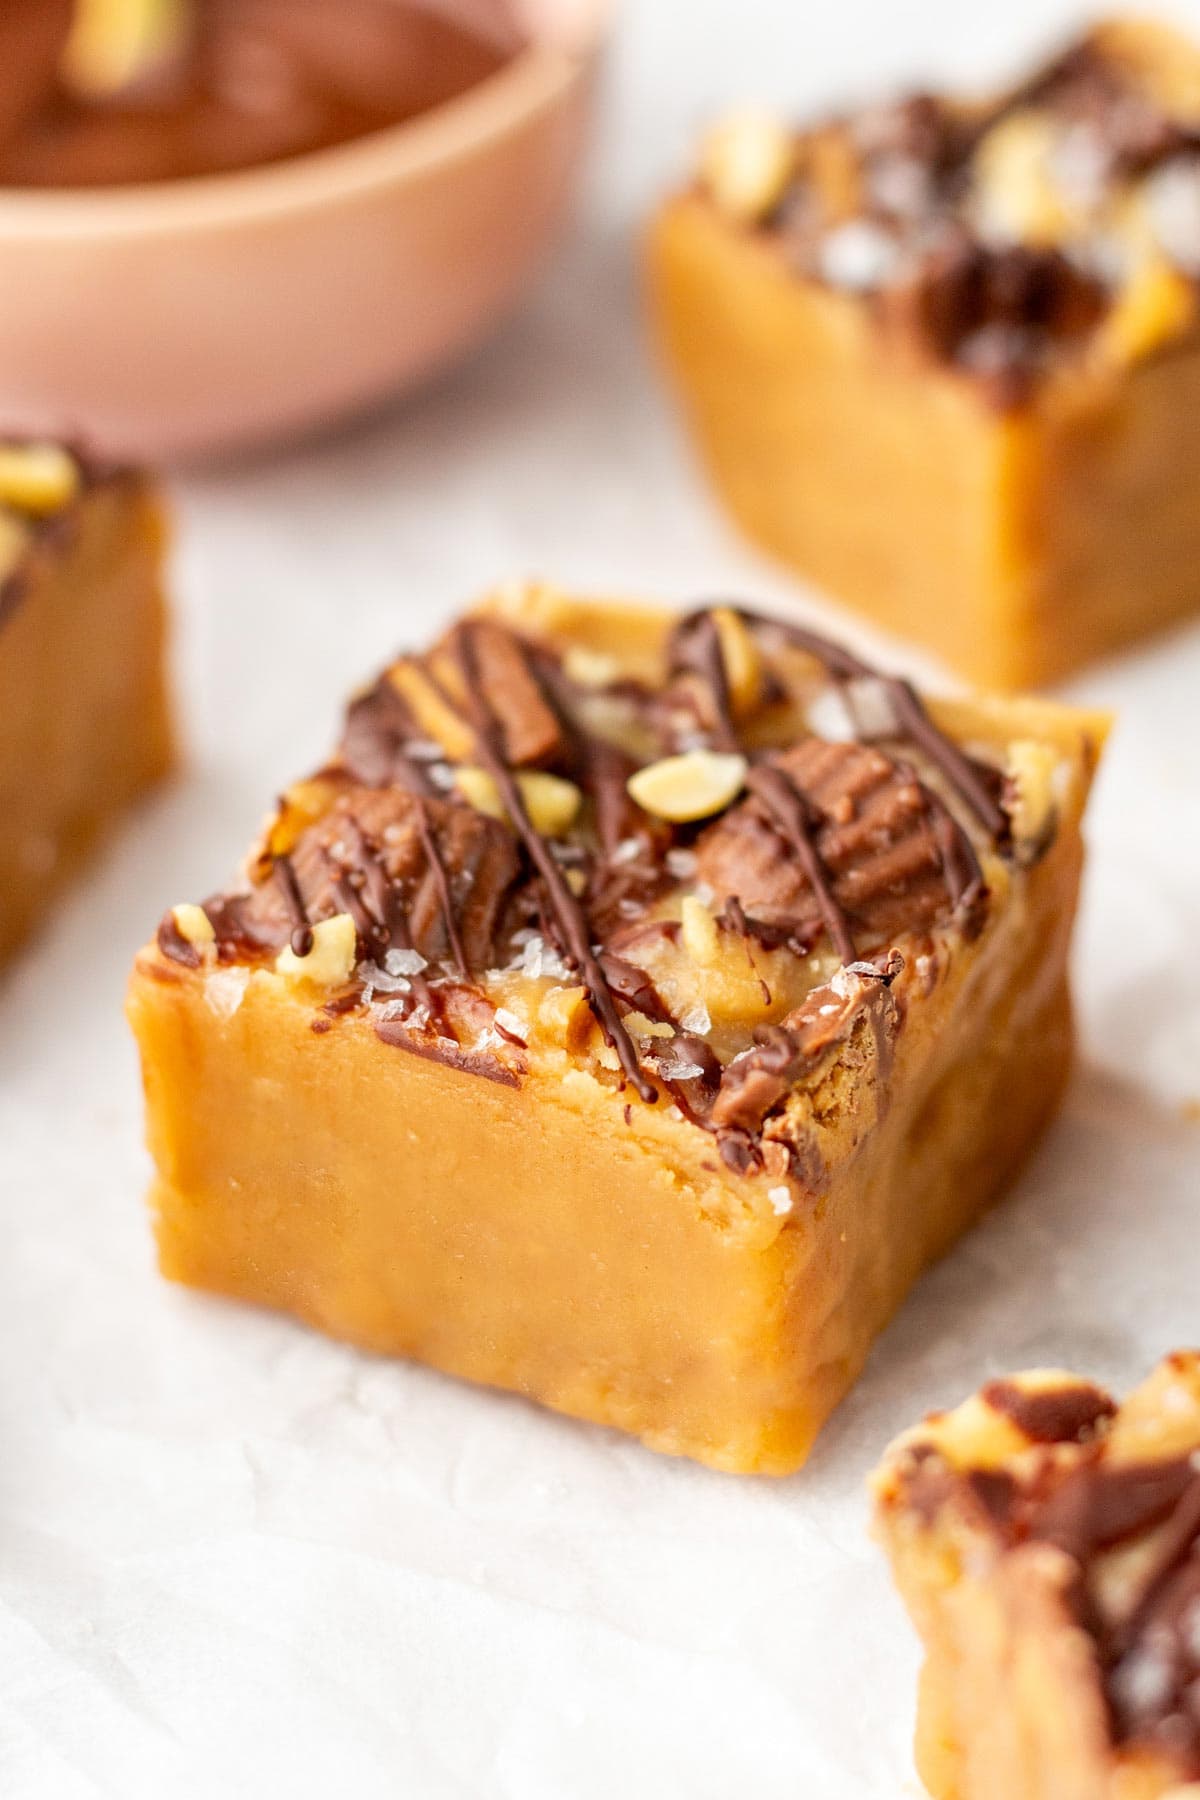
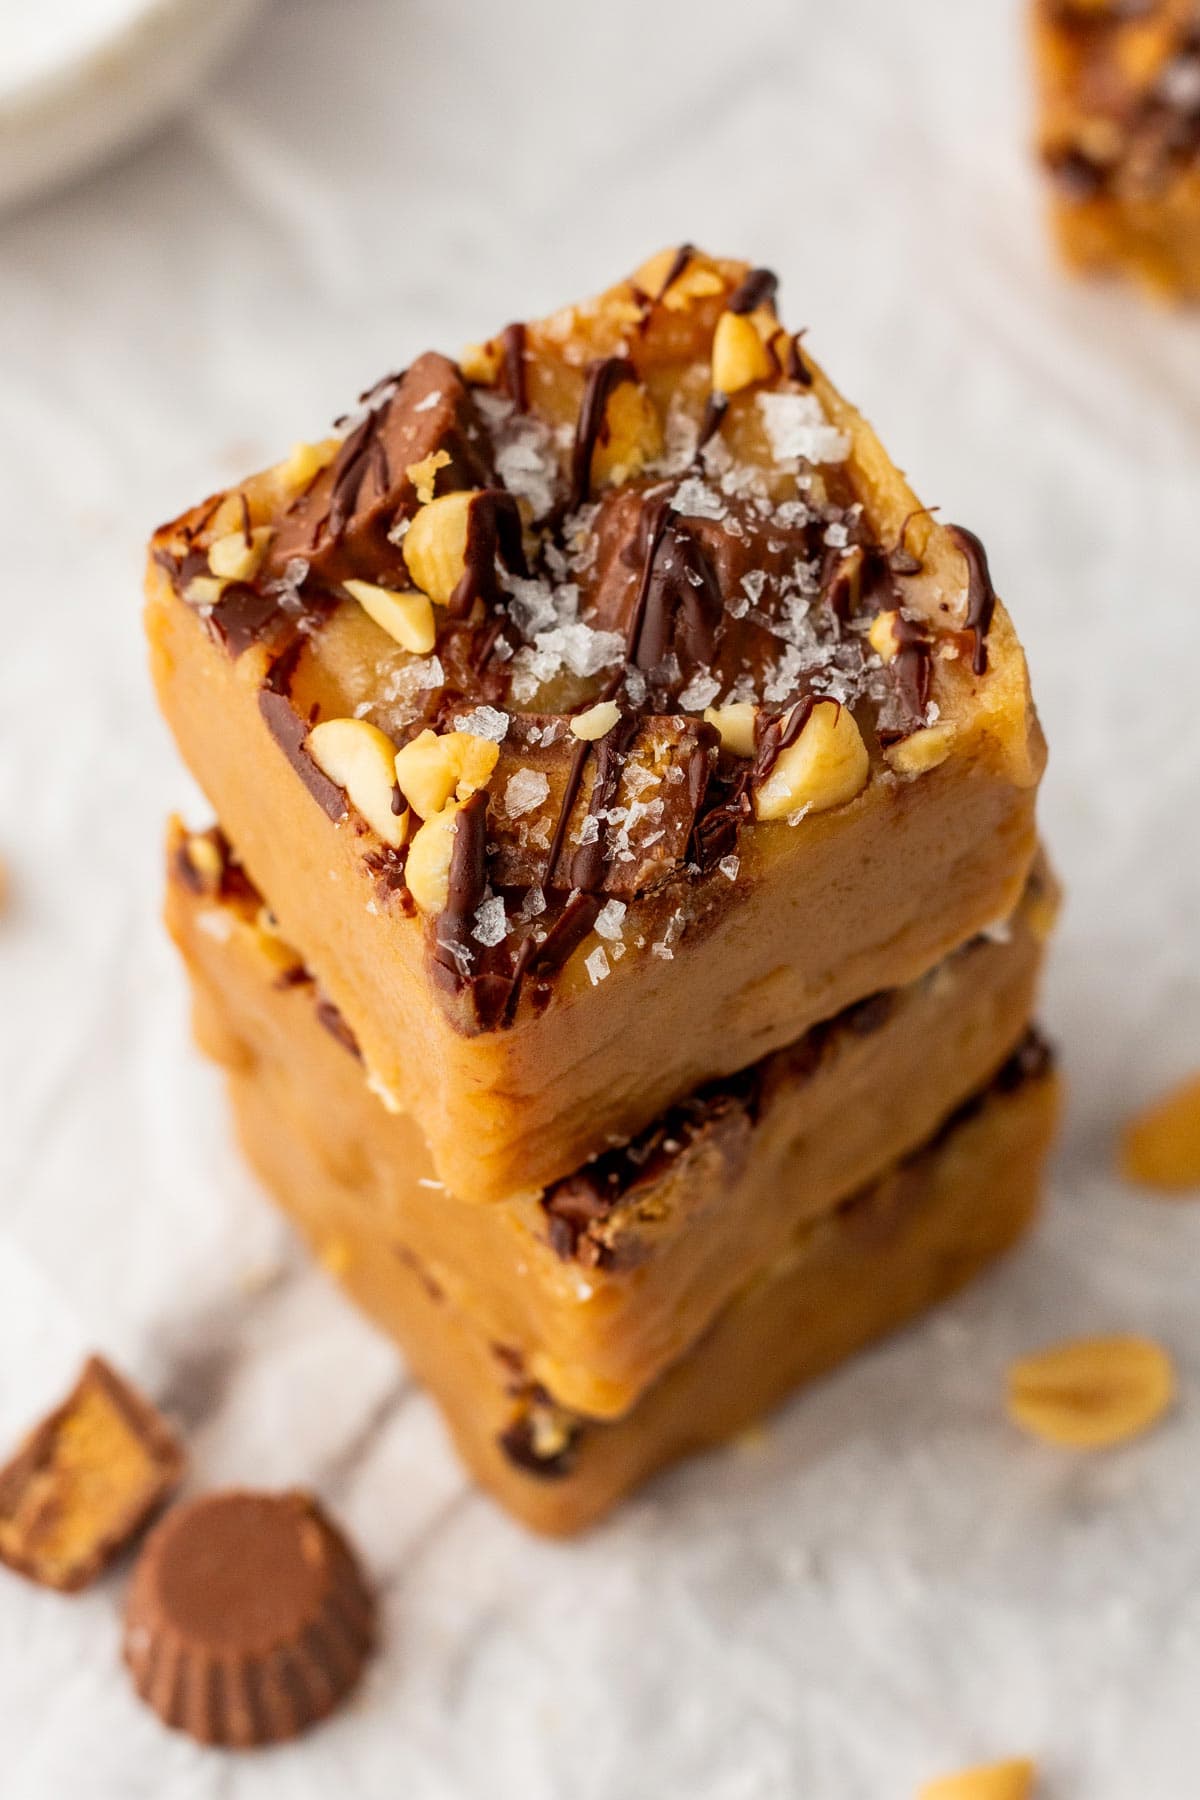
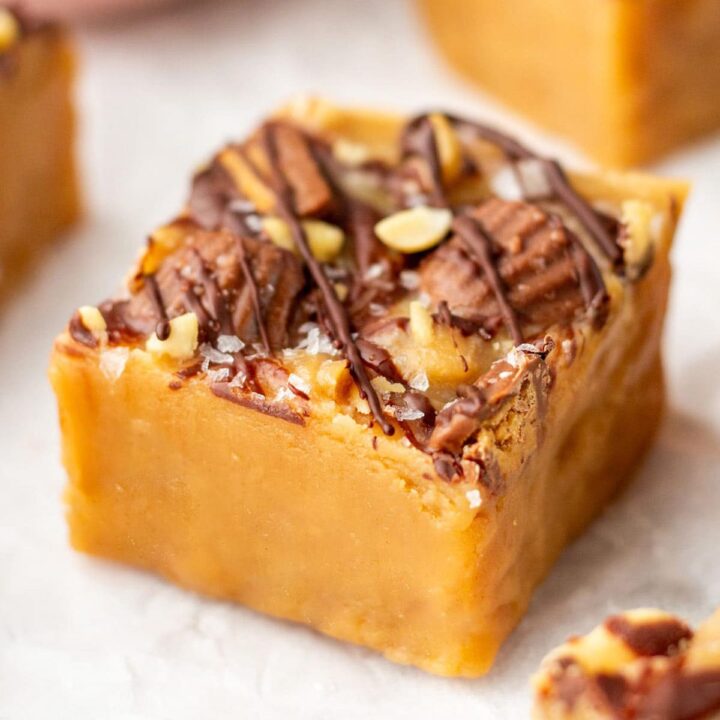
Creamy peanut butter fudge, thick chocolate swirls, mini Reese’s on top, and a sprinkle of flaky sea salt… all without hauling out a candy thermometer. This Peanut Butter Fudge comes together on the stovetop in about 15 minutes, then chills into perfectly sliceable, rich squares.
Easy Peanut Butter Fudge with Chocolate Swirl
Old-fashioned fudge can be a little high-maintenance. There’s the soft-ball stage, the frantic thermometer watching, and crossing your fingers that everything sets instead of turning grainy. This peanut butter fudge? None of that. We melt everything together, pour, swirl, and chill. That’s it.
Here’s why you’ll love this peanut butter fudge:
- No Candy Thermometer: No boiling to specific temperatures, no worrying about soft-ball stages.
- Only 8 Ingredients: Most of them are pantry staples, and the toppings are optional.
- Ultra-Creamy Texture: Soft, smooth, and sliceable without being sticky.
- Easy to Customize: Skip the candy, change the chocolate, add your own mix-ins.
- Make-Ahead: Stays fresh in the fridge for days and freezes beautifully.
This is also a perfect “bring to the office / give to neighbors / tuck into cookie boxes” kind of recipe. You get 10 to 12 very thick squares from a loaf pan, but you can easily cut them smaller if you’re building a dessert tray. Generally find fudge too sweet? The flaky sea salt on top and switching to dark chocolate gives just enough balance.
And because we’re not relying on finicky sugar stages, this is a great recipe to make with kids. They can stir the fudge off the heat, help swirl in the melted chocolate, press the mini Reese’s on top, and shower everything in flaky sea salt. Then everyone gets to keep checking the fridge to see if it’s ready yet!
Ingredients and Substitutions
Pictured below is what you’ll need to make this easy Peanut Butter Fudge, along with some key ingredient notes and substitutions.

- Peanut Butter: Use a standard, shelf-stable creamy peanut butter (like Jif or Skippy), not natural peanut butter that separates. The added stabilizers help keep the fudge smooth and set firmly.
- Sweetened Condensed Milk: Use regular full-sugar sweetened condensed milk, not evaporated milk. For dairy-free fudge, use sweetened condensed coconut milk instead; the fudge will have a faint coconut note and may be slightly softer but still sliceable.
- Butter: Unsalted butter lets you control the salt level, but if you only have salted, skip extra salt in the fudge. For dairy-free fudge, use a good quality vegan butter stick (not a spread) with a similar fat percentage to butter.
- Chocolate Chips: The recipe calls for semi-sweet chocolate chips, but feel free to use dark chocolate chips or chopped dark chocolate for a more intense, less-sweet flavor, or milk chocolate for something sweeter and softer. Use dairy-free chocolate chips if making a dairy-free version of this fudge.
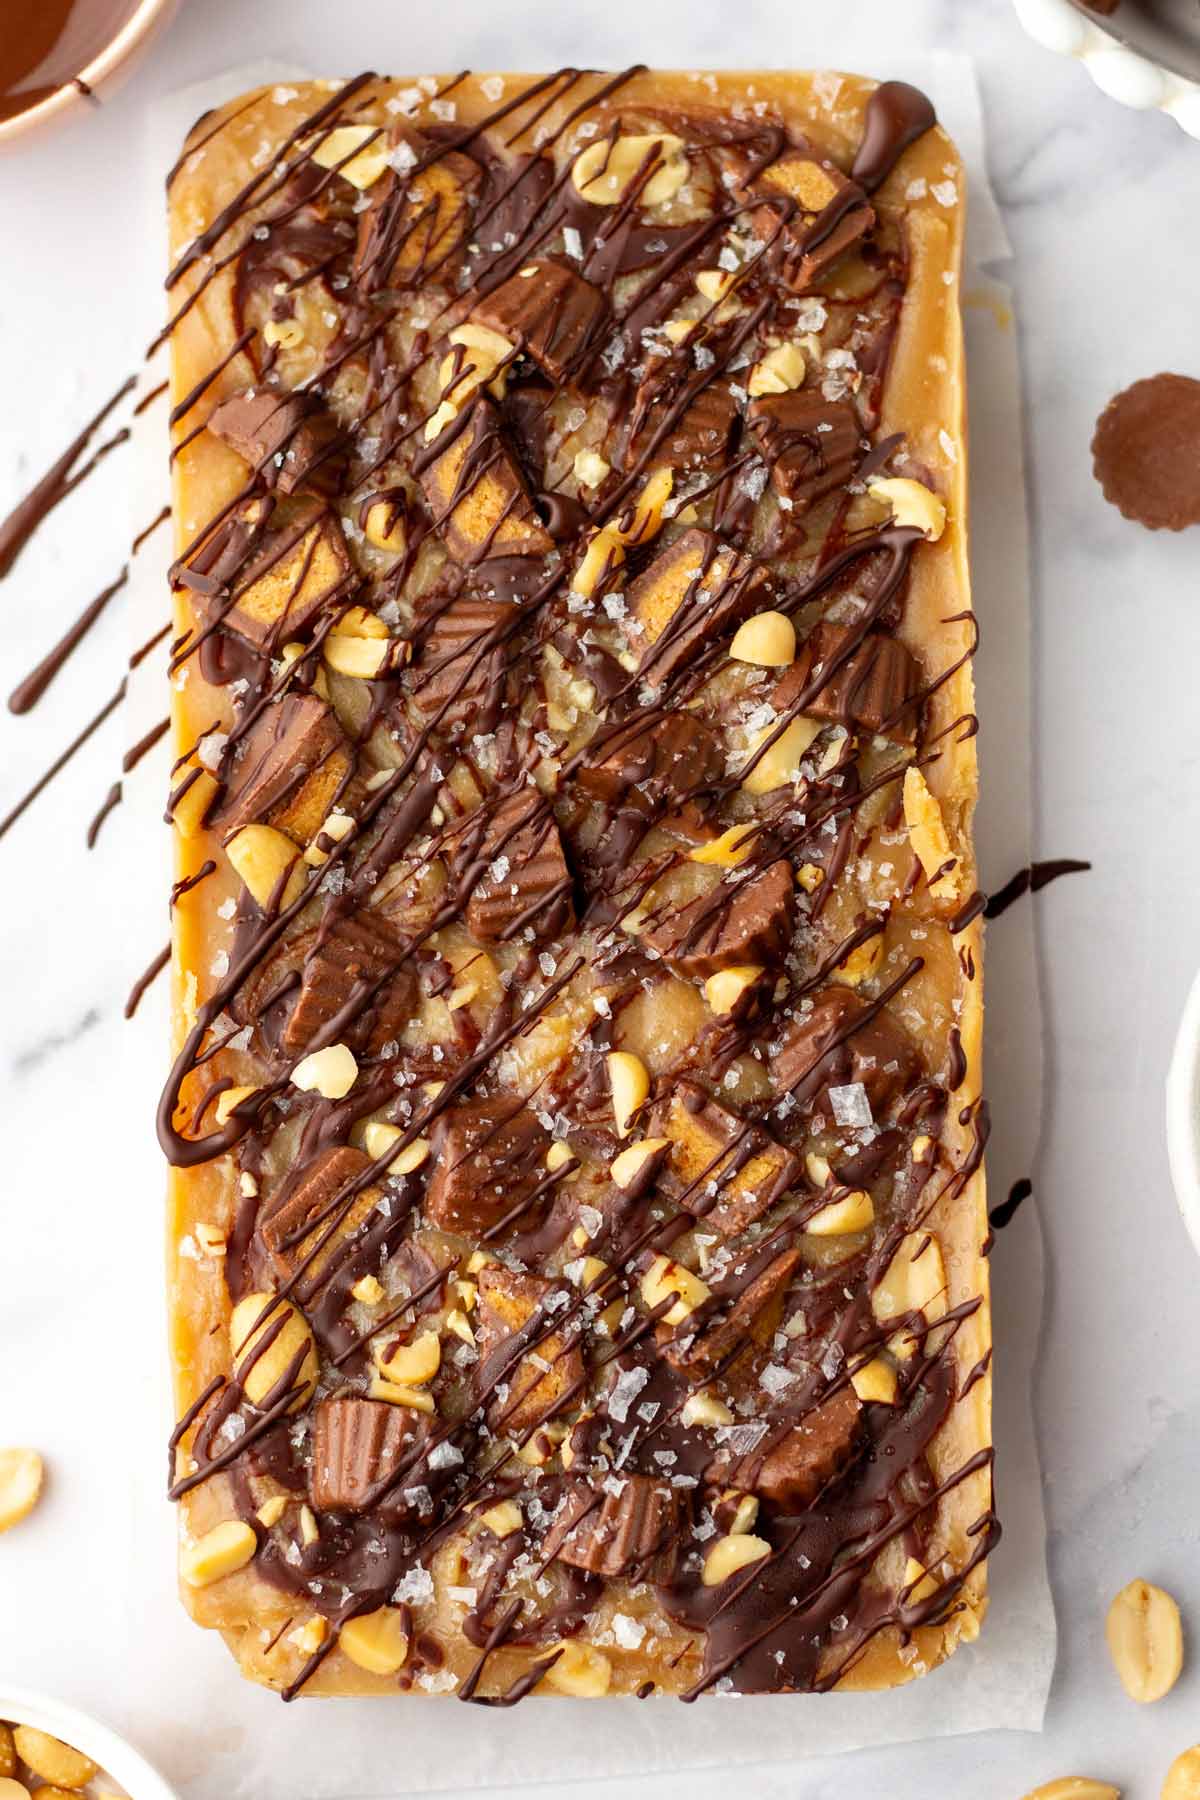
- Toppings: I went with miniature peanut butter cups and chopped peanuts, but swap in any size chopped peanut butter cup, Reese’s Pieces, mini chocolate chips, or leave the fudge plain on top.
- Sea Salt: Using flaky sea salt, like Maldon, really makes the fudge pop and keeps it from feeling overly sweet. If you don’t have flaky salt, finish with a very light sprinkle of fine sea salt as fine salt tastes stronger.
Gluten-Free Notes: This fudge is naturally gluten-free as long as your peanut butter, condensed milk, and chocolate candies are certified gluten-free. Some brands of peanut butter cups or chocolate chips can contain gluten or be processed in facilities with wheat, so always check labels!
How to Make Peanut Butter Fudge.
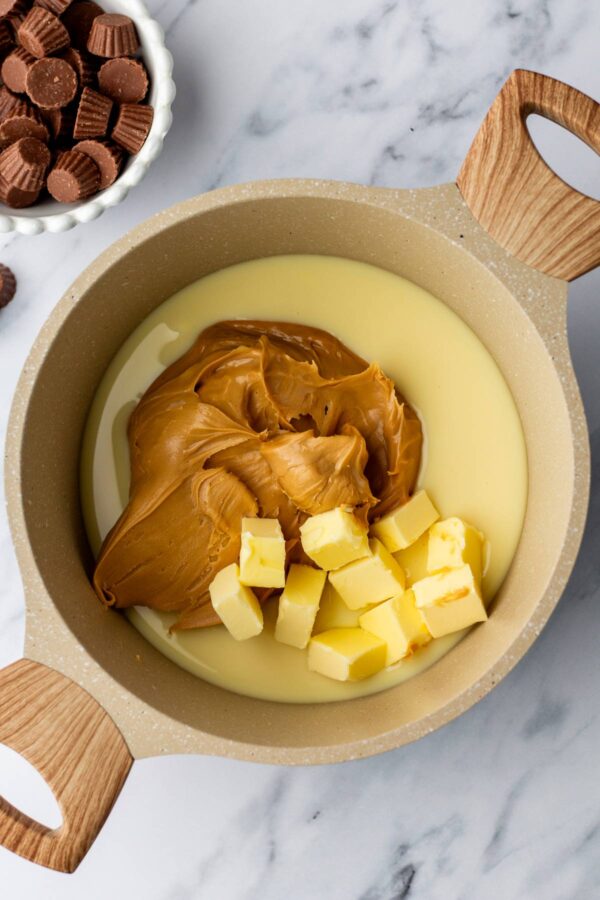
- Combine the Base: Add creamy peanut butter, sweetened condensed milk, and butter to a medium saucepan. Warm over medium heat, stirring constantly, until the mixture is melted, smooth, and just starting to bubble around the edges. Remove from the heat and stir in the vanilla extract.

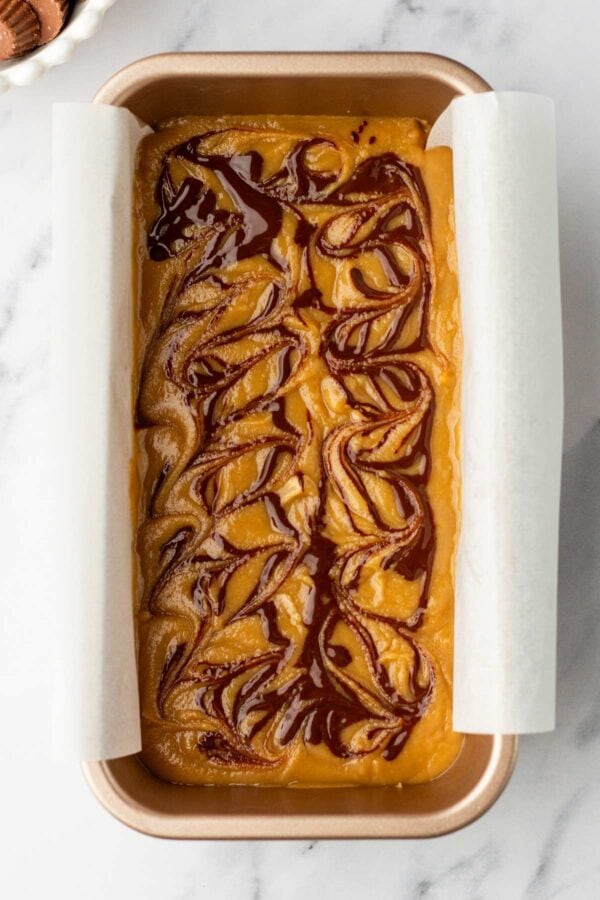
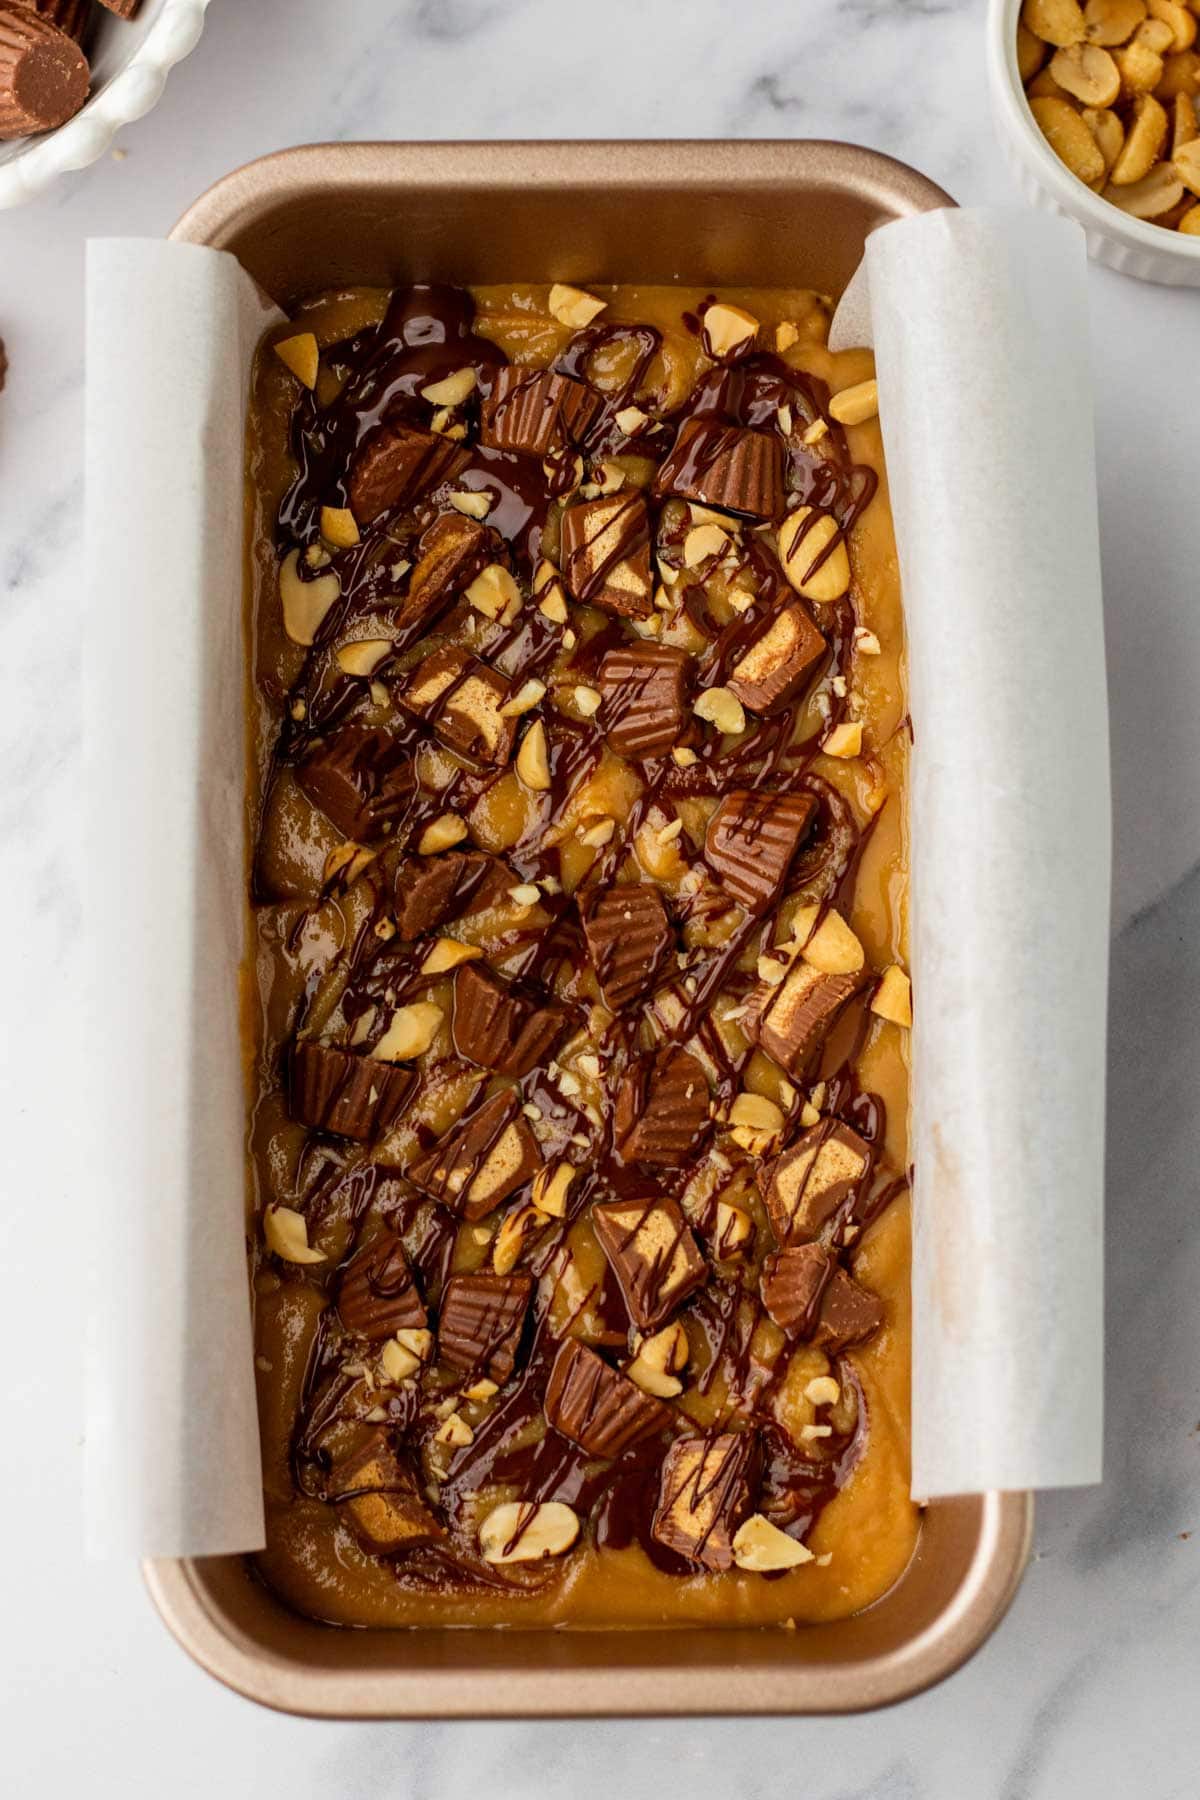
- Pour the Fudge: Pour the warm peanut butter into a 9×5-inch loaf pan, using a spatula to spread it into an even layer. Drizzle the melted chocolate over the peanut butter layer, swirling gently with a knife or toothpick.

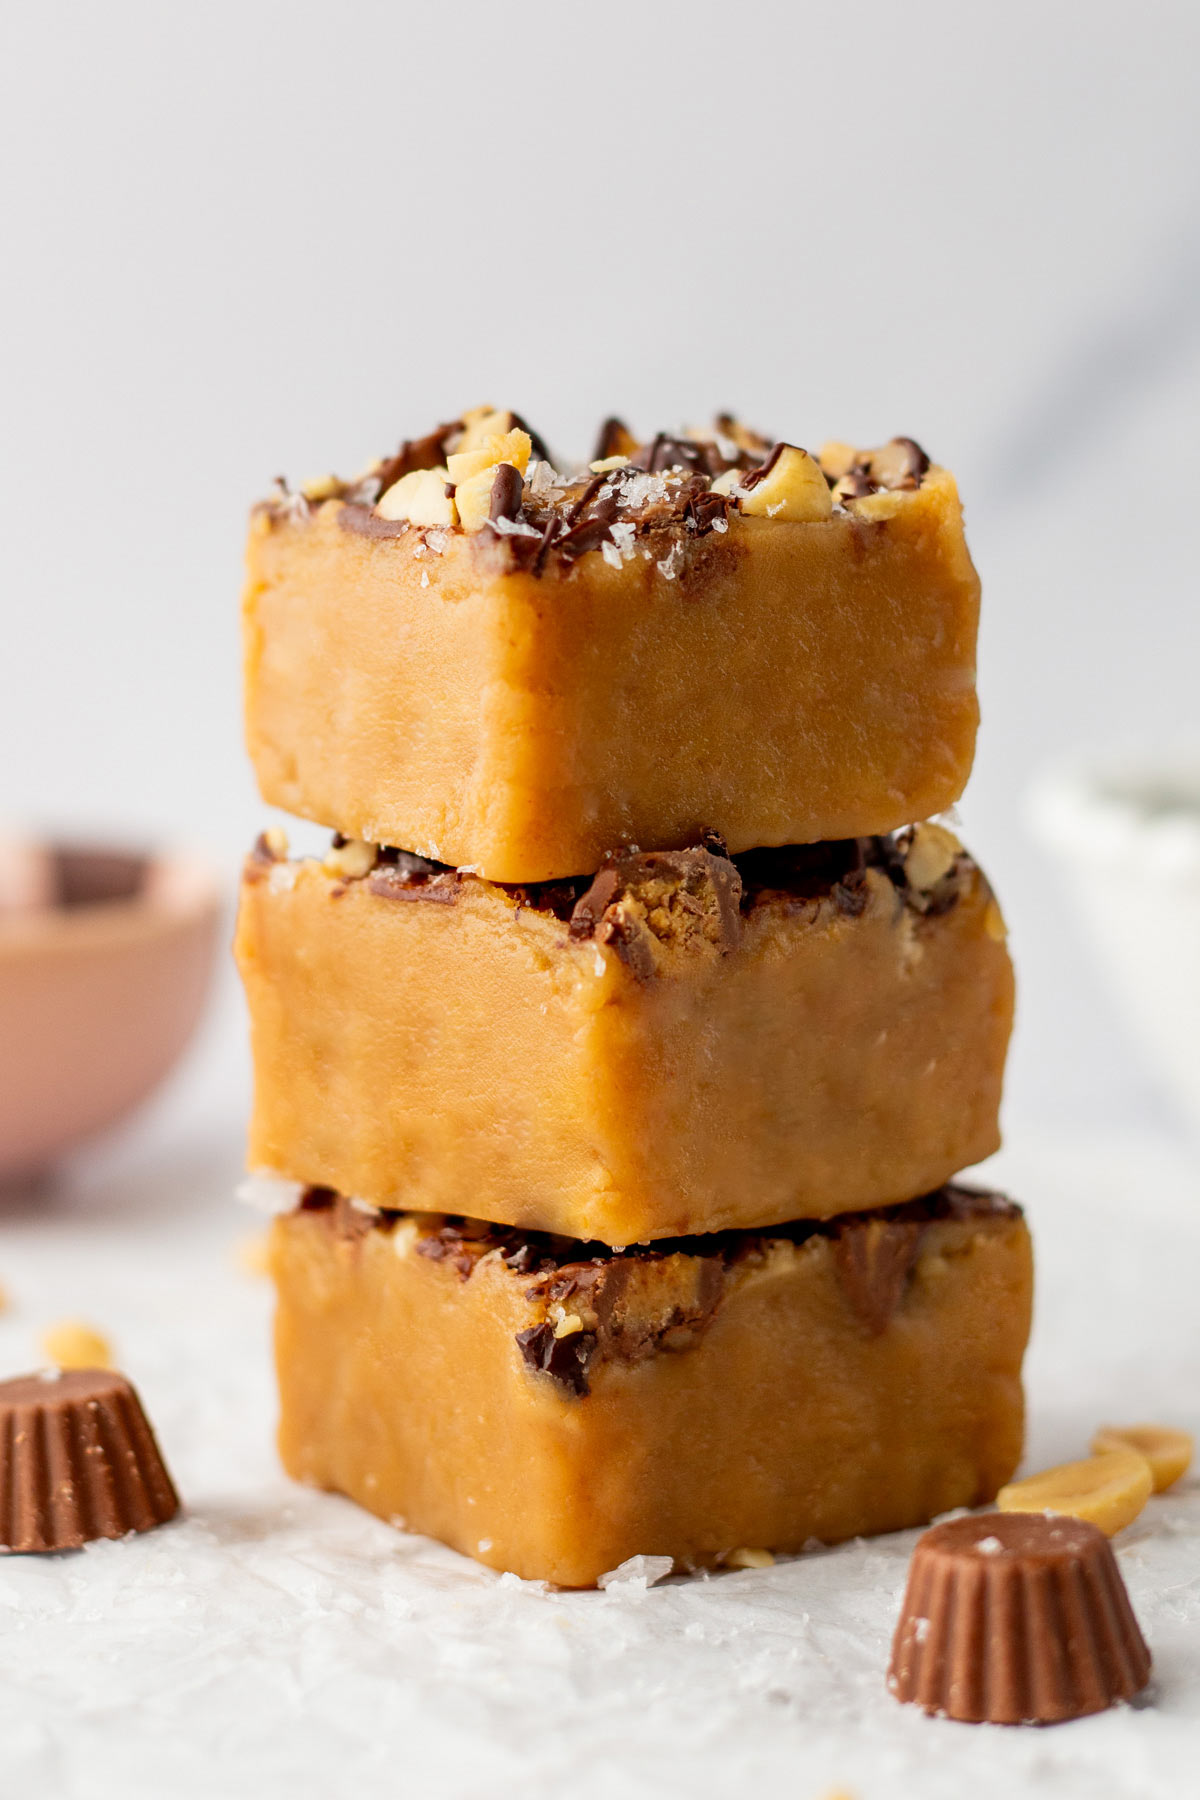
- Add Toppings: Gently press the halved mini Reese’s or other toppings into the top of the fudge and sprinkle with flaky salt while the fudge and chocolate are still soft. Refrigerate for at least 2 hours, or until the fudge is firmly set, before removing from the pan and slicing.
Sweetened Condensed Milk for Easy Fudge
Traditional fudge recipes rely on cooking sugar syrup to a precise temperature to control how much water has evaporated and how the sugar crystallizes. With this peanut butter fudge, we skip the candy thermometer entirely, yet still end up with a firm but creamy texture that slices cleanly. So what is doing the heavy lifting here?
Kitchen Chemistry
Sweetened condensed milk is milk with roughly 60% of the water removed and a high concentration of dissolved sugar. This concentrated mixture, combined with the fat in the peanut butter and butter, forms a stable, dense matrix as it cools. Because the water content is already low and the sugar is already dissolved, there is no need to boil to a specific temperature to achieve the right texture.
As the fudge cools in the refrigerator, the fats firm and the sugar-rich condensed milk thickens further, locking the structure into place without large sugar crystals forming. That’s why the fudge tastes so smooth without any concerns of a grainy texture.
The type of peanut butter matters here, too. Standard creamy peanut butter is an emulsion that holds fat and solids in a stable suspension. Natural peanut butter, where the oil separates on top, can disrupt this balance. Too much free oil interferes with the matrix formed by the condensed milk and butter, leaving you with soft, greasy fudge that may not fully set.
Tips and Tricks for the Best Peanut Butter Fudge
- Line the Pan: Use parchment paper with overhang on the long sides so you can easily lift the entire block of fudge out of the pan for clean slicing.
- Avoid Overheating: Warm the peanut butter, condensed milk, and butter just until everything is melted and smooth, since boiling the mixture can cause scorching and affect the final texture.
- Stir Constantly: Keep the spatula moving while heating to prevent the mixture from sticking to the bottom of the pan or forming little burnt bits.
- Customize Toppings: Swap mini Reese’s for full-sized chopped peanut butter cups, chopped peanuts, peanut butter chips, mini chocolate chips, or leave the top plain.
- Scale Up: Double the recipe and pour into a 9×13-inch pan for a thinner layer of fudge that yields more squares, perfect for parties and holiday trays.
- Slice Cleanly: Use a large, sharp knife to cut the fudge and wipe it with a warm, damp cloth between cuts to keep the edges neat and prevent chocolate from smearing over the peanut butter layer.
- Storage: Store the fudge in an airtight container in the refrigerator for up to 1 week; stack layers with parchment or wax paper to prevent the fudge from sticking. For long term storage, freeze fudge squares in a single layer, then transfer to an airtight container or freezer bag for up to 3 months.
- Recommended Tools: Saucepan | Loaf Pan | Parchment Paper | Mixing Bowl
More Easy No Bake Treats
- Bourbon Balls
- Sprinkle Rice Krispie Treats
- Peanut Butter Oatmeal Bars
- Oreo Truffles
- Peanut Butter Bars
Peanut Butter Fudge
Turn a jar of peanut butter into something special with this ultra-creamy Peanut Butter Fudge topped with melted chocolate, mini Reese’s, and a pinch of sea salt for the perfect sweet and salty bite.
Ingredients
- 1 cup (270 grams) creamy peanut butter
- 1/2 cup (156 grams) sweetened consdensed milk
- 1/4 cup (57 grams) unsalted butter
- 1 teaspoon vanilla extract
- 1/2 cup (85 grams) chocolate chips
- 8 miniature Reese's Peanut Butter Cups, halved
- 1/4 cup (28 grams) chopped peanuts
- flaky sea salt, to taste
Instructions
- Line an 8.5 x 4.5-inch or 9 x 5-inch loaf pan with parchment paper, leaving some overhang for easy removal.
- In a medium heavy-bottomed saucepan, melt the peanut butter, sweetened condensed milk, and butter over medium heat. Stir until completely melted and smooth, then remove from the heat and stir in the vanilla extract.
- Pour the peanut butter fudge mixture into the loaf pan, smoothing the top.
- Melt the chocolate chips in the microwave in 30-second intervals, stirring well after each interval. Drizzle the melted chocolate over the fudge and use a toothpick or knife to create a swirl pattern over the top of the fudge.
- Press the chopped Reese's and peanuts into the top and sprinkle with flaky sea salt.
- Refrigerate for at least 2 hours, or until the fudge is firm and fully set. Once set, lift the fudge out of the pan using the parchment paper and cut it into thick bars or smaller squares. Drizzle with additional melted chocolate, if desired.
Notes
- Warm the peanut butter, condensed milk, and butter just until melted and smooth, being careful not to boil the mixture. Stir constantly to prevent the mixture from sticking to the bottom of the pan.
- This recipe can be doubled and poured into a 9x13-inch pan.
- For clean fudge slices, use a large, sharp knife and wipe it with a warm, damp cloth after each cut.
- Other topping ideas include full-sized chopped peanut butter cups, peanut butter chips, or miniature chocolate chips, or leave the toppings off for completely smooth fudge.
- Store the fudge in an airtight container in the refrigerator for up to 1 week; stack layers with parchment or wax paper to prevent the fudge from sticking. For long term storage, freeze fudge squares in a single layer, then transfer to an airtight container or freezer bag for up to 3 months.
- Recommended Tools: Saucepan | Loaf Pan | Parchment Paper | Mixing Bowl
Recommended Products
As an Amazon Associate and member of other affiliate programs, I earn from qualifying purchases.