Traditional Challah Recipe
Learn to make a beautifully soft and fluffy Traditional Challah thanks to a gradual flour method that keeps the dough light rather than dense. This includes all the tips and tricks and visual cues necessary to master this classic yeast bread!

This is a classic, soft challah with a light, airy crumb, built around a gradual flour addition that makes the dough forgiving and easy to work with.
Challah became a weekly ritual in our house during the pandemic, back when I suddenly found myself working from home (with a 1 and 4 year old, to boot!). Before that, I only worked from the office, which meant there was rarely time to mix dough, let it rise properly, and still get dinner on the table. One unexpected benefit to being home was the space to slow down just enough to add this ritual to our week.
I started baking challah every Friday, and over time, I refined this recipe into what you see here. This is the dough I’ve made hundreds of times as part our Shabbat celebrations. Some weeks it’s simple and classic, other weeks we add all sorts of toppings or mix-ins, but the base dough has stayed the same because it works.
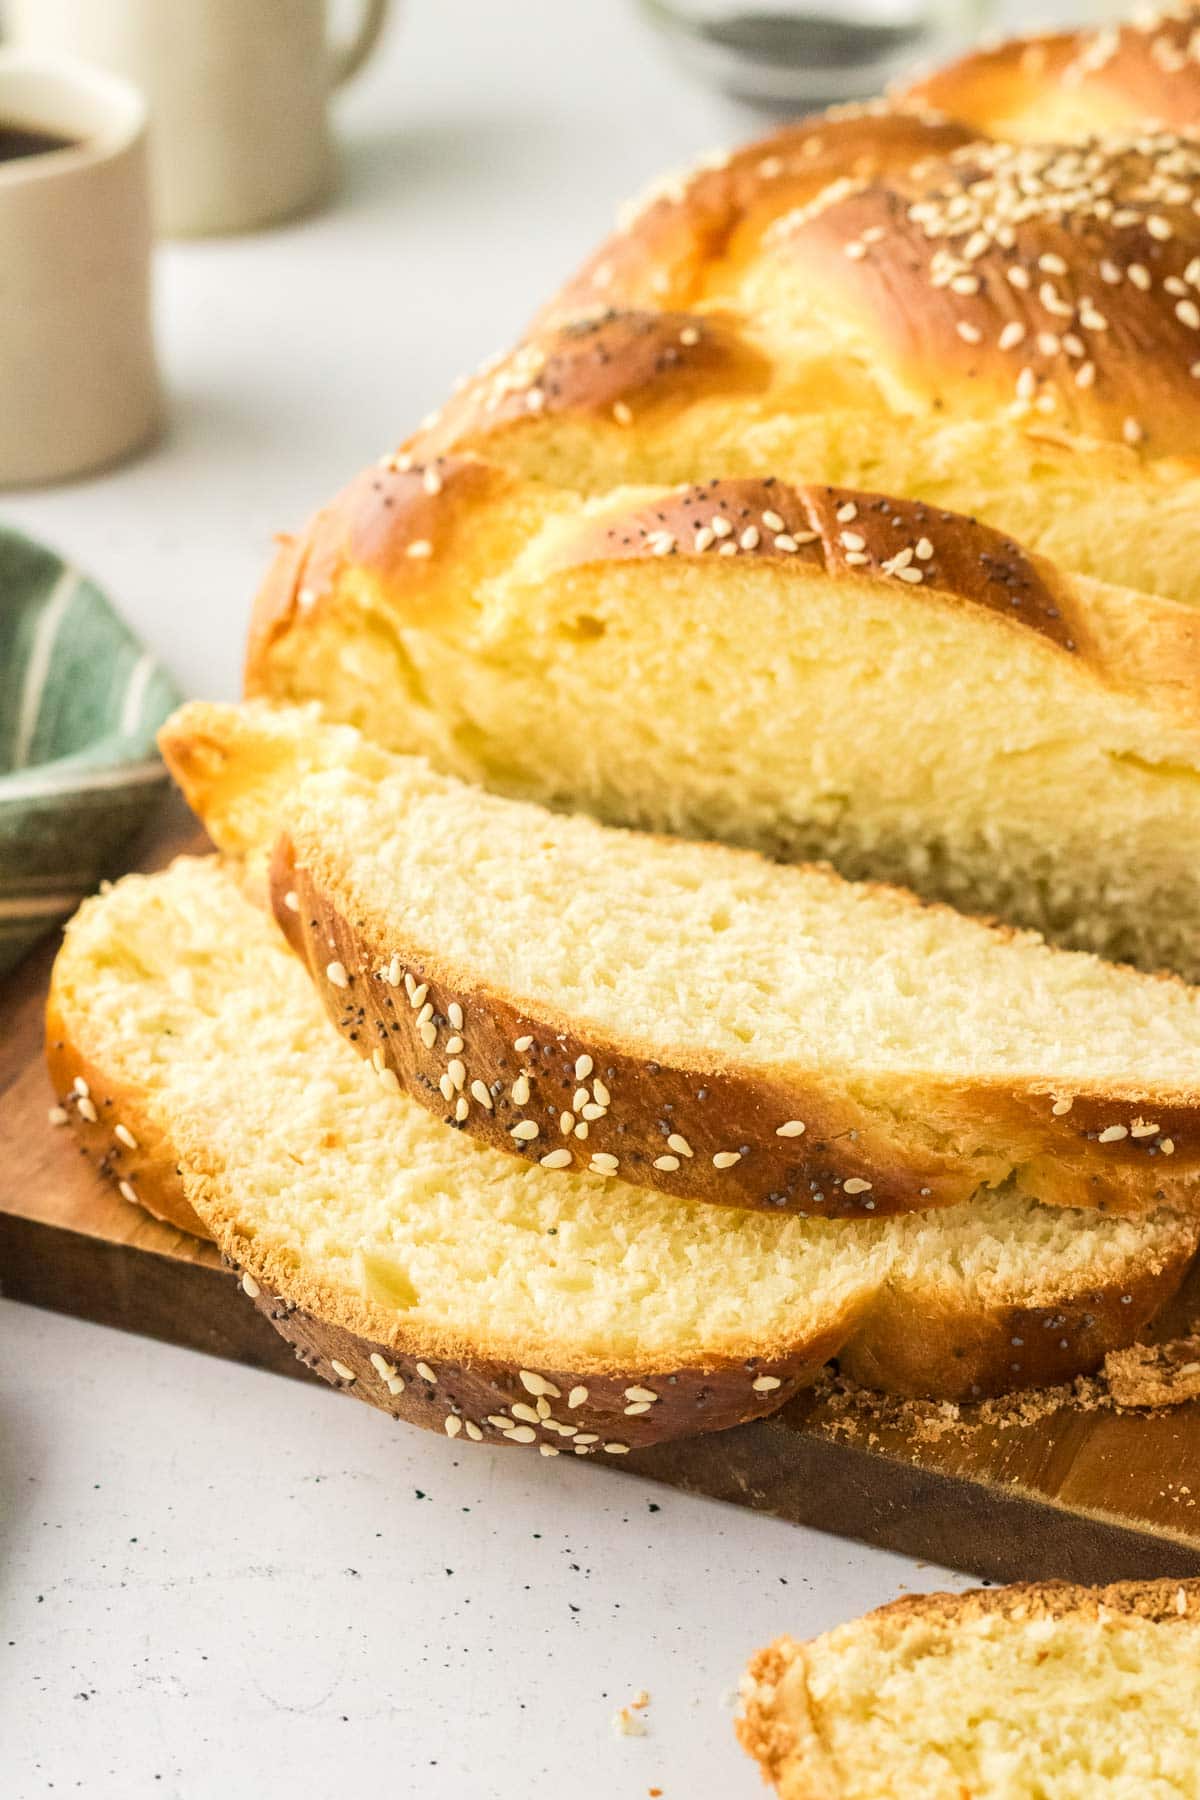
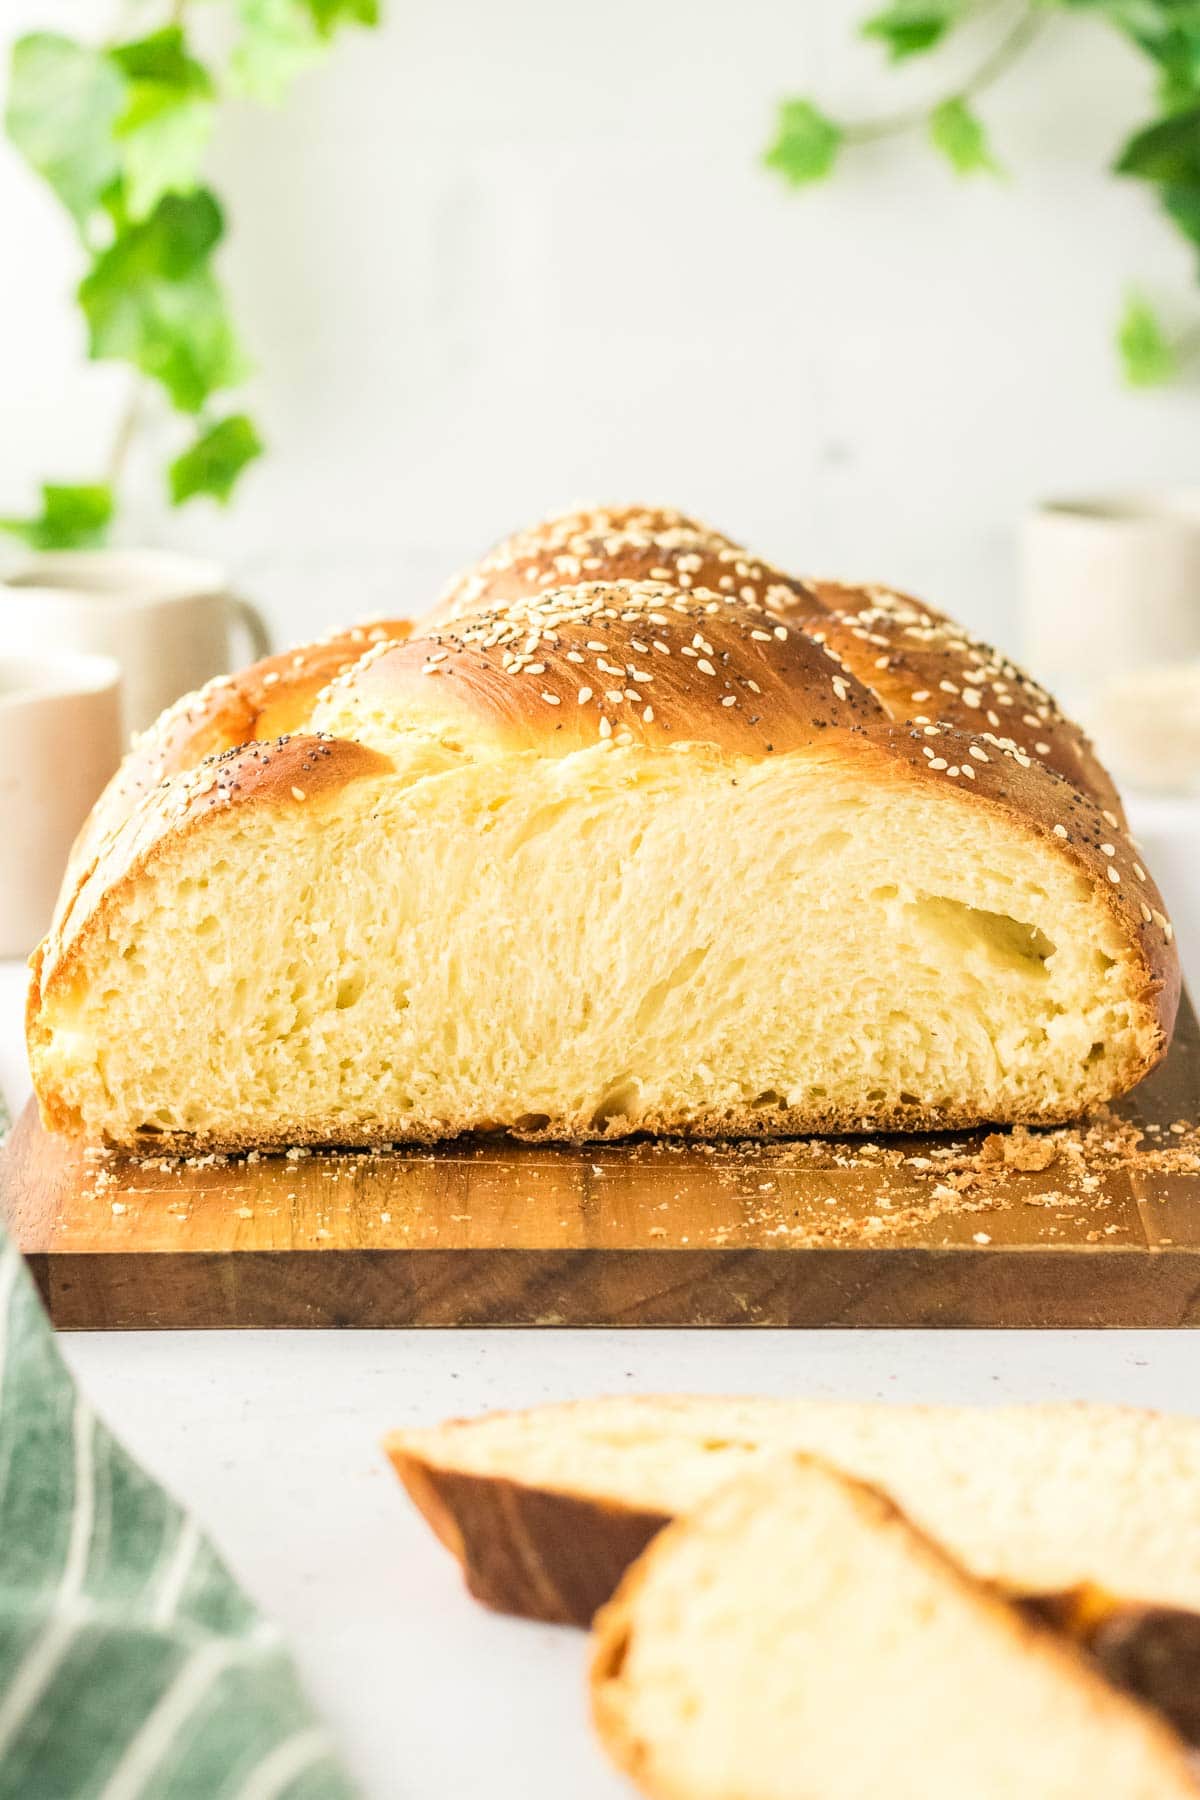
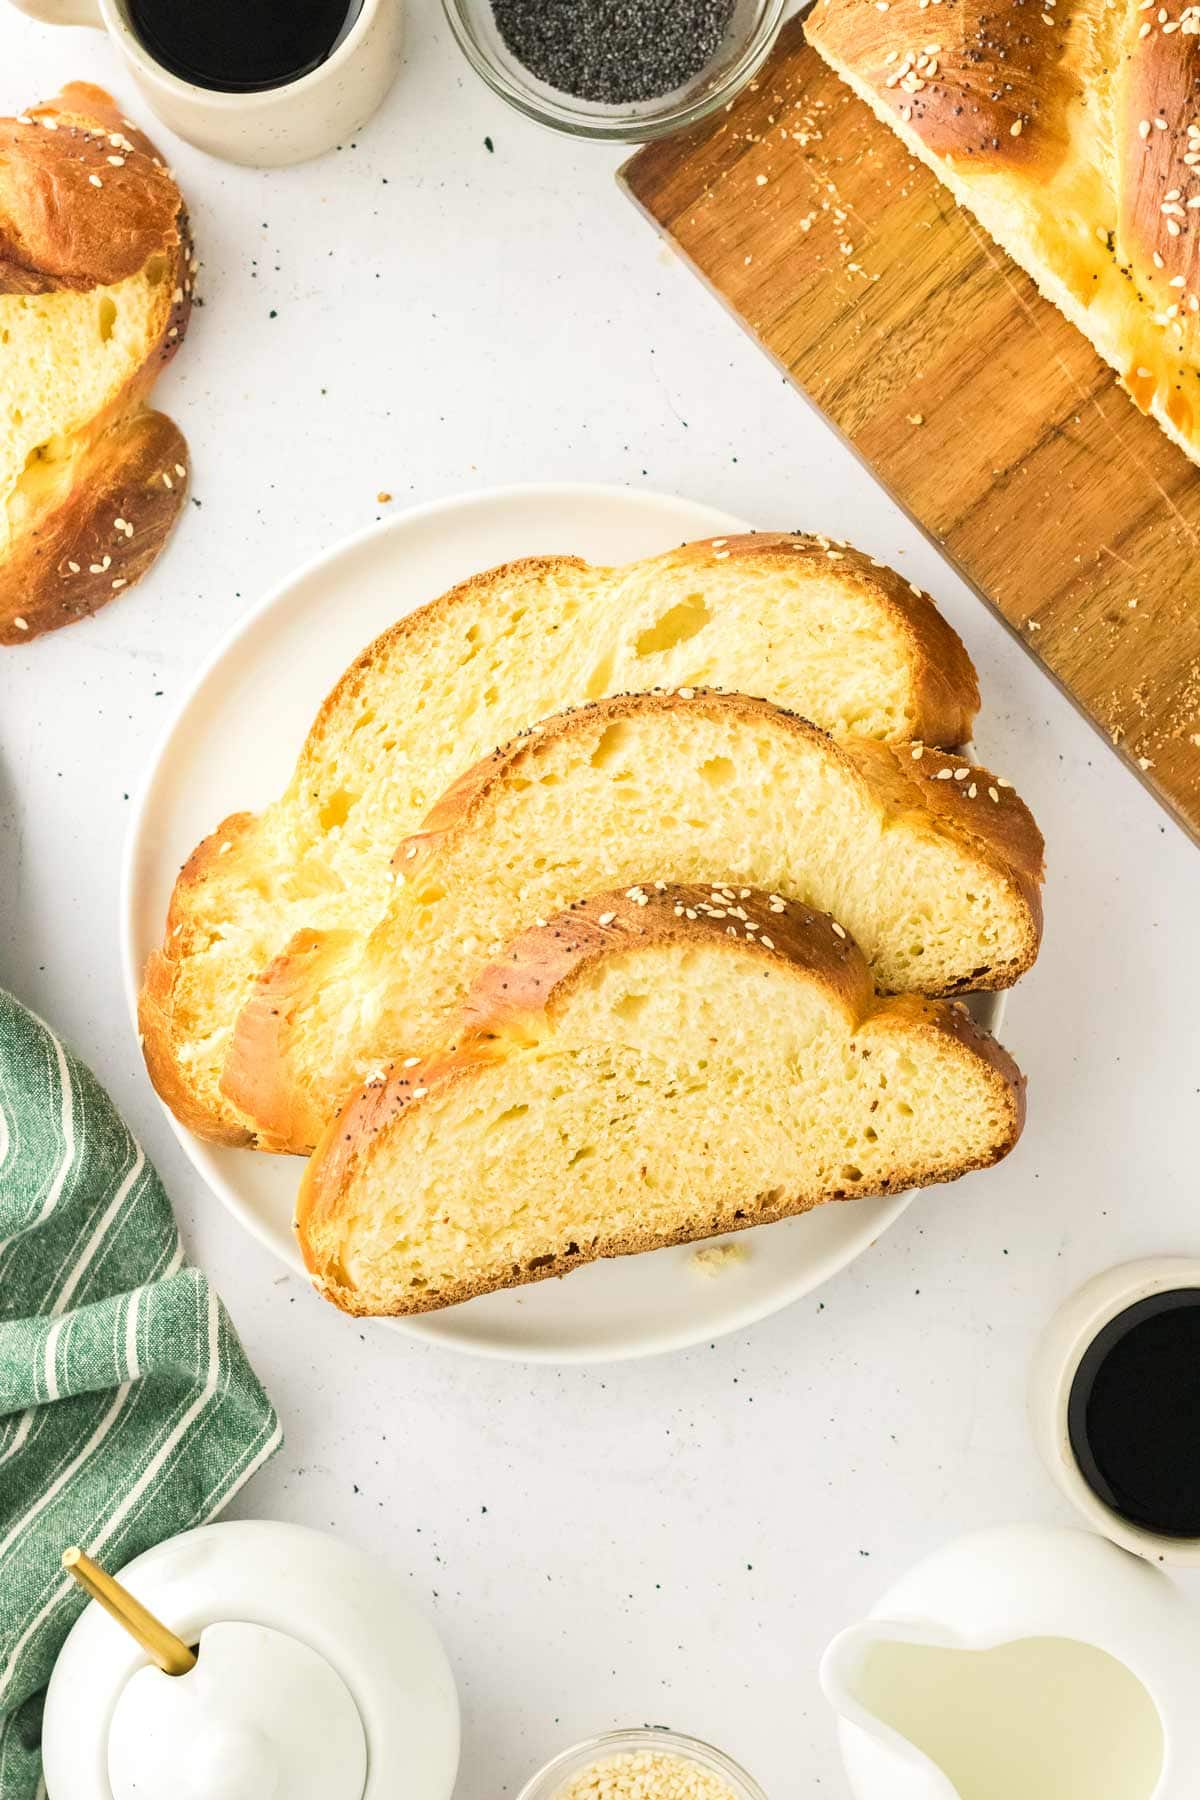
What I love about this version is how consistently it delivers a soft, fluffy interior with a deeply golden crust. It braids easily, rises well, and holds its structure whether you’re slicing it neatly or tearing off warm pieces straight from the loaf.

At this point, I know this challah by feel. I know what the dough should look like when it’s mixed just right, how it should stretch as it’s braided, and when it’s ready to go into the oven. That familiarity comes from repetition, and it’s what gives me confidence in sharing this recipe.
Whether you bake challah regularly or are making it for the first time, this is a reliable, well-tested place to start for challah that is approachable, flexible, and meant to be enjoyed.
Ingredients and Substitutions
Pictured below is what you’ll need to make this challah bread, along with some key ingredient notes and substitutions.
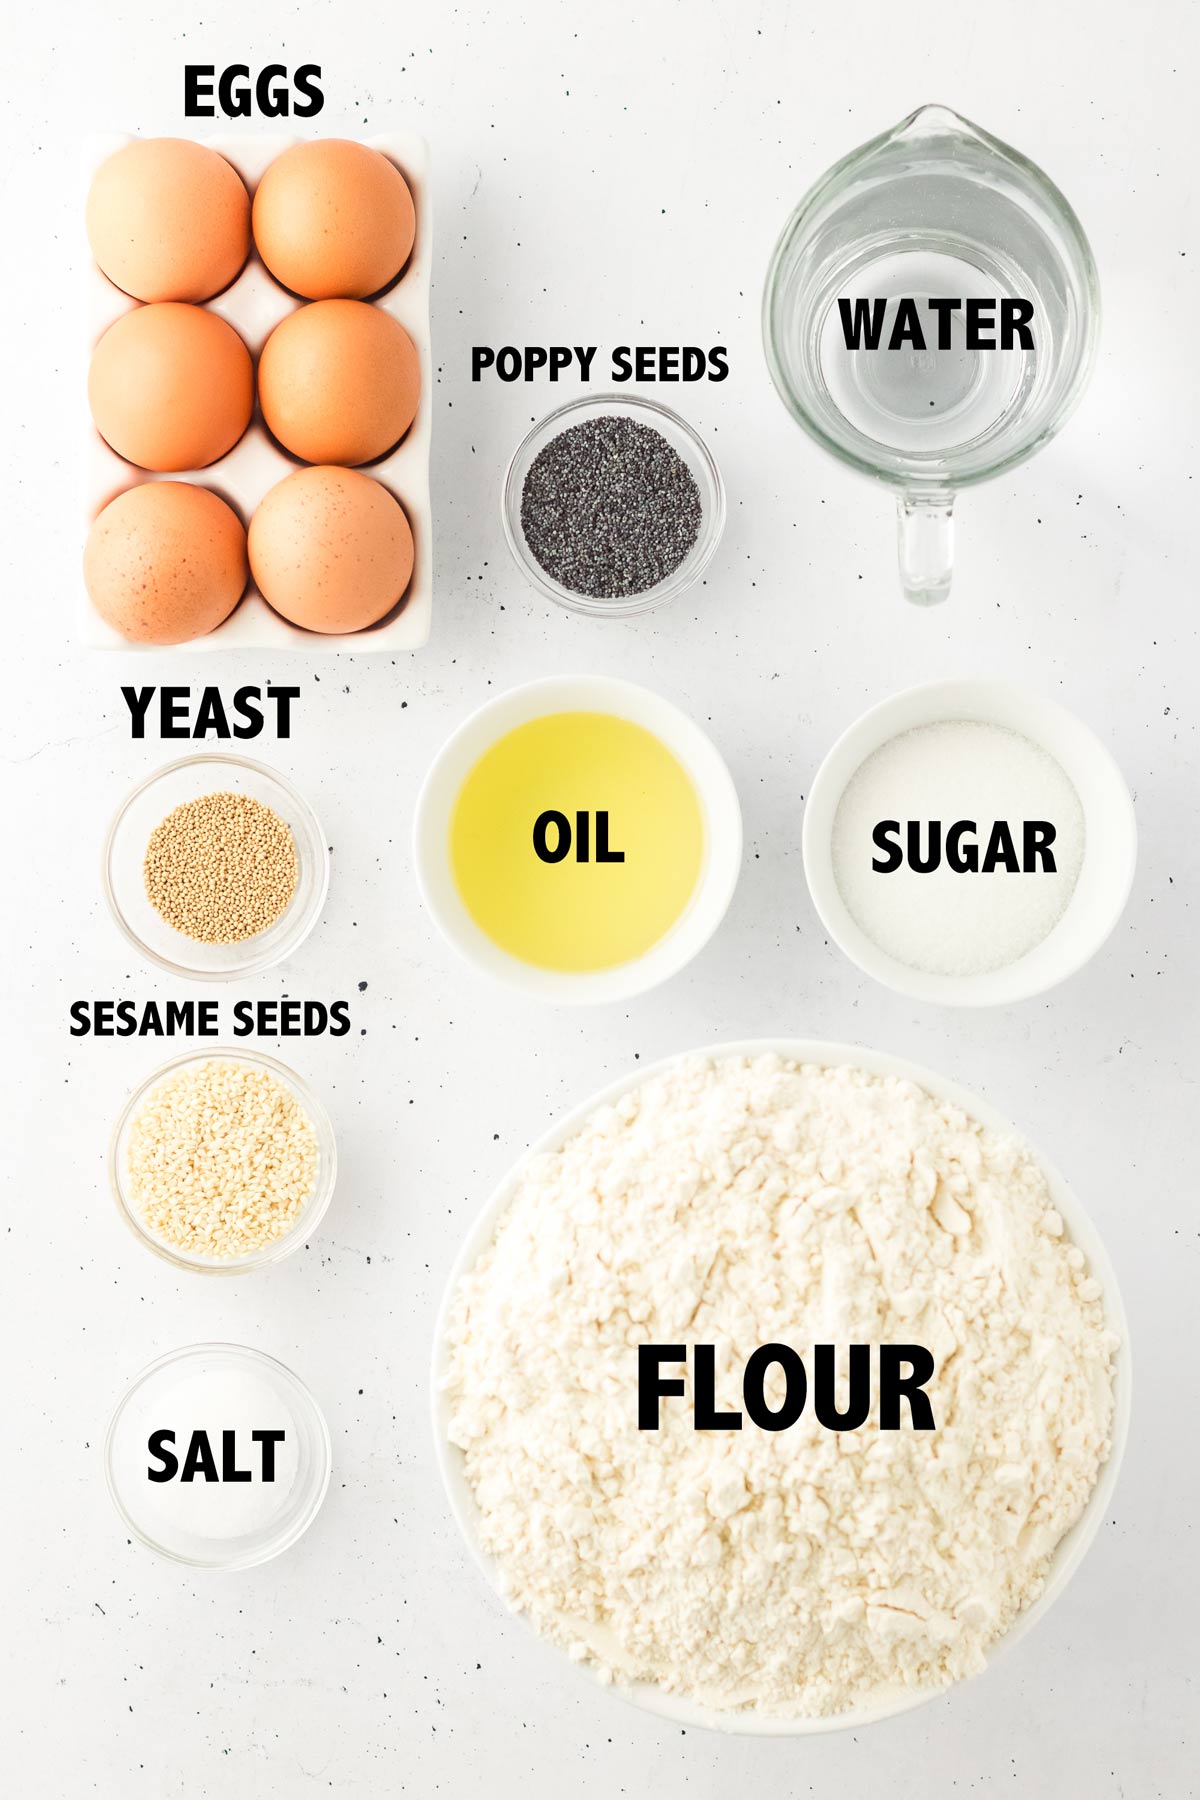
- Yeast: I use SAF Gold instant yeast, which is designed for enriched doughs like challah. It handles sugar and fat well and gives a strong, steady rise. If using active dry yeast, you’ll need to bloom it first until foamy.
- Water: Warm, not hot. If it’s too hot, it can kill the yeast. You should be able to comfortably hold your finger in it.
- Flour: All-purpose flour gives the best balance of structure and softness here. Bread flour will make the loaf chewier and is not my preference for this recipe.
- Sugar: This challah is slightly sweeter than some, which helps keep it soft and tender for several days. You can reduce the sugar to 2/3 cup, noting that the dough will rise more slowly. Honey can replace sugar (by weight, not volume), but expect a stickier dough and a slightly darker crust.
- Oil: Use a neutral oil, like canola, vegetable, or grapeseed oil.
How to Make Challah (Step-by-Step with Cues)
- Choose Your Yeast: If using active dry yeast, bloom the yeast in warm water with a pinch of sugar until the top looks foamy and creamy. If using SAF Gold instant yeast, skip blooming and mix it right into the dry ingredients.
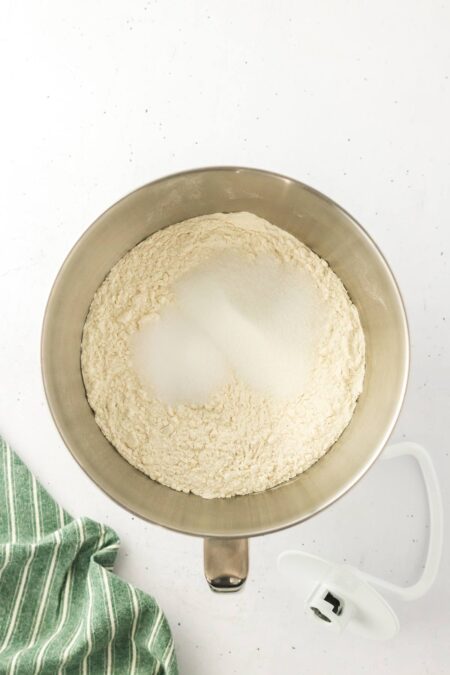
- Mix the Dry Base: Combine the first portion of flour, sugar, and salt (and instant yeast, if using). Whisk well so the salt and yeast are evenly distributed. Uneven mixing can cause slow spots in the rise.
- Add Liquids and Start Dough: Add the water (and bloomed yeast, if applicable) and oil. At this stage, the mixture may look very loose – you’re not making dough yet, you’re hydrating the flour and dissolving the sugar.

- Add Eggs and More Flour: Add the eggs and another cup of flour and mix until the dough turns smoother and slightly glossy. The mixture will tighten slightly but still look closer to thick batter than dough. It will pour slowly off a spoon or paddle rather than hold a shape.
- Add Even More Flour: Switch to the dough hook, if you’re using a mixer. Add the next portion of flour and mix until the dough begins to pull away from the sides of the bowl. The dough will switch from glossy and loose to matte and stretchy. It may still cling to the bottom of the bowl.
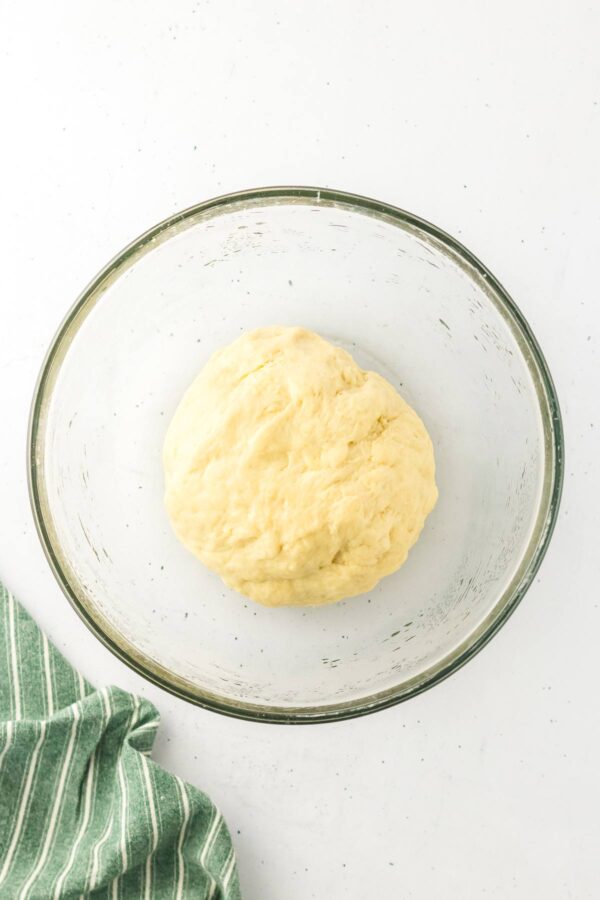
- Knead Until Elastic: Turn the dough out onto a lightly floured surface. Knead, adding small amounts of the remaining flour only if needed. The dough should feel soft and slightly tacky, not wet and sticky, and not dry or stiff. If it sticks to your hands like glue, dust lightly. If it feels firm or cracks when stretched, stop adding flour and keep kneading. Knead for about 5 minutes, or until the dough looks smoother and more elastic. A fingertip pressed into the dough should spring back slowly and leave a shallow indentation.
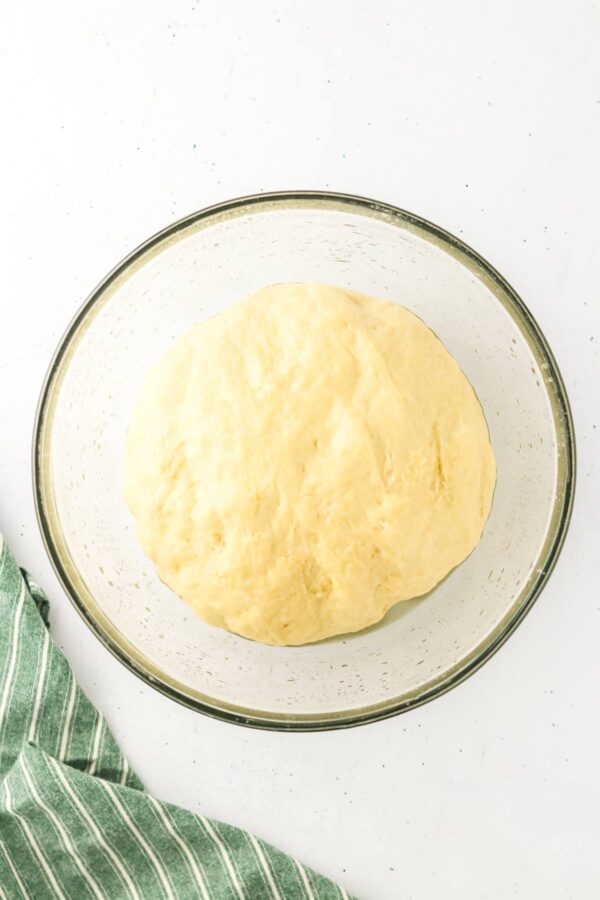
- First Rise: Place the dough in a greased bowl, cover with a damp towel, and let rise in a warm place for about three hours. If you have a proofing setting in your oven, use it! When gently pressed after the first rise, the dough should feel airy and soft, not tight. Gently punch down once during the rise if possible. You’ll feel the dough relax and release trapped gas, which helps create a more even crumb later.
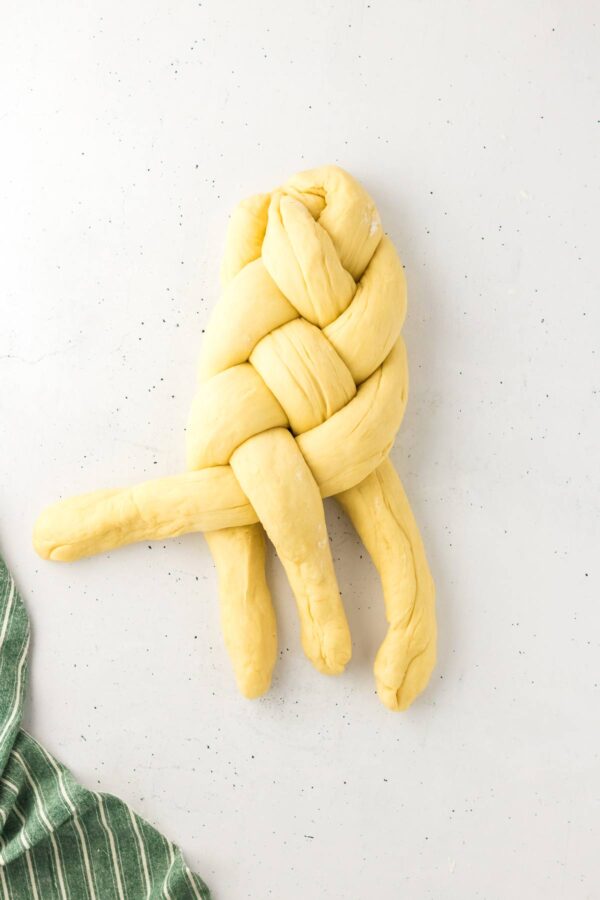
- Shape and Braid: Turn the dough out, divide, and braid it into your desired shape. The dough should roll easily into strands without tearing or snapping back. If it resists, let it rest for 5-10 minutes before continuing.

- Second Rise: Place the braided challah on a lined baking sheet and let it rise until visibly larger and light. The loaf should look puffy and feel marshmallow-soft when gently pressed. If it springs back immediately, it needs more time. This rise is key to a fluffy interior.

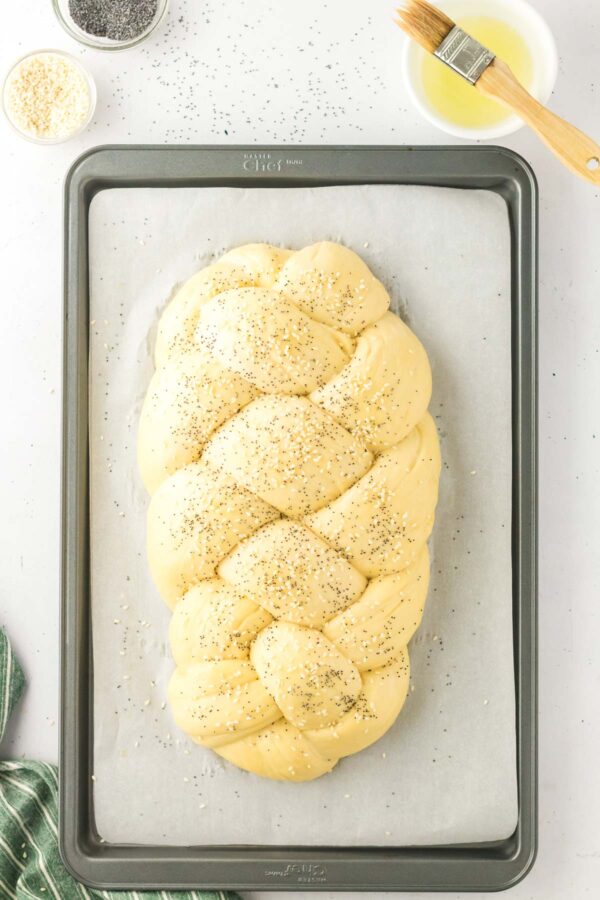
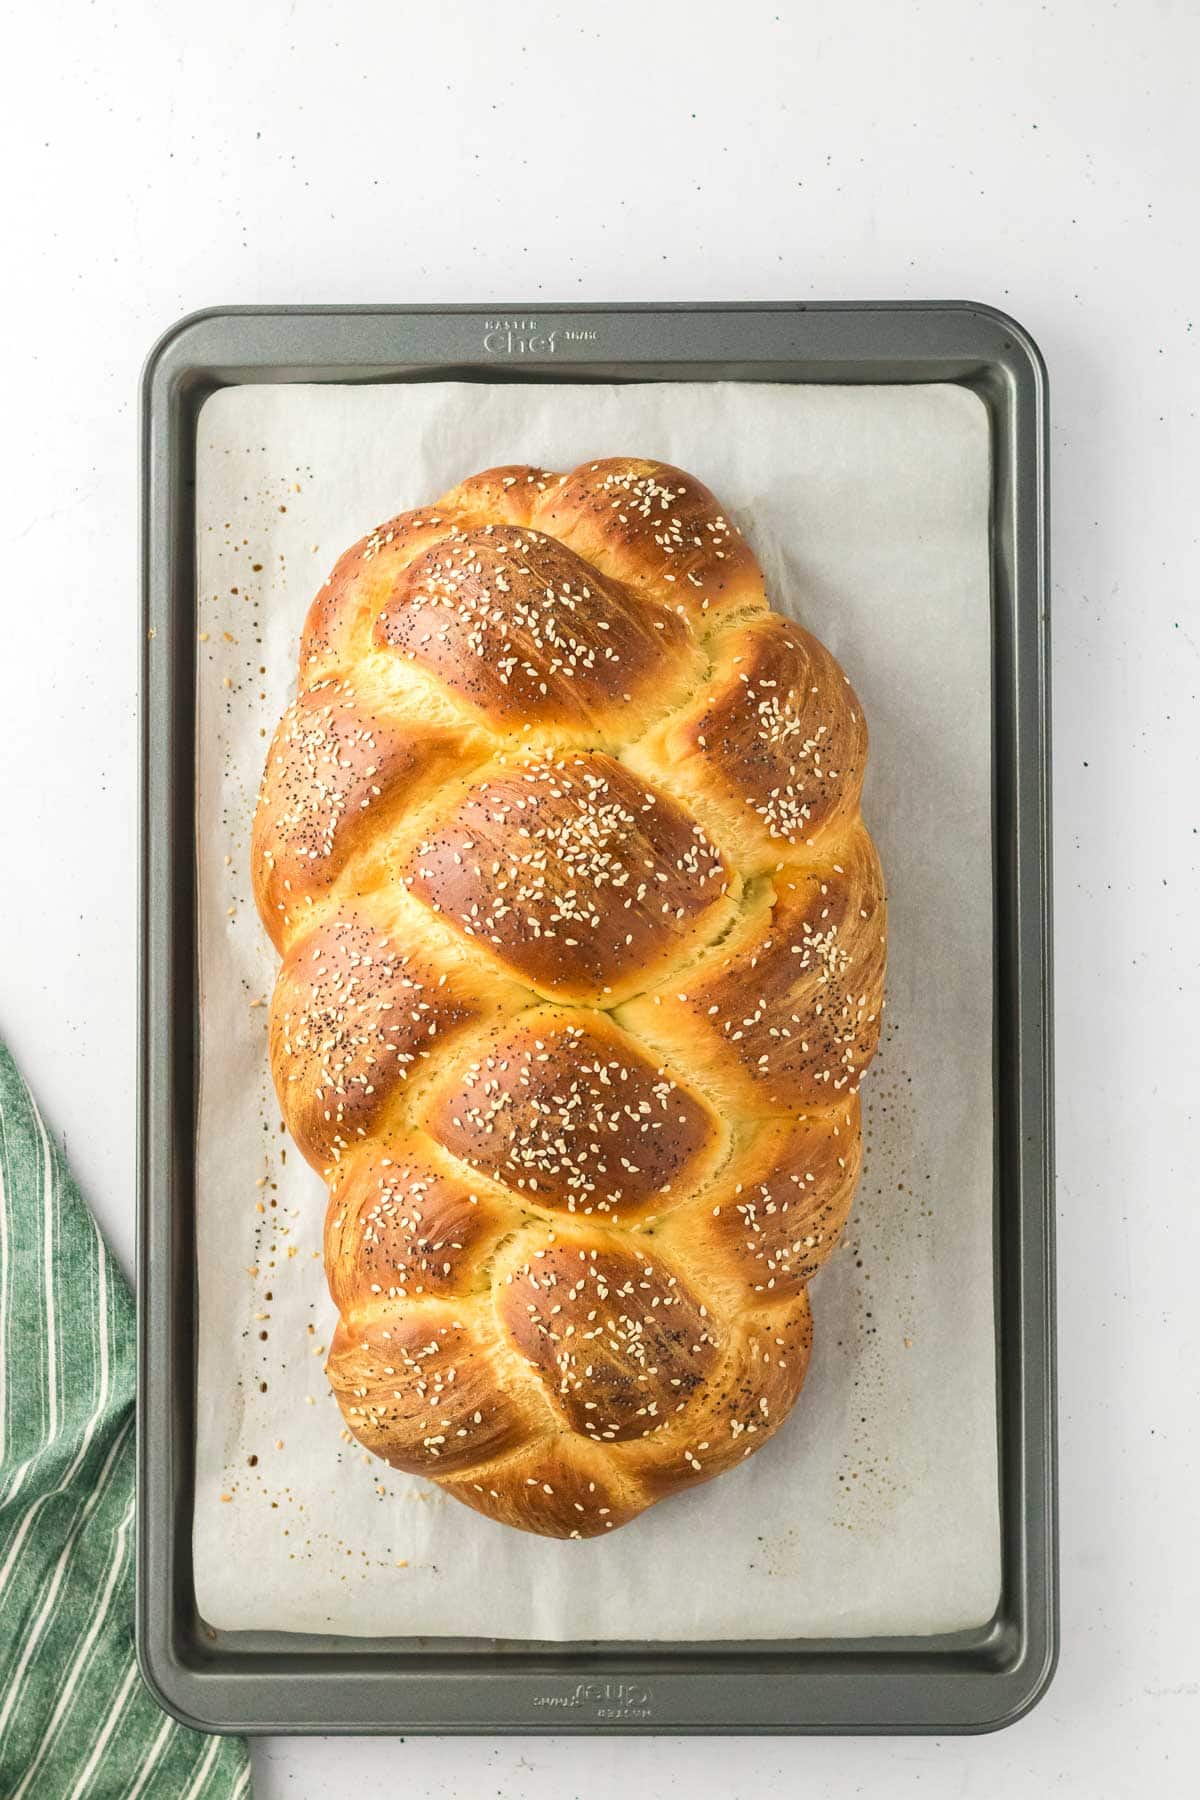
- Egg Wash: Brush generously with egg wash, making sure to get into the creases of the braid. Add toppings if using.
- Bake. Bake until golden brown. The loaf should feel light for its size, sound hollow when tapped, and register 190-195°F in the center. Let the challah cool before slicing to allow the crumb to set.
Hydrated Flour = Best Challah
If you’ve made challah before, you might not be used to adding flour in quite so many different steps. The dough looks almost soupy at first and it might make you question if you’re doing it right, especially if you’re used to adding flour up front and kneading right away. But you’re doing it exactly right for the fluffiest challah!
Kitchen Chemistry
Flour takes time to fully absorb water, and gluten only begins forming efficiently once the flour is hydrated. Starting with a wetter mixter allows water to penetrate the starches and proteins first, which leads to stronger gluten development later without adding extra flour, resulting in a softer crumb and better rise.
For this recipe, that means resisting the urge to fix the texture too early. The loose, glossy mixture at the beginning is intentional. As you add flour in stages and continue mixing, the dough will tighten on tis own as hydration catches up and gluten develops.
If you add too much flour early, the dough stiffens before the flour is fully hydrated, which limits gluten formation and leads to a denser loaf. Let the dough go through the soupy-to-tacky progression, add flour gradually, and stop as soon as the dough feels soft and slightly tacky.
Challah Flavor Variations
This recipe makes two normal-sized loaves or one giant loaf. Our Shabbat tradition is to make one plain loaf and one fun loaf – at one point, we were aiming for 52 different variations of challah over a whole year, although we lost count at some point! Here are some of my favorite flavor varieties and how to make them.
For mix-ins, gently flatten the dough portion into a rectangle, sprinkle fillings evenly, roll up jelly-roll style, then roll into strands and braid. For swirls, twist strands together before braiding. All mix-ins and quantities below are for one loaf only, so you can keep one loaf classic and turn the other into a flavored variation.
- Poppy Seed: Add 2 tablespoons poppy seeds to the dough and/or sprinkle generously on the egg wash.
- Sesame Seed: Press 2-3 tablespoons sesame seeds on top of the egg-washed dough.
- Black and White Sesame: Roll each strand of challah dough prior to braiding in either black or white sesame seeds, then braid for contrast.
- Za’atar: Add 1 tablespoon za’atar to the dough and sprinkle an additional tablespoon of za’atar over the egg wash, along with a pinch of flaky salt.
- Everything Bagel: Press 2 tablespoons of everything bagel seasoning onto the egg-washed loaf prior to baking.
- Rosemary Garlic: Add 1 tablespoon finely chopped fresh rosemary plus 1 small grated garlic clove to the dough.
- Raisin: Add 3/4 cup raisins, folding in during shaping. If the raisins are very dry, soak briefly and pat dry first
- Craisin: Add 3/4 cup dried cranberries, folding in during shaping.
- Honey: Brush the loaf with honey diluted 1:1 with warm water after baking.
- Pistachio: Add 1/2 cup chopped pistachios to the dough. Pairs well with the honey glaze.
- Chocolate Chip: Add 3/4 cup chocolate chips, folding them into the dough during shaping.
- Coconut Chocolate Chip: Add 1/2 cup chocolate chips + 1/2 cup sweetened shredded coconut, mixing into the dough.
- Chocolate Cherry Swirl: Add 1/2 cup chopped dried cherries + 1/2 cup chocolate chips. Roll the dough into a rectangle, sprinkle fillings, roll up, and then braid.
- Oreo: Add 6-8 chopped Oreo cookies and fold into the dough.
- Mint Chocolate: Add 3/4 cup chocolate chips + 1/2 teaspoon peppermint extract and gently knead into the dough.
- Blueberry Almond: Add 1/2 cup dried blueberries + 1/2 cup sliced almonds, folded into the dough.
- Lemon Poppy Seed: Add the zest of 1 lemon + 2 tablespoons poppy seeds, kneading the zest and seeds into the dough. Finish with lemon glaze, if desired.
- Apple Cinnamon: Add 3/4 cup finely diced dried apples + 1 1/2 teaspoons cinnamon. Sprinkle over flattened dough, roll up, and braid.
- Rainbow: Divide dough into 4-6 pieces, tint each with gel food coloring, knead, roll into strands, and braid.
- Sprinkle: Add 1/2 cup rainbow sprinkles on top of the egg wash.
- Funfetti: Add 1/2 cup rainbow sprinkles + 1 teaspoon vanilla or almond extract to the dough and knead gently.
Tips and Tricks for the Best Challah
- Expect a Loose Start: This dough looks almost soupy early on, and that’s intentional. Resist adding extra flour until the dough has had time to hydrate and tighten on its own.
- Add Flour Gradually: Stop adding flour as soon as the dough is soft and tacky. A dough that feels a little sticky will bake up lighter than one that feels firm.
- Warm Rise: The first time rise can be shortened by keeping the dough in a warm place. If you have a proof setting on your oven, use it – or place the dough in a cold oven with the oven light turned on.
- Second Rise: Don’t skip the second rise! The final proofing after braiding is crucial to prevent a dense loaf.
- Make-Ahead Dough: Make the dough through the end of the first rise. Once the dough has risen and been punched down, cover it tightly and refrigerate it overnight. The next day, remove the dough from the refrigerator and let it sit at room temperature for 30-45 minutes. Divide, shape, braid, and proceed with the recipe as written.
- Freeze Dough: After braiding the loaf, the entire unbaked loaf can be frozen. Place the braided dough on a cookie sheet and freeze until solid. Once the unbaked loaf is frozen, wrap it tightly in plastic wrap, then wrap it in aluminum foil. The dough can be stored in the freezer for up to 2 months. To bake the loaf, unwrap and place it on a cookie sheet. Thaw fully in the refrigerator, then allow it to rise for 1 hour at room temperature prior to baking.
- Braiding: This recipe can be braided as a 3-, 4-, or 6-strand braid. Slightly uneven strands or lopsided braids won’t affect how the challah bakes. Challah is made to look handmade, and it will still rise and bake beautifully!
- Storage: Store challah wrapped at room temperature for up to three days. For longer storage, freeze the fully baked and cooled loaf or individual slices wrapped tightly. Avoid refrigerating, which dries out the crumb faster than freezing.
- Recommended Tools: SAF Gold Yeast | Stand Mixer | Pastry Brush | Baking Sheet | Instant-Read Thermometer | Kitchen Scale
More Yeast Recipes

Traditional Challah
This classic challah recipe bakes up tall, soft, and beautifully golden with a light interior that tears easily. The dough is forgiving, easy to braid, and reliable every time.
Ingredients
- 1 1/2 tablespoons instant yeast (SAF Gold preferred) or active dry yeast
- 1 1/4 cups warm water
- 5 to 5 1/2 cups (600-660 grams) all-purpose flour
- 1/2 tablespoon salt
- 3/4 cup (148 grams) granulated sugar
- 1/4 cup vegetable oil
- 3 large eggs (2 for dough, 1 for egg wash)
- optional: sesame seeds or poppy seeds
Instructions
- If you are using active dry yeast, start by blooming the yeast. Combine the yeast, 1 teaspoon of the sugar, and the warm water in a small bowl. Let this sit for 10 minutes, until foamy. If using SAF Gold Instant yeast, skip this step.
- In a large bowl or stand mixer fitted with the whisk attachment, combine 2 cups of the flour, the remaining sugar, the salt, and the SAF Gold instant yeast.
- Add the water (and bloomed yeast, if applicable) and the oil. Mix thoroughly.
- Add two of the eggs, along with 1 additional cup of flour. Mix until smooth. Switch to the dough hook, if using a stand mixer. Add another 2 cups of flour and mix until the dough begins to pull away from the sides of the bowl.
- Turn the dough out onto a lightly floured surface and knead for about 5 minutes, working in the remaining 1/2 cup of flour only if needed. The dough should be soft and slightly tacky, not wet or stiff.
- Place the dough in a greased bowl, cover with a damp towel, and let rise for 2-3 hours, until nearly doubled in size, punching down the dough once during the rise if possible.
- Divide the dough and braid into one or two 3-, 4-, or 6-strand challahs. A simple three-strand braid works well. If the dough resists shaping, let it rest for 5-10 minutes and try again. Place the braided challah on a baking sheet lined with parchment paper and let it rise for 45-60 minutes, until visibly larger and light to the touch. While the challah rises, preheat the oven to 350°F.
- Beat the remaining egg with 1 teaspoon of water and brush generously over the loaves. Sprinkle with sesame and poppy seeds, if using. Bake until golden brown. One large loaf will take 27-28 minutes; two smaller loaves will take 24-26 minutes. The loaf should sound hollow when tapped and register 190-195°F internally. Let the loaf cool before slicing.
Notes
- This dough looks very wet and almost batter-like early on. It will tighten as flour is added and the dough is kneaded.
- Only add the additional flour until the dough feels soft and slightly tacky. A dough that is a little sticky will bake up lighter than one that feels firm.
- Rise times are guidelines. The dough is ready when it looks puffy and feels airy.
- If your kitchen is cool, let the dough rise in a turned-off oven with the light on. The gentle warmth helps ensure a steady rise without overheating the dough.
- Slightly uneven strands or a lopsided braid are completely normal and won't affect how the challah bakes.
- Bake until golden brown. A pale loaf is usually underbaked, even if the bake time seems right.
- The dough can be made through the first rise, covered tightly, and refrigerated overnight. Let it sit at room temperature until pliable, then shape, rise, and bake as directed. Alternatively, the brraided loaf (prior to the second rise) can be frozen whole, then thawed in the refrigerator and brought up to room temperature prior to the second rise.
- Recommended Tools: SAF Gold Yeast | Stand Mixer | Pastry Brush | Baking Sheet | Instant-Read Thermometer | Kitchen Scale
Recommended Products
As an Amazon Associate and member of other affiliate programs, I earn from qualifying purchases.