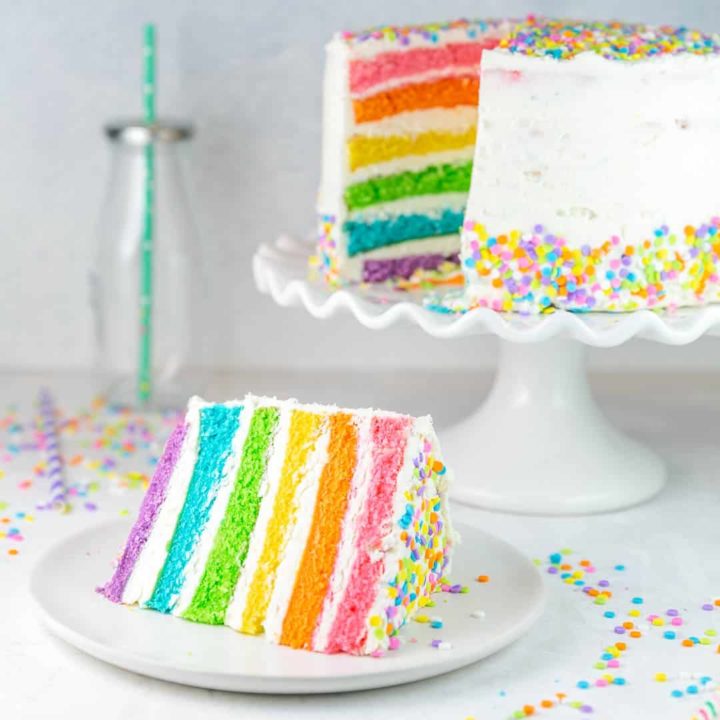
Rainbow Layer Cake Recipe
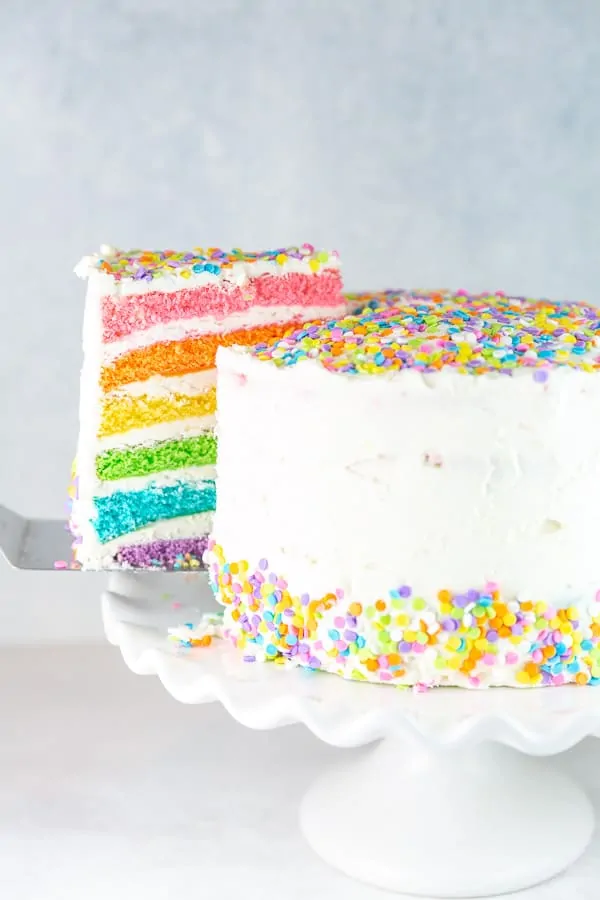
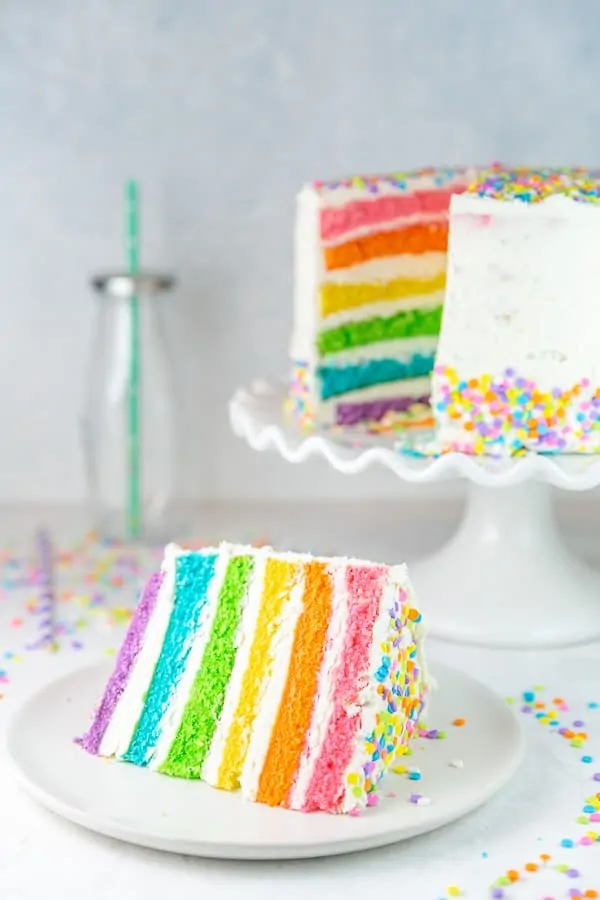
Everything you need to know about how to make a delicious Rainbow Layer Cake from scratch. With six bright and colorful layers, this recipe uses perfectly sized shorter cake layers – big enough for a celebration, but easier to make and transport.
This post may include affiliate links. As an Amazon Associate I earn a fee from qualifying purchases.
For the past several years, I’ve always shared some sort of cake or decadent sprinkle-coated dessert this last week in June, because it’s a pretty big week around here.
2019: Funfetti Babka
2018: Almond Rhubarb Cake
2017: Funfetti Bundt Cake
2016: Peanut Butter Banana Cupcakes
2015: Chocolate Oreo Peanut Butter Torte
2014: Chocolate Peanut Butter Cup Cake
Why the celebratory dessert trend? The last week in June includes not only my birthday but also my blog-iversary. I hit publish on the very first post on Bunsen Burner Bakery on June 28th, 2011 (a dark chocolate cheesecake recipe, for those who are curious).
So this year, I’m sharing another celebration-worthy dessert: this amazing rainbow layer cake recipe, which served as a very special 2nd birthday cake for our favorite little girl back in April.

It’s so fittingly appropriate for so many reasons. A tall, beautiful rainbow cake? I’d love one for my birthday! Or my blog-iversary. June is Pride Month – now we can even celebrate with a giant edible rainbow. And of course, the state of the world is more than a little dreary, so how about a rainbow cake to brighten things up?
So come along for all the tips you need to make a beautiful rainbow cake of your own. It’s easier than you think, especially because this one is neither six cake layers tall (i.e., so tall your cake is at risk of sliding off without wooden dowels to anchor it), nor does it involve cutting cake layers in half, which is not the easiest.
Easy recipe, beautiful cake. Just the way it should be.

Easy Six Layer Cake
I know, I know. “Easy” and “six-layer cake” seem like they don’t go together.
But here are the benefits to this rainbow layer cake recipe, which actually do make it pretty easy:
- The layers are not as thick as a normal cake layer. Lots of rainbow cakes use six layers, each as thick as a normal 2 or 3-layer cake.
- No need to anchor the cake with wooden dowels, which you would have to do to transport a normal cake that is six layers tall.
- Each cake layer is specifically designed to be baked in a thinner layer, meaning no need to bake a full-sized cake and cut it in half (messy, easy to accidentally screw up, leaves you with lots of extra cake you may not need).
- All the cake batter can be mixed at once in a stand mixer or a large mixing bowl, so there’s no need to make two separate batches of cake.

Brightly Colored Rainbow Cake Layers
If you skip ahead to the ingredients, you’ll notice this cake uses only egg whites, not whole eggs. This is to keep the color of the cake as white as possible, so colors stay true to the food coloring.
Depending on the ratio of other ingredients, cakes made with egg whites can sometimes lean towards spongy or dry. To prevent this and maintain a fluffy cake texture, we’ll add cornstarch to the flour to replicate the lower protein content of cake flour.
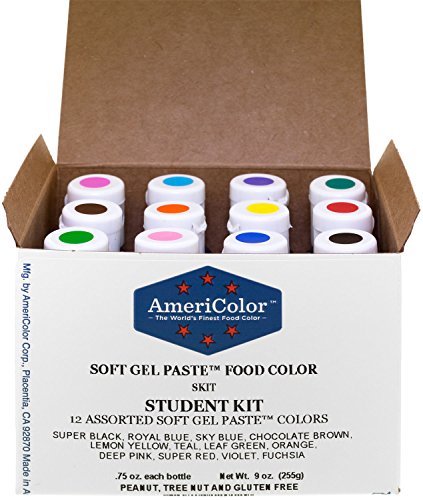
While any food coloring can work, I always recommend gel based food colors for the brightest colors. Only a few drops are necessary – remember, you can always add more food coloring as you stir in, but you can’t take it out!
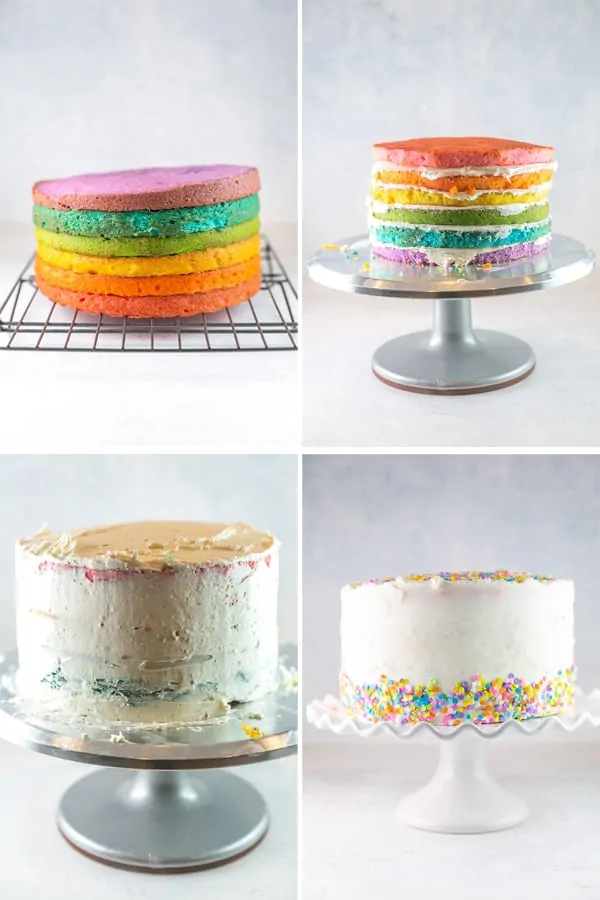
Divide your batter into six equal bowls. Add a few drops of food coloring a stir. Add more if necessary. That’s it – the cake is ready to be baked!
Bake Cake Batches Quickly
I don’t know too many casual home bakers who have six 8-inch cake pans, so chances are, you’ll have to bake these in batches. I own three 8-inch cake pans, so I baked mine as two groups of three. If you have two cake pans, you’ll need to do three batches of two cakes.
One bit of advice: work quickly. Each cake layer only takes 15 minutes to bake, because it’s thinner than usual. Let the cake cool in the cake pan for 10 minutes, then turn out the cake onto a wire rack.
Run the cake pan under room temperature and then cold water to wash it and return the pan to room temperature. Once the cake pan is no longer warm, bake the next layer.
Why do we want to do this quickly instead of over the course of a full day? It’s time for my favorite subject… kitchen chemistry!
Kitchen Chemistry
Baking soda and baking powder are chemical leavening agents which create gas bubbles, providing lift to the batter. Upon interacting with the liquid in the batter, baking powder and baking soda both immediately release gas bubbles – and we want to trap these bubbles in the batter when we bake them! Waiting too long to bake your cake means the gas bubbles will deflate before the cake is baked and the structure of the cake is set.
The goal for baking these cakes is to minimize the amount of time between mixing ingredients and baking – but fortunately, in the United States baking powder is sold as double-acting baking powder. This means there are two rising stages: one when mixed, and a second release of gas once the batter is heated during baking.
Rotating between pans in the manner described above is sufficient to capture the gas released from the leaveners, but don’t make your cake batter in the morning and plan to finish baking the layers at night.
Frosting a Rainbow Layer Cake
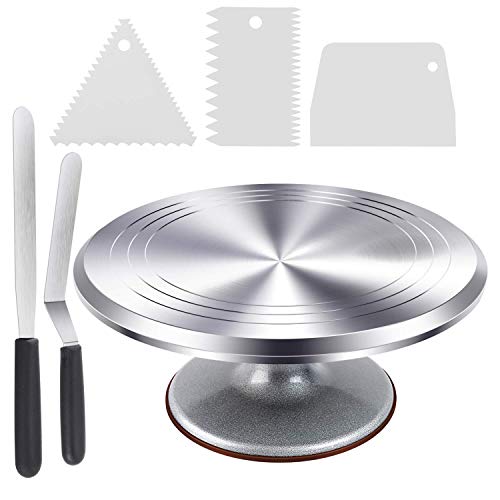
Once you make the cake layers and the frosting, it’s time to decorate! The only tool you really need is a spatula, but a cake turntable and cake scraper can make the job easier.
Place your bottom layer of the cake on the cake stand (in this case, I used my purple layer) and spread a layer of frosting on top. Spread the frosting across the cake. Place the next layer of cake (blue) on top and repeat, ending with the final layer (red). Put this layer on upside-down, with the bottom of the cake facing upright for a flat surface.
Next, apply a crumb coat: a thin layer of frosting that holds together any of the crumbs that break loose from the sides of the cake. Apply a thin, even layer of frosting – don’t worry if it looks messy! Refrigerate for at least 30 minutes to set the frosting.
After the crumb coat has hardened, use the spatula to apply frosting to the sides of the cake and smooth it out.
Finally, add the layer of frosting to the top of the cake and smooth with a spatula.
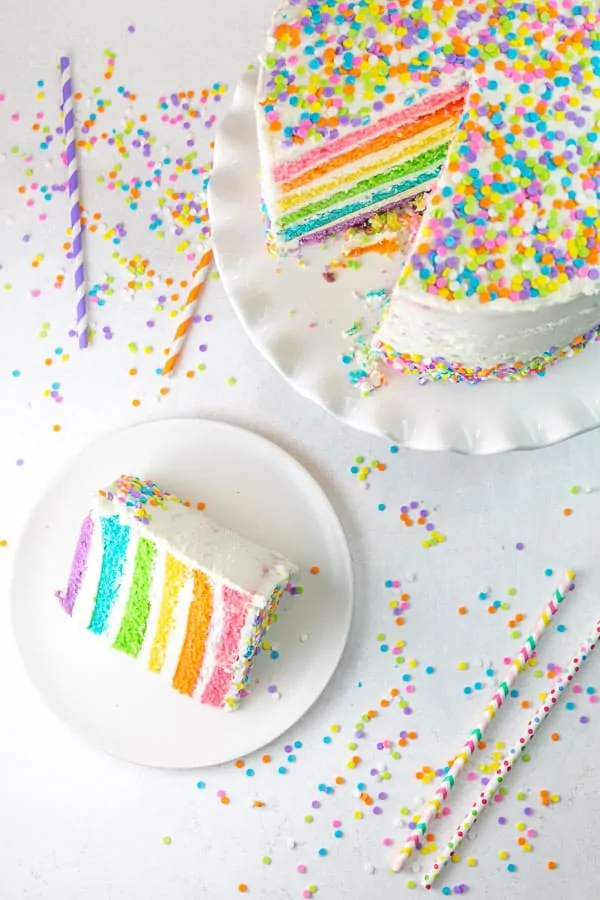
Last but certainly not least: for a cake this festive, decorate liberally with sprinkles! I used pastel candy quins to match the pastel rainbow colors, but the choices are endless when it comes to fun and festive sprinkles!
Tips and Tricks for the Best Rainbow Layer Cake
- Use gel food coloring for the brightest, boldest colors in the rainbow cake layers. I use AmeriColor gels for this cake.i
- For perfectly even cake layers, weigh the batter of the cake and divide it into six bowls.
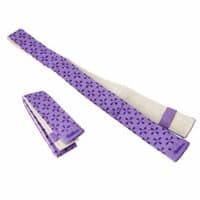
- To keep cake layers perfectly flat, use Bake Even Strips (or wet cloth soaked in water and wrapped tightly around the outside of the cake pan).
- All components of this cake can be made ahead of time. The cake layers can be baked and frozen for up to 3 months. The buttercream frosting can be made up to two days ahead of time. The entire cake can be assembled a day or two before serving.
- Start the frosting with a crumb coat – a thin layer of frosting that holds any crumbs from the sides of the cake in place.
- To prevent the cut cake from getting stale, wrap leftover slides in plastic wrap or push wax paper against the exposed edge to minimize contact with air.
More Layer Cake Recipes
- Best Chocolate Layer Cake with Chocolate Buttercream Frosting
- Chocolate Oreo Cake
- Strawberry Layer Cake with Whipped Cream Frosting
- Carrot Cake with Lemon Cinnamon Cream Cheese Frosting
- Chocolate Hazelnut Cake
- Vanilla Layer Cake with Blueberry Cardamom Curd
- All Cake Recipes »
Rainbow Layer Cake
With six bright and colorful layers, this Rainbow Layer Cake recipe is sure to bring a smile to anyone’s face!
Ingredients
For the Cake:
- 3 3/4 cup (450 grams) all-purpose flour
- 1/2 cup (56 grams) cornstarch
- 2 1/2 cups (495 grams) granulated sugar
- 3/4 teaspoon salt
- 1 1/2 tablespoons baking powder
- 1 teaspoon baking soda
- 6 large egg whites, room temperature
- 2/3 cup (132 grams) vegetable oil
- 1 2/3 cups (378 grams) buttermilk, room temperature
- 18 tablespoons (254 grams) unsalted butter, room temperature
- 2 teaspoons vanilla extract
- 1 teaspoon almond extract (optional)
- 6 colors of food coloring
For the Frosting:
- 2 cups (454 grams) unsalted butter, room temperature
- 11 cups (1248 grams) confectioners' sugar
- 3/4 cup (170 grams) heavy cream
- 2 teaspoons vanilla extract
- 3/4 teaspoon salt
- sprinkles for decorating, optional
Instructions
- Preheat the oven to 325 °F. Line 8-inch pans with parchment paper and grease with a light spray of non-stick cooking spray.
- Make the cake batter. Mix together the flour, cornstarch, baking soda, baking powder, sugar, and salt in the bowl of a stand mixer or a large mixing bowl. Cut the butter into 1-inch pieces and slowly add to the dry mix while the mixer is running on low speed. Continue to mix until the flour mixture looks sandy and crumbly with no large pieces of butter, about 30 seconds.
- Pour in the oil and buttermilk, mixing on low speed until thoroughly combined, 1 to 2 minutes. Slowly add in the egg whites, one at a time, followed by the vanilla extract and almond extract. Mix until just fully incorporated.
- Color the batter. Divide the batter into six bowls, approximately 330 grams of batter per bowl. Color each with the desired food coloring, starting with a few drops, mixing, and adding more if necessary.
- Bake the cake. Pour the colored batter into the prepared cake pan and bake for 15 minutes or until the top springs back when lightly pressed and the edges just start to pull away from the cake pan. Let the cakes cool for 10 minutes in the pan before turning out to a wire rack to cool completely. Wash the cake pans and repeat as necessary until all layers have been baked.
- Make the frosting. While the cakes cool, prepare the buttercream frosting. Using a mixer, beat the butter on medium speed until light and creamy, about 2 minutes. Add confectioners' sugar, one cup at a time, continuing to mix. Pour in the heavy cream, vanilla extract, and salt. Beat together for 30 seconds, then increase to medium-high speed and beat for an additional 2 to 3 minutes, until light and fluffy.
- Assemble the cake. Starting with the purple layer and working up to red, place a layer of cake down, cover with frosting, add another layer and more frosting, until all six layers have been stacked. Coat the outside and top of the cake with a thin crumb coat of frosting, then refrigerate for 30 minutes to set the crumb coat. Use the remaining frosting to spread along the outside and top of the cake and decorate with sprinkles.
Notes
- Use gel food coloring for the boldest colors in the rainbow cake layers. I use AmeriColor gels for this cake.
- To keep cake layers perfect flat, use Bake Even Strips.
- All components of this cake can be made ahead of time. The cake layers can be baked and frozen for up to 3 months. The buttercream frosting can be made up to two days ahead of time. The entire cake can be assembled a day or two prior to serving.
- To prevent the cut cake from getting stale, wrap leftover slides in plastic wrap or push wax paper against the exposed edge to minimize contact with air.
Leftover cake can be stored at room temperature for up to 3 days, refrigerated for up to 5 days, or frozen for up to 3 months.
Recommended Products
As an Amazon Associate and member of other affiliate programs, I earn from qualifying purchases.


Hi! Thanks for sharing this recipe. Looks beautiful. My 13-year-old decided to make it as his birthday cake, but we could not figure out when to add cornstarch. It is one of the ingredients, but there is no indication when to use it. We simply added it to the flour mixture. Are we doomed? Does it belong somewhere else? Thanks!
Oh goodness, thank you for pointing out my omission – I’m fixing the recipe now. You did it exactly correctly; adding cornstarch helps replicate the protein content of cake flour. You could use cake flour instead but I find it’s a lot easier to just keep all-purpose flour at home and I always have cornstarch on hand for other cooking needs. So it just gets mixed in with the flour to lower the protein content a little and make a more tender cake crumb. I hope he had a great birthday!
Hi,i am planning to make this recipe halfed with 4 inch pans instead of 8 inch pans.Is it okay if i used butter blend instead of butter for the cake batter and fresh whole milk instead of heavy cream for the buttercream frosting?If not can i use any other recipe?Will the butter and milk affect them?
What is “butter blend?” I’ve never heard of it, so I can’t comment on to how it works. You can use whole milk – the frosting is just a little less rich and fluffy, but it still tastes great and will spread on the cake well. But if you want to use 4 inch pans, you should QUARTER the recipe, not halve it! If you want to half the recipe, use 6 inch pans (technically, you’d want to use 0.56 of the recipe rather than 0.5, but halving will work).
Is there anything i can add or do to the buttercream to prevent it from melting? I live in Singapore and is humid around 30°+-. I plan to add marshmallow fluff/creme and use half butter,half shortening and then add some constarch to it.
Will it be okay?
This say it serves 16. How big of cake slices are these?
Hi Jennifer – these are made with 8-inch slices, so each cake slice is designed to be 1/16th of an 8-inch round circle. While narrow, the cake is tall with all the layers of frosting between the six layers of cake.
Can I buy vanilla whipped cream frosting instead of making this frosting? Or will it not match well with this cake?
I’ve never used store bought whipped cream frosting before, but if you can decorate a cake with it, it’s certainly worth a try!
Can I use regular whole milk instead of buttermilk?
Hi Amanda – the recipe requires the lower pH of buttermilk to work. In this case, you can add a tablespoon of vinegar or lemon juice to a cup of milk, let it sit for 5 minutes, and use this instead of the buttermilk.
I made this cake last night and in taking the layers off of the cooling rack, just about every single one broke/crumbled into pieces. What did i do wrong?
Hi Julie – I’m so sorry to see that your cakes crumbled! This is usually due to overbaking – all the moisture evaporates out and you’re left with a dry, crumbly cake. Because these are thin layers, underbaking can happen quickly. My first suggestion is to use an oven thermometer to make sure your oven is at exactly 350 (and adjust the temperature accordingly if it runs a little hot, like many ovens do) – if it’s too hot, it will dry the cake layers out too much!