Best Chocolate Layer Cake with Chocolate Buttercream Frosting
Everyone needs a perfect homemade cake recipe, and this is the Best Chocolate Layer Cake! The recipe is easy to make and always turns out perfectly. With step-by-step instructions for how to assemble and decorate layer cakes, even beginner cake bakers will succeed!
This has become my most favorite, go-to chocolate cake recipe. Everyone needs a great homemade chocolate layer cake recipe in their pocket, and this is mine.
Once you have a great chocolate cake recipe, the flavor combinations are endless. While I’m presenting this one as a chocolate layer cake with chocolate buttercream frosting, the cake can be mixed and matched into endless combinations.
Vanilla frosting. Peanut butter frosting. Oreo frosting. Raspberry frosting. Filled with chopped nuts or candy or fruit. But all these cakes start with a great chocolate cake base – and this is that chocolate cake.
A very similar version of the cake is used in my most popular layer cake recipe: a chocolate peanut butter cup cake.
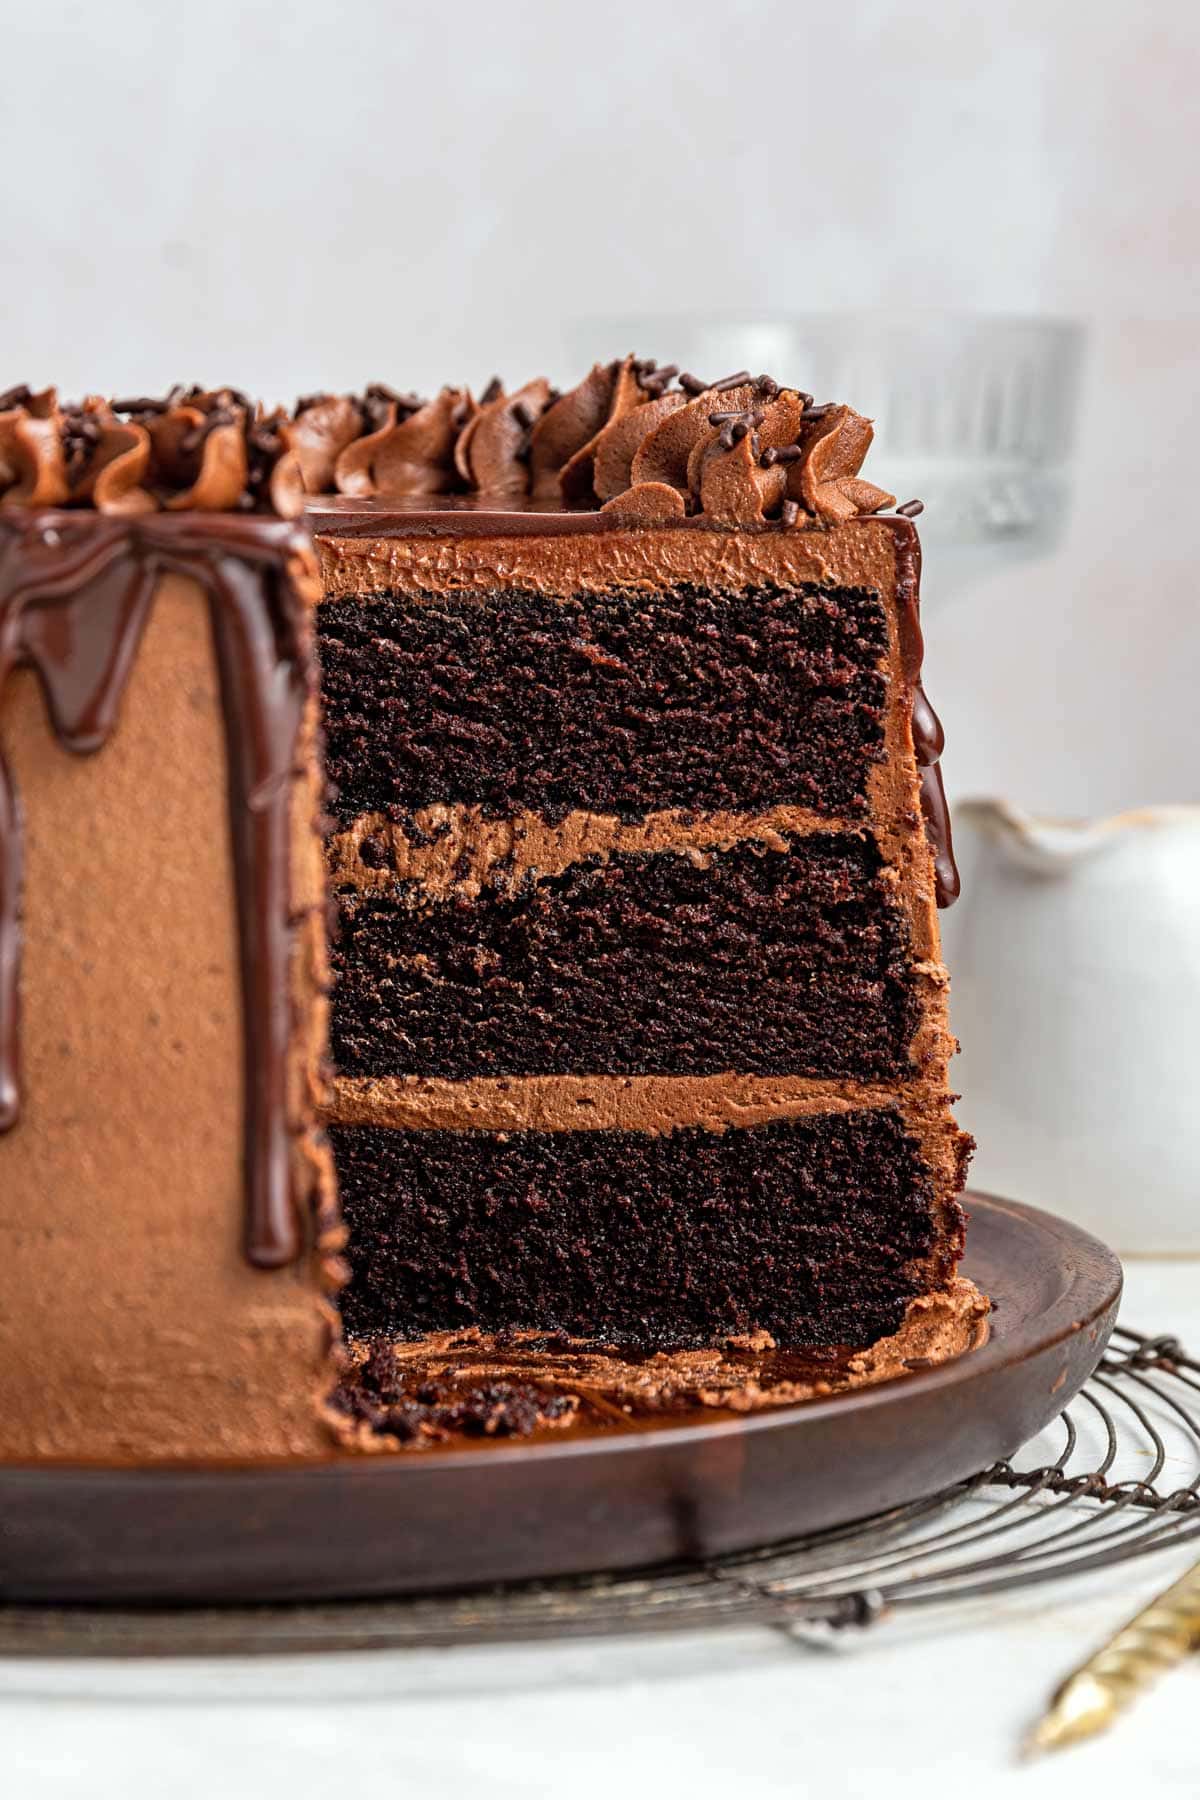
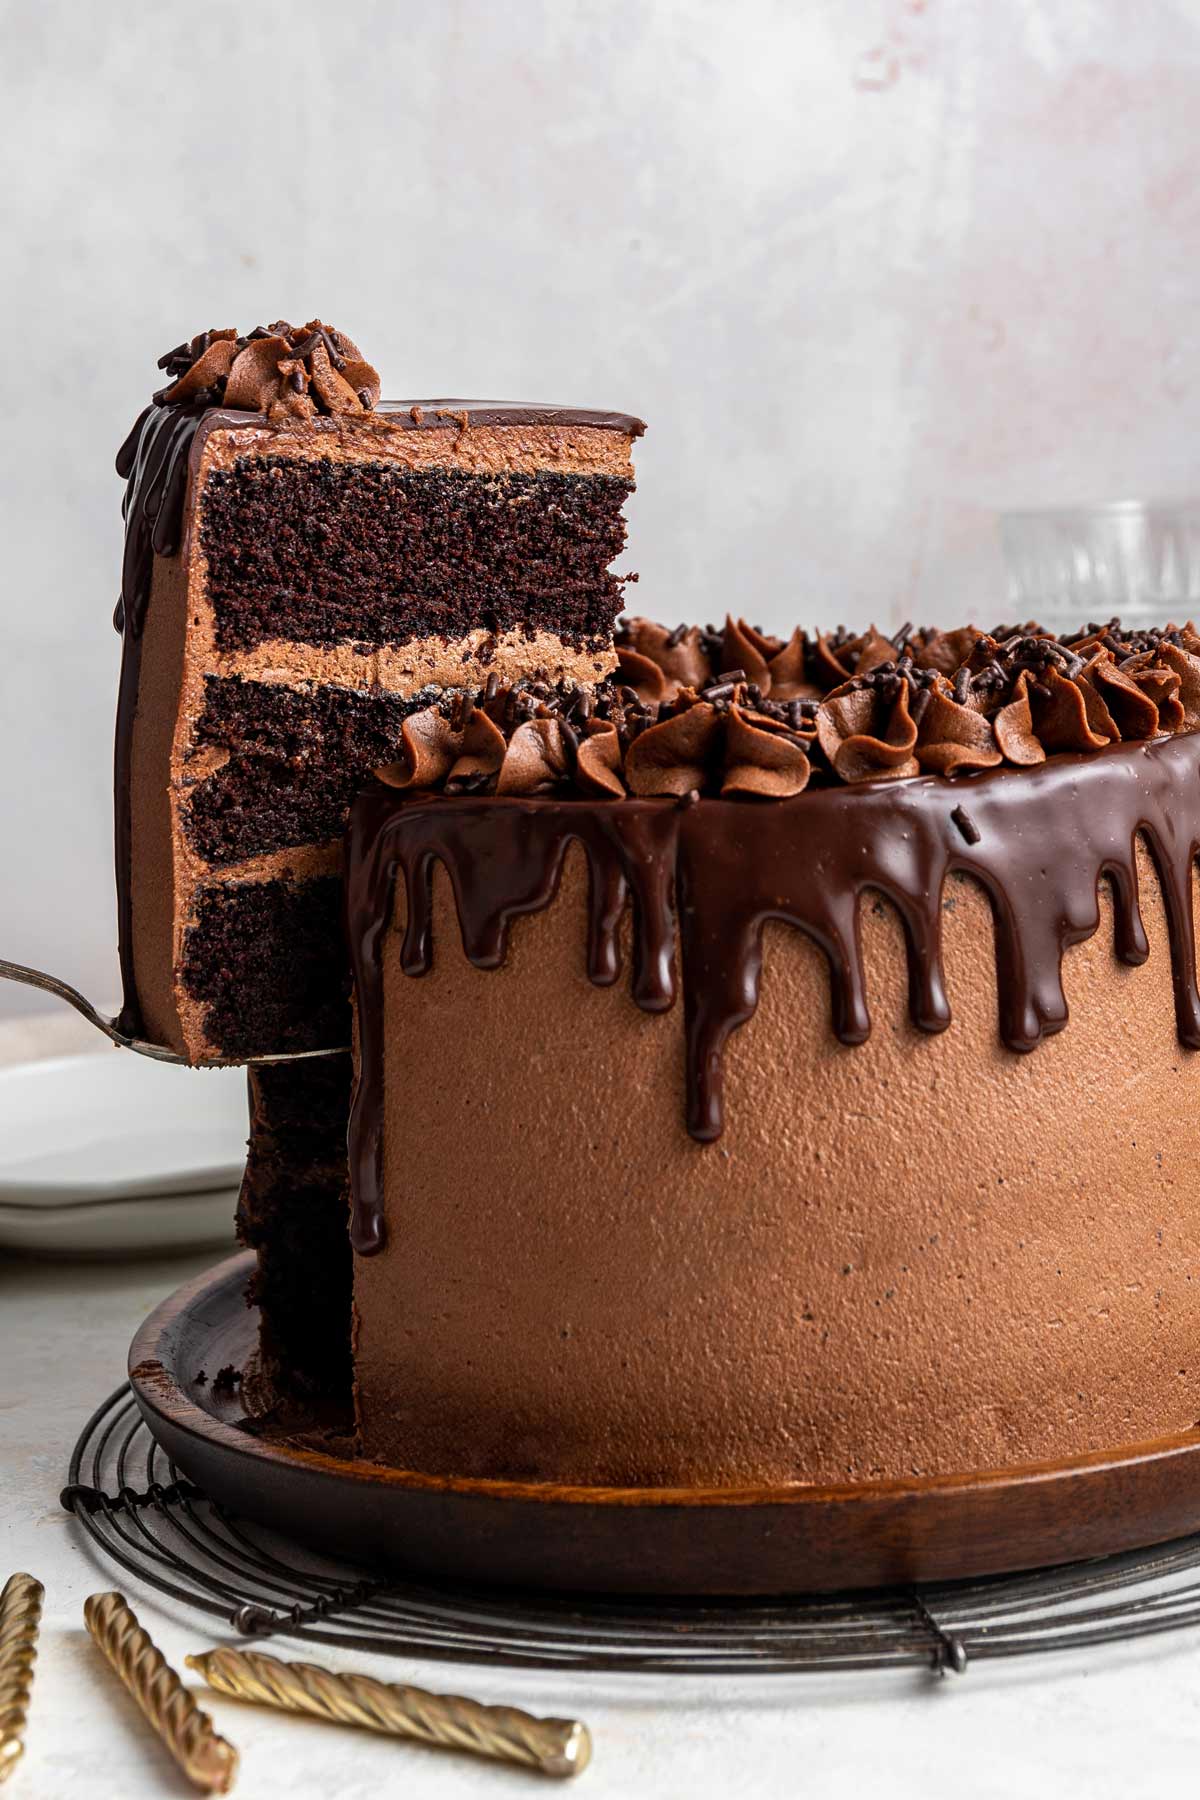
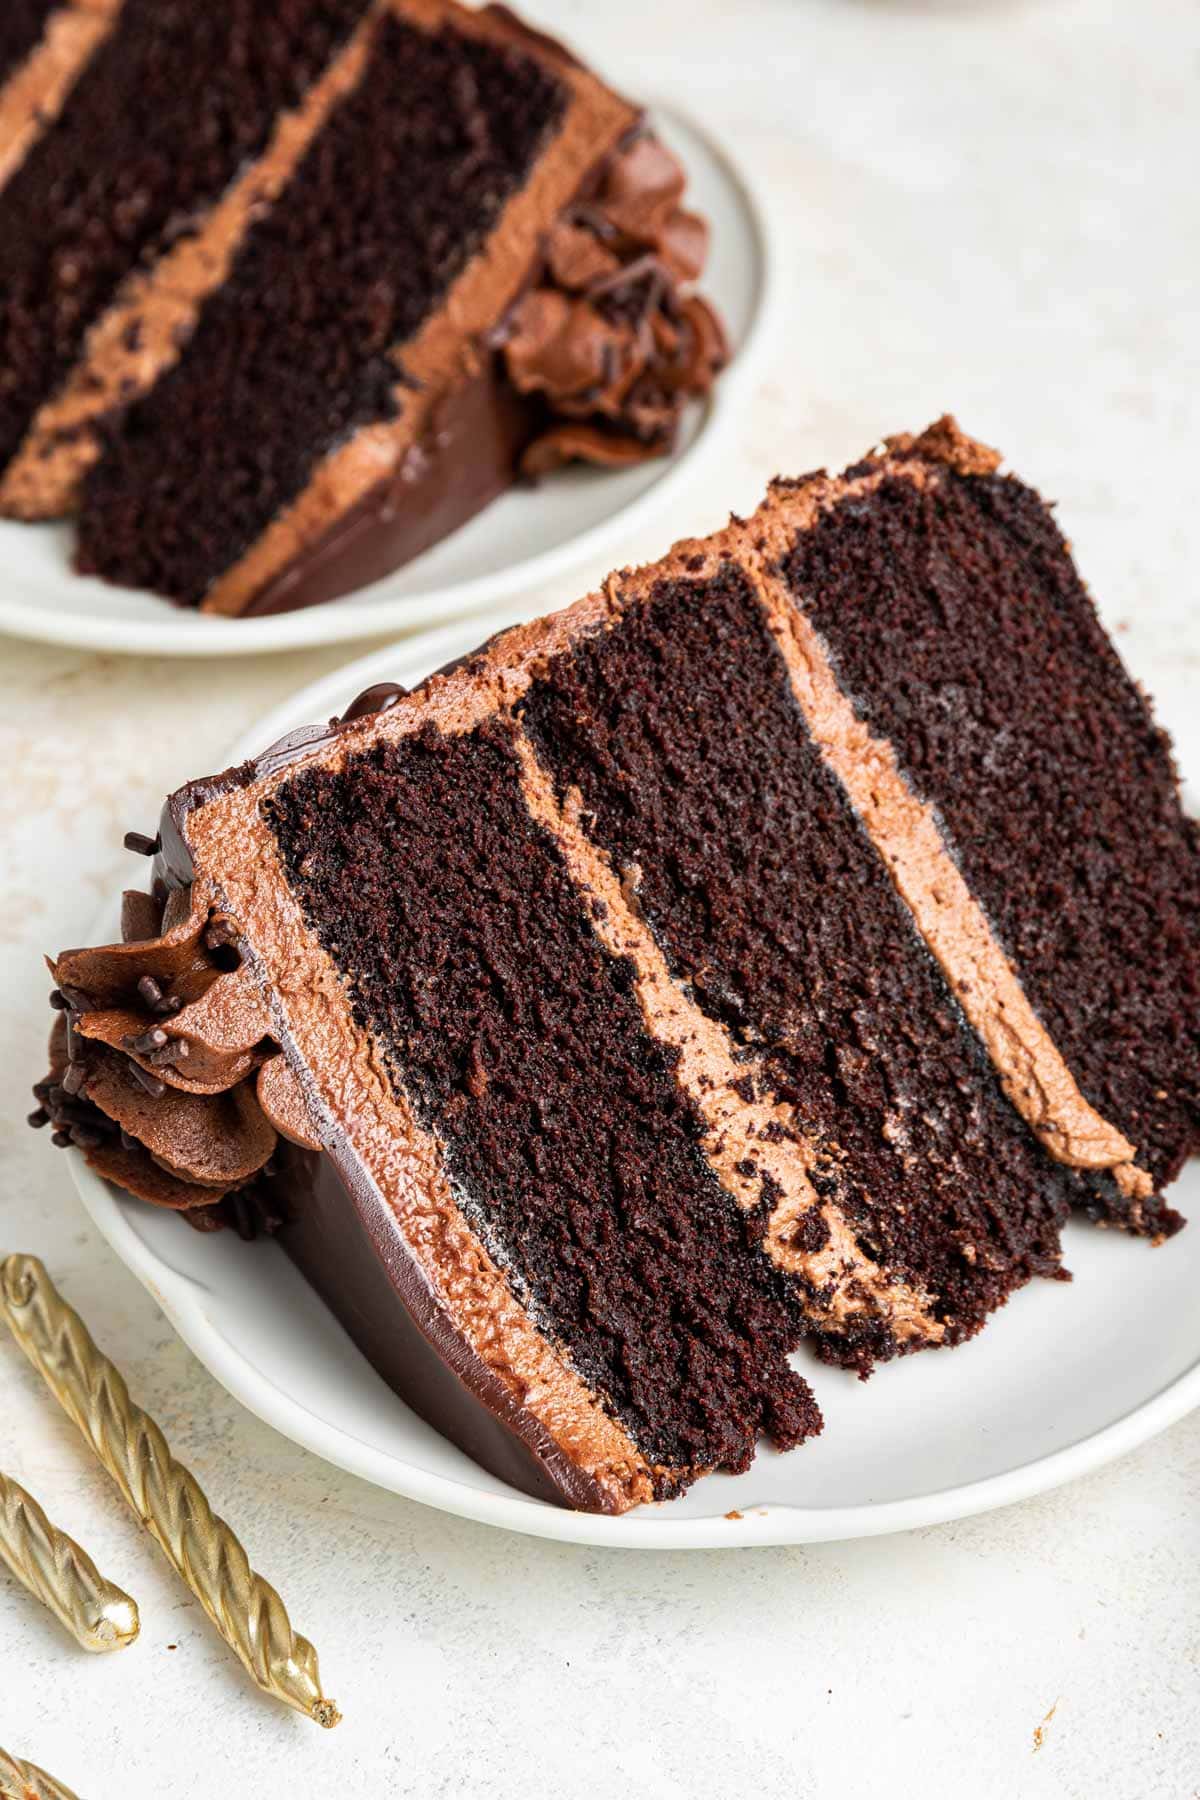
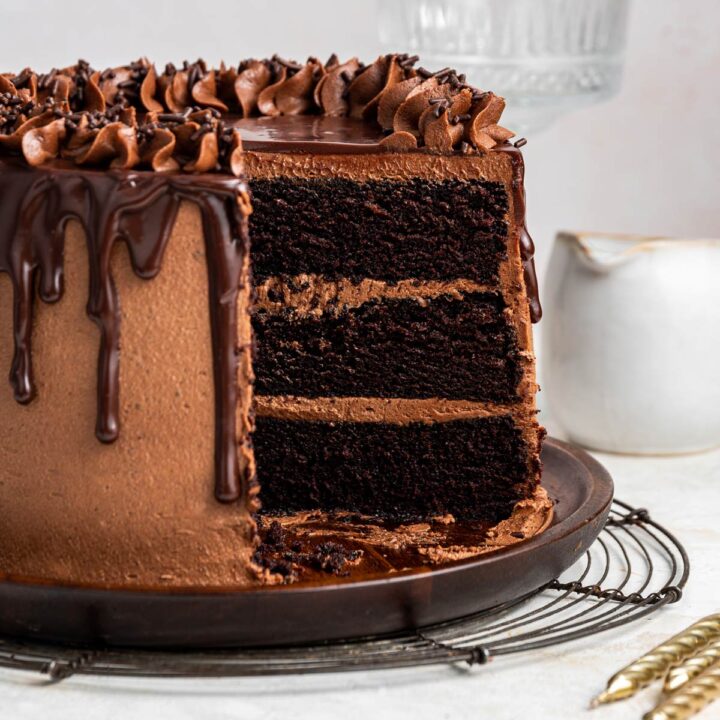
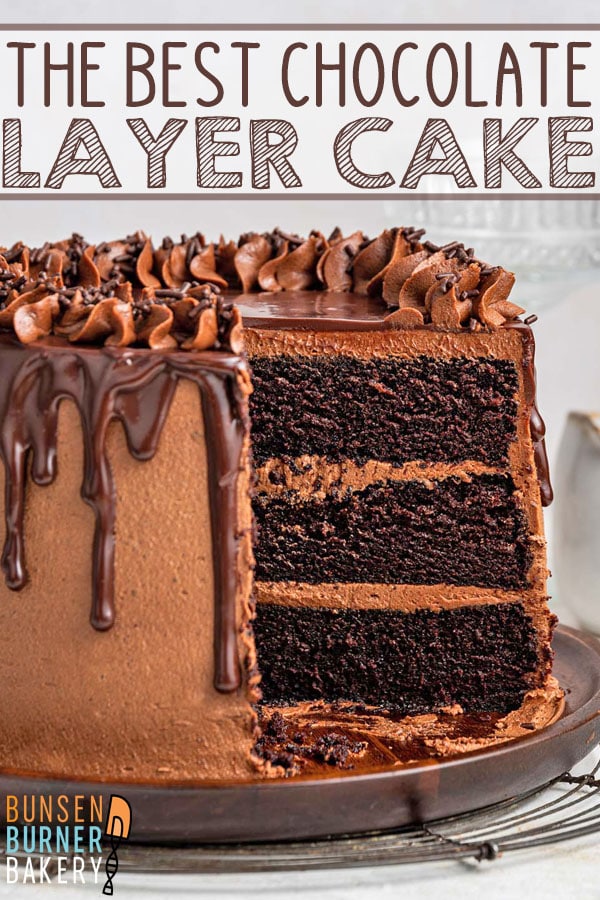
This cake is light and fluffy; not at all dense and heavy, like a chocolate bundt cake or chocolate pound cake. It’s moist with a tight crumb – perfect for decorating with lots of frosting. I’ve made it as two, three, and four layer cakes.
It is, truly, the best chocolate layer cake.
Ingredients and Substitutions
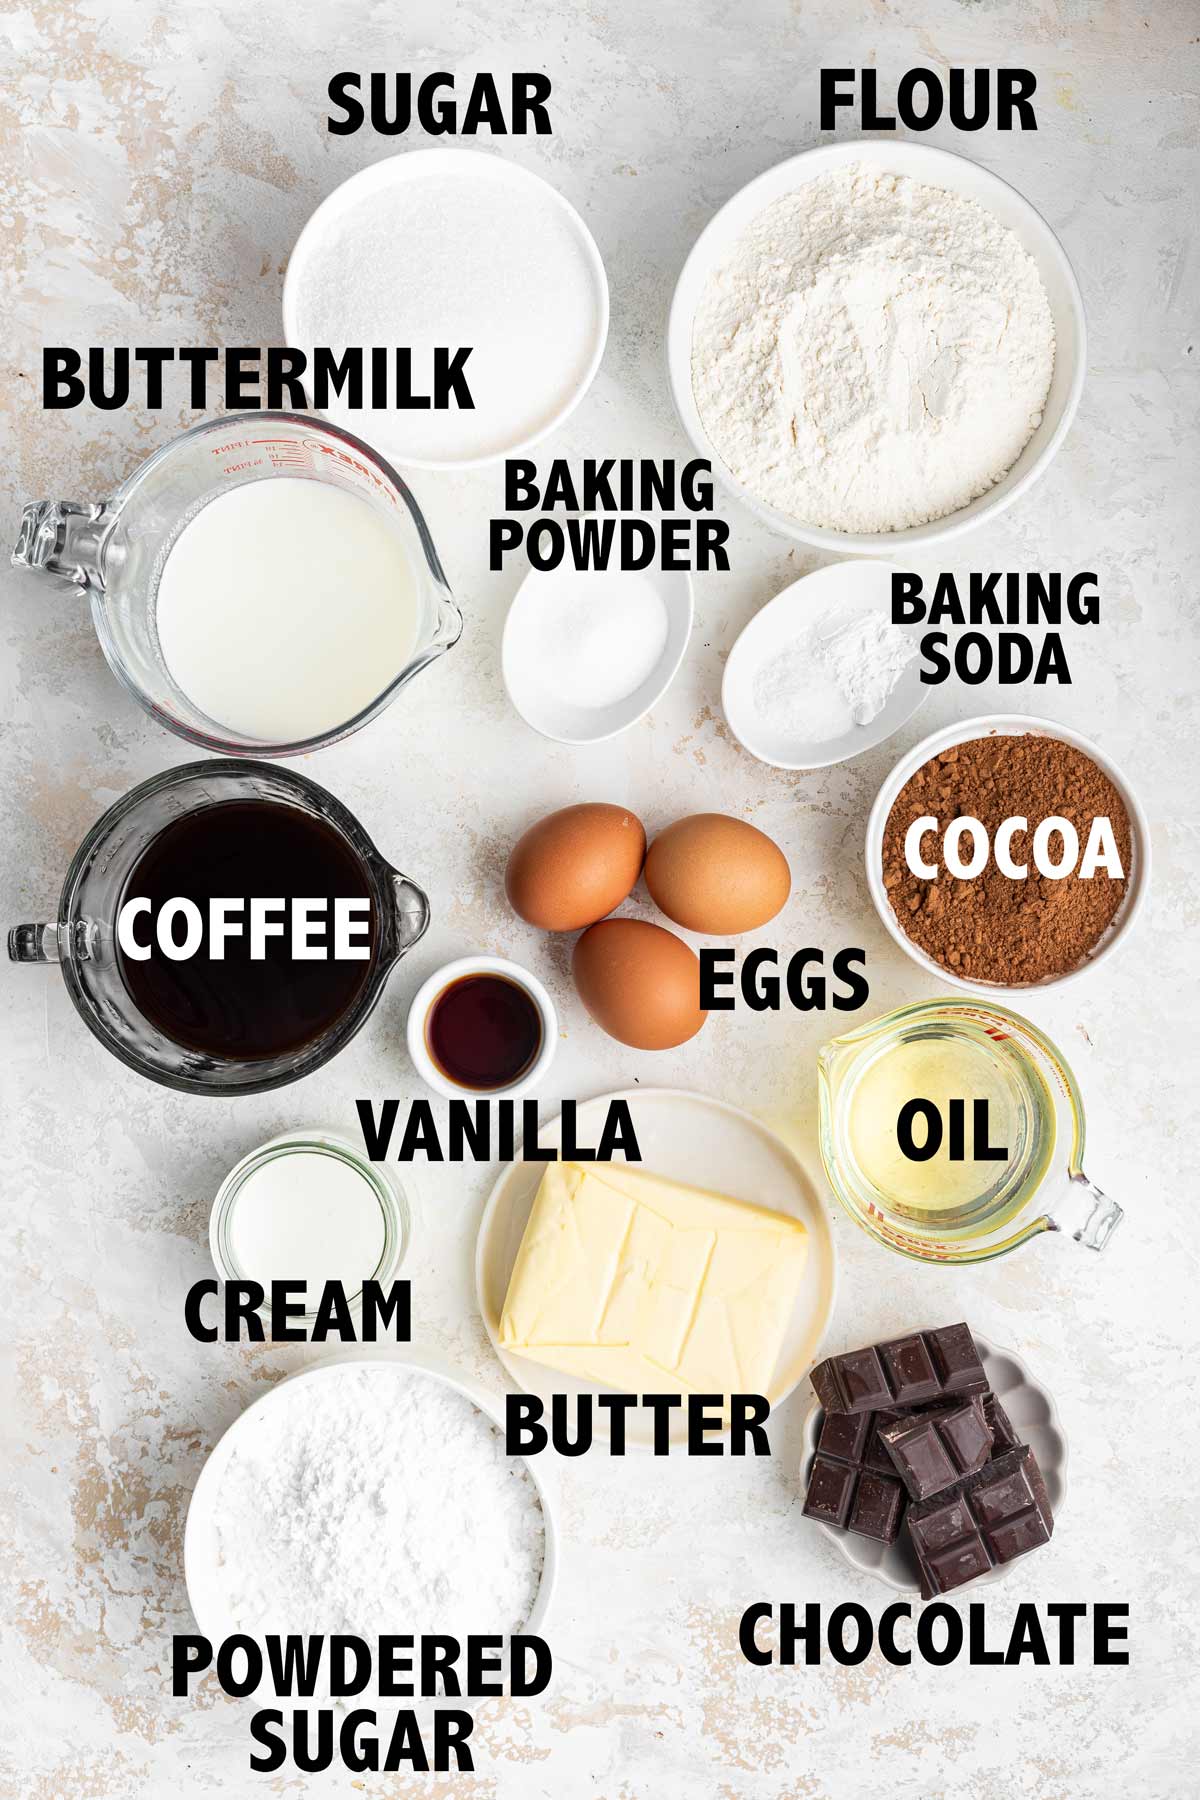
Let’s talk about the ingredients that go into making the best chocolate layer cake and how they all work together.
- All-Purpose Flour: Flour provides the structure of the cake, thanks to the gluten that develops when the protein from the flour combines with moisture and heat. To properly measure flour, use a spoon to scoop flour into the measuring cup and use a knife to level off, rather than scooping the flour directly into the measuring cup. To make this cake gluten-free, substitute a 1:1 gluten-free all-purpose baking mix.
- Granulated Sugar: In addition to making cakes sweet, sugar is important for keeping baked goods moist. Sugar and water form a bond, which means that our cake holds in additional water and won’t dry out. Sugar also increases the leavening ability of a cake.
- Unsweetened Natural Cocoa Powder: Natural cocoa powder is made from roasted and ground cocoa beans, and has an acidic pH.
- Baking Soda/Baking Powder: Because the cake uses natural cocoa powder and has an acidic pH, we’ll use both baking soda AND baking powder as chemical leavening agents.
- Eggs: Eggs are important for the structure of a cake, determining height and texture.
- Buttermilk: Buttermilk is also acidic, and further lowers the pH of the batter, which results in a cake that is more tender and moist.
- Hot Coffee: Coffee naturally makes chocolate taste even more chocolatey. Using hot coffee helps to bloom the cocoa powder – this releases the flavors trapped in the solid cocoa powder molecules. As the hot liquid mixes with the cocoa powder, the cocoa powder dissolves quickly.
- Vegetable Oil: Cocoa powder is very dry – we need lots of extra moisture to offset this. Vegetable oil hydrates better than butter, so we need an oil-based cake, rather than butter.
The end result here is a super chocolatey cake with an almost magically fluffy texture. It’s so good – and so, so easy!
Baking with Buttermilk
I often get questions about baking with buttermilk. Is it necessary? Can regular milk be substituted? Are there any alternatives? What is buttermilk? What else can you do with buttermilk if you buy a big container for one cake?
So let’s answer some of those questions.
Traditionally, buttermilk was the non-fat liquid left behind after churning butter. Today, buttermilk is usually cultured by inoculating fresh pasteurized milk with enzymes.
Storebought buttermilk is usually thicker and tangier than homemade variations (see below for homemade ideas!), so I recommend purchasing buttermilk when possible. Buttermilk freezes well, so you can always buy a large container and freeze in 1/2 or 1 cup amounts to pull out for future baking. Thaw frozen buttermilk overnight in the refrigerator.
If you find yourself in a jam, you can make buttermilk at home by adding 1 tablespoon of lemon juice or vinegar to 1 cup of low-fat milk. Let this stand at room temperature for 10 minutes, then stir and add to your recipe.
Why do we even use buttermilk instead of regular milk? It’s time for my favorite subject… kitchen chemistry!
Kitchen Chemistry
Buttermilk is slightly acidic, and lowering the pH of the batter helps to break down the long strings of gluten from the flour, leading to a cake that is more tender and moist. Buttermilk also helps to produce carbon dioxide when paired with baking soda which also helps with lighter and fluffier cakes.

Silky Smooth Chocolate Buttercream
Basic American-style buttercream is easy to make – but hard to perfect. It can be too greasy, too grainy, and often too sweet.
To make sure the buttercream isn’t too greasy, use room temperature butter. By “room temperature”, we actually mean a little on the cooler side – around 65 °F. The length of time you have to leave your butter out depends a lot on the weather. If it’s winter and your kitchen is 65 or 70°, it will take a lot longer than if it’s summer and your kitchen is in the upper 70s!
Let your butter sit out to warm up – don’t microwave it to warm up! Greasy buttercream frosting is the result of too-soft butter, which doesn’t blend with the powdered sugar in the same way.
Grainy buttercream wasn’t whipped long or fast enough. For the best, fluffiest buttercream, add the powdered sugar and a little heavy cream, then whip on high speed. Add more powdered sugar and more heavy cream and whip again.
To combat the often cloyingly sweet buttercream issue, add a pinch of salt.
Frosting Layer Cakes
The only tool you really need to decorate a cake is a spatula, but if you’ll be making layer cakes a few times a a year, there are a few tools that can definitely make the process a bit easier, which I’ll share here (links may be affiliate)!
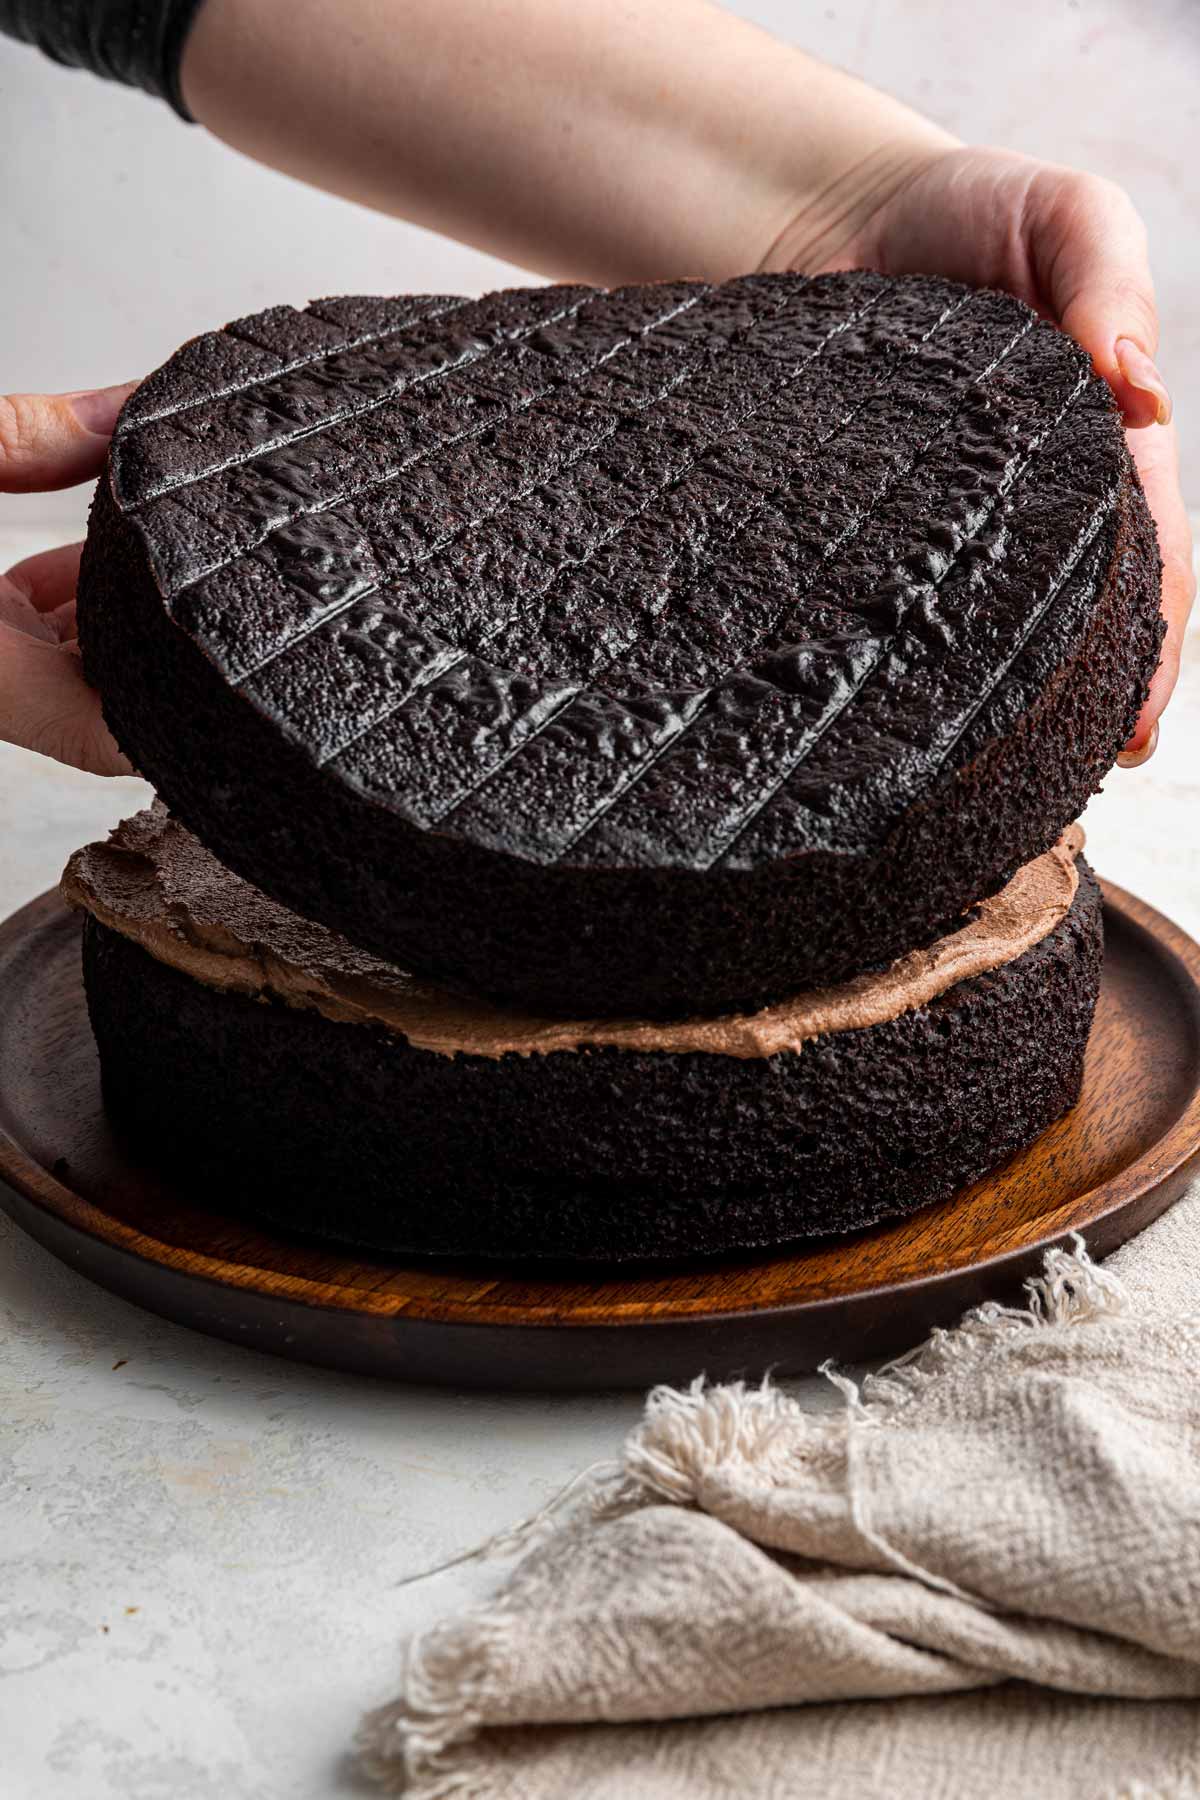
The first step to decorating layer cakes is starting with flat cake layers. You can achieve this by leveling cakes by cutting them flat or using Bake Even strips – my preferred method.
When it comes to smoothing on frosting, I find it’s much easier to decorate on a turntable. I recently “upgraded” to this still inexpensive aluminum rotating cake stand which works like a dream!
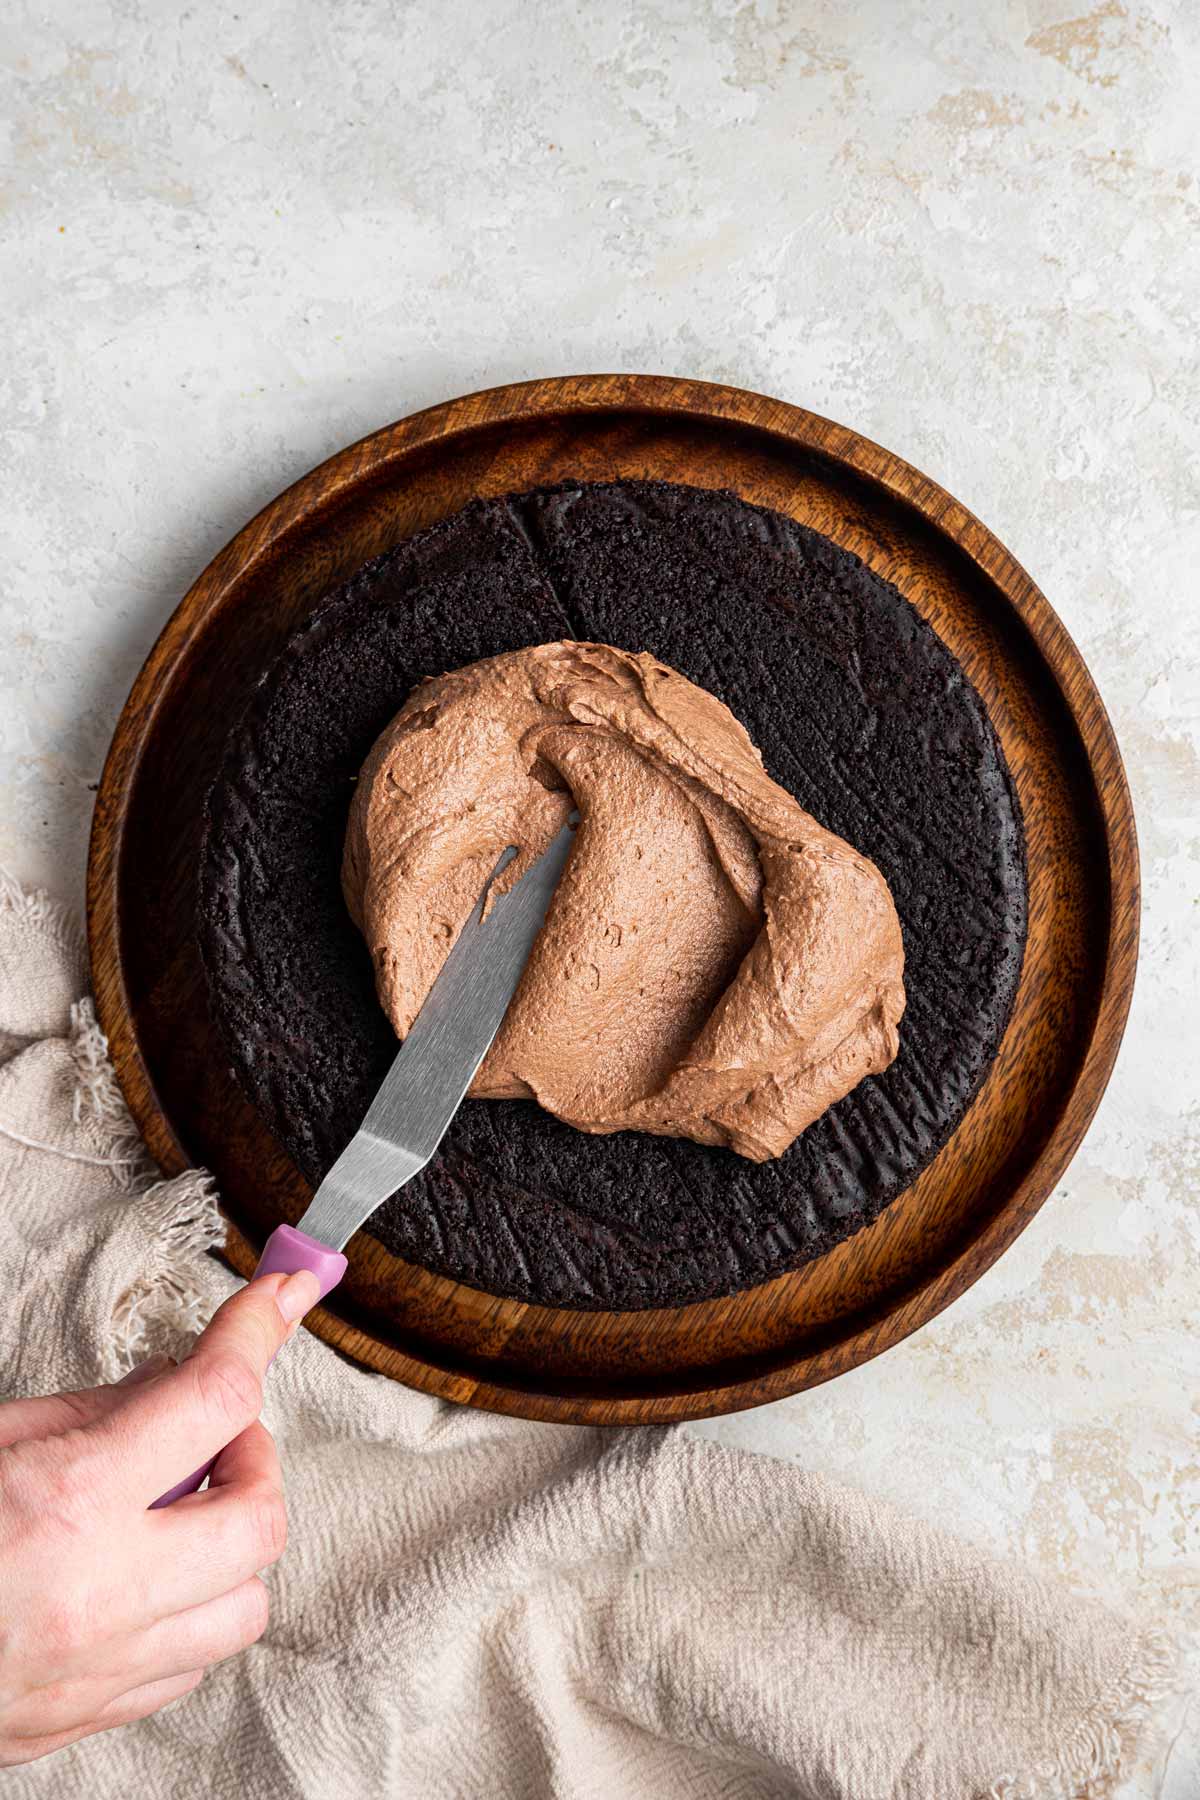
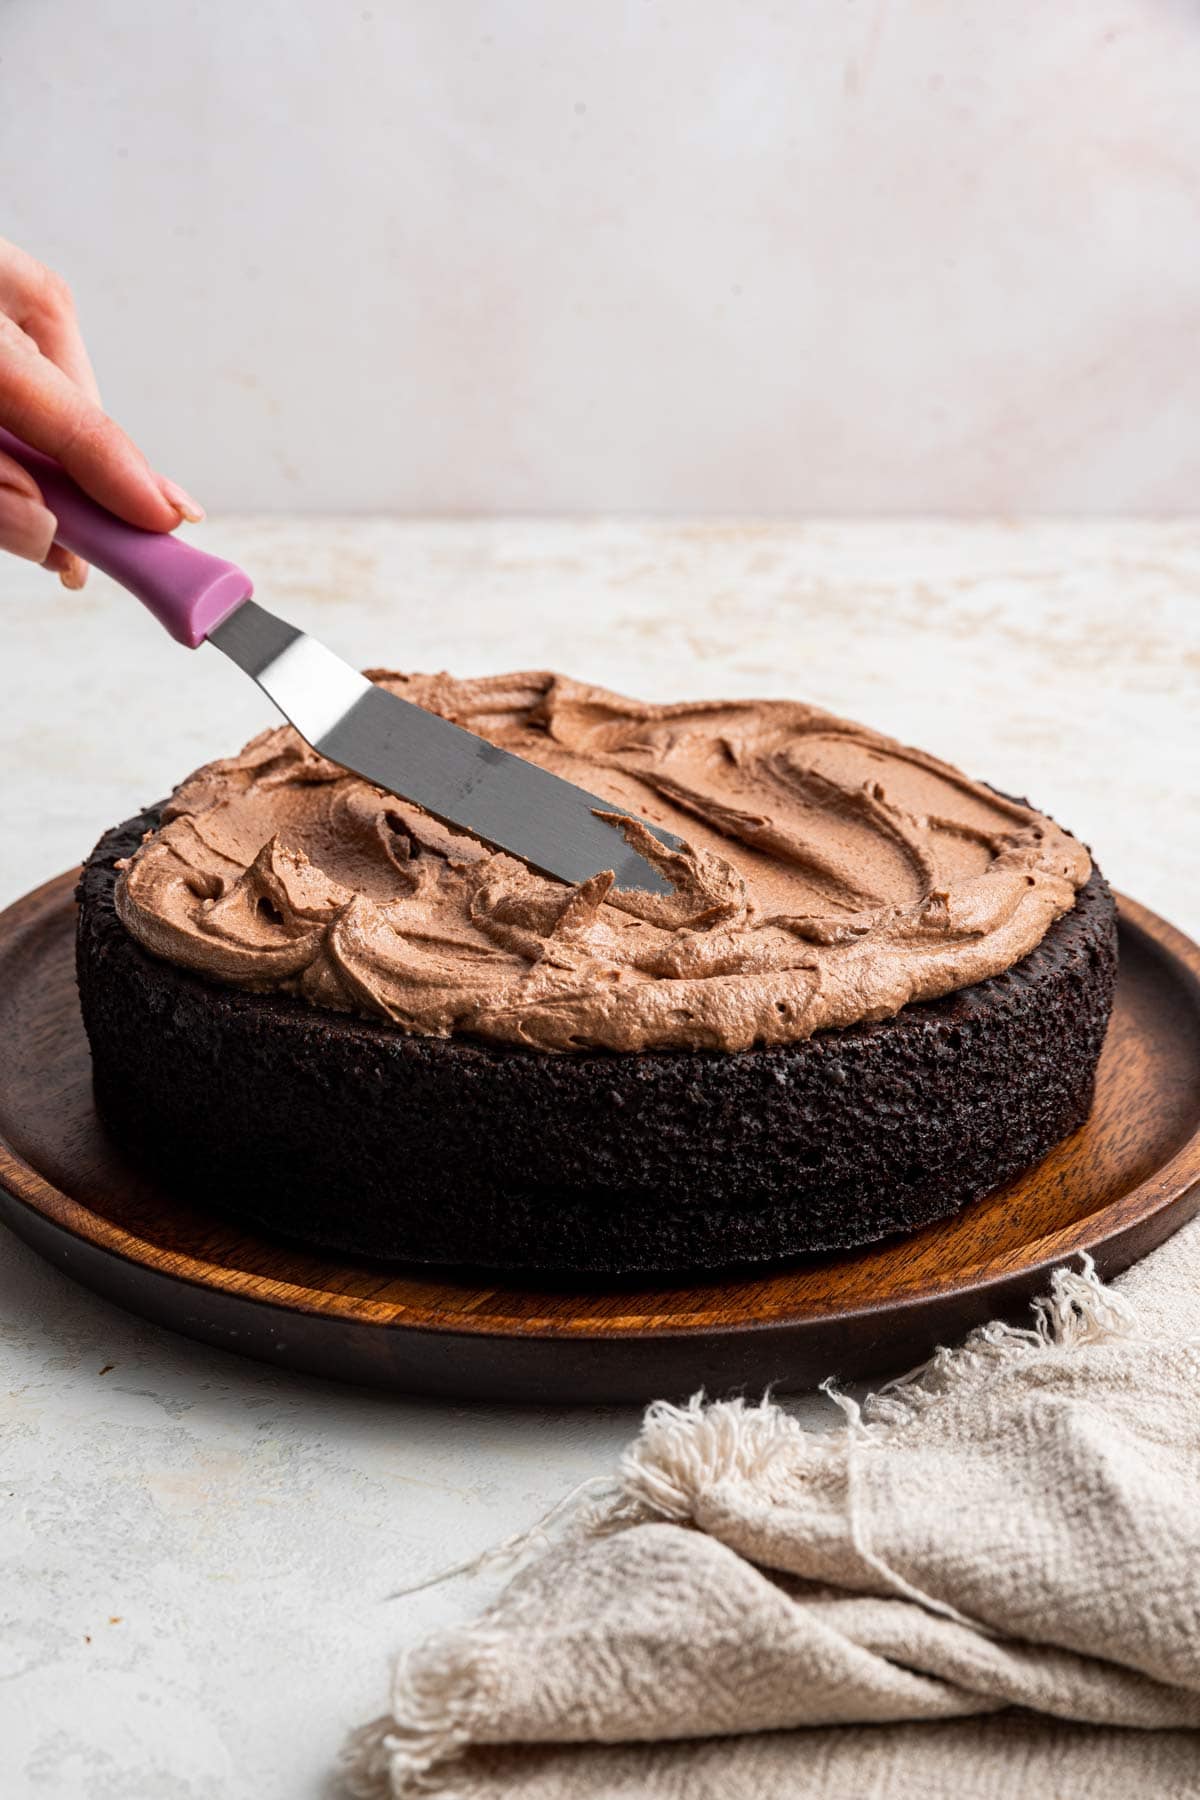
Place one layer of the cake on the cake stand and spread a layer of frosting on top. Spread the frosting across the cake using an offset spatula into an even layer. Place the next layer of cake on top and repeat, ending with the final layer of cake on top with the bottom of the cake facing upright.
Next, apply a crumb coat: a thin layer of frosting that holds together any crumbs from the cake. Spread a thin layer of frosting to the top and sides of the cake and refrigerate for 30 minutes (or longer – this can be done ahead of time, too!). This step catches those extra crumbs and traps them so they don’t show up in your final layer of frosting.
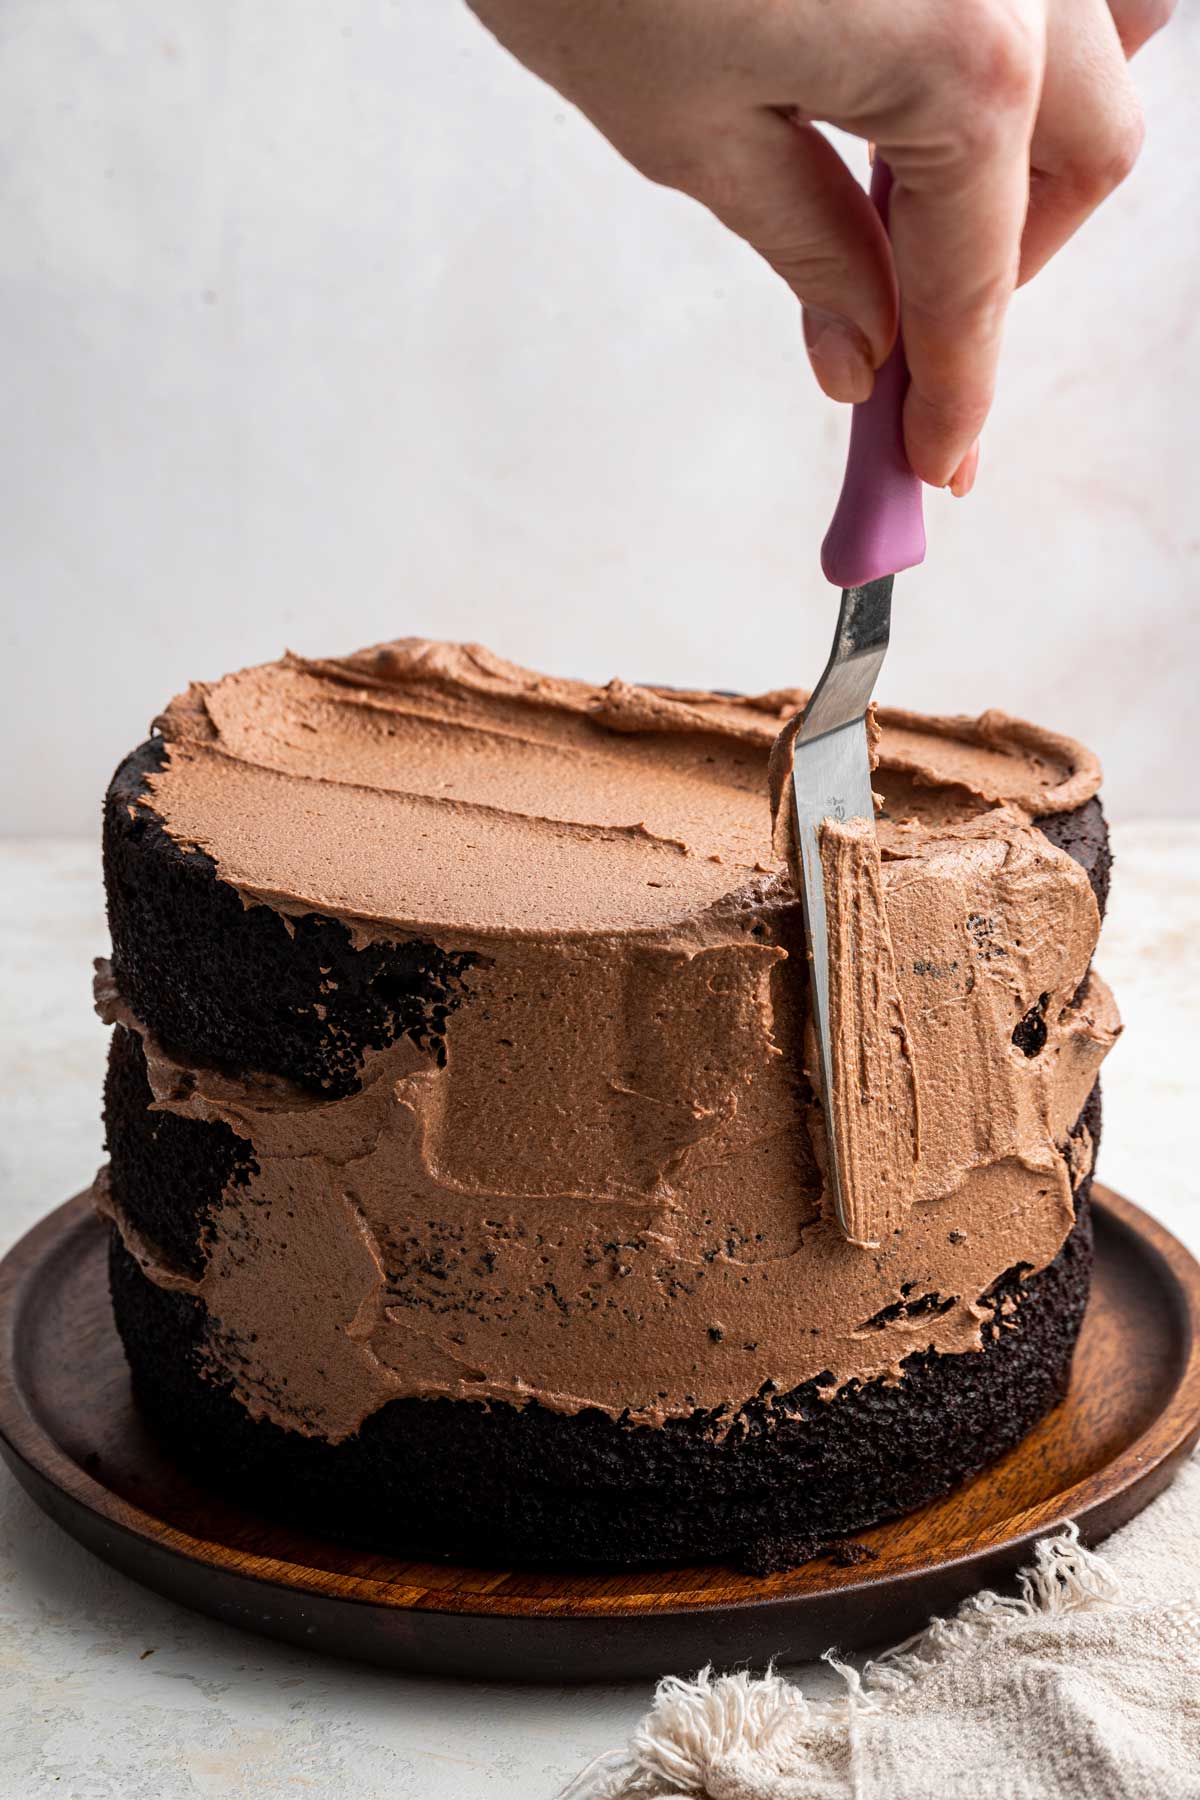
After the crumb coat has hardened, use the offset spatula to apply frosting to the sides of the cake and smooth it out. Rotate the cake on the turn table and smooth the frosting using either the offset spatula or a cake scraper. A cake scraper is one of the least expensive, most useful tools in my baking arsenal!
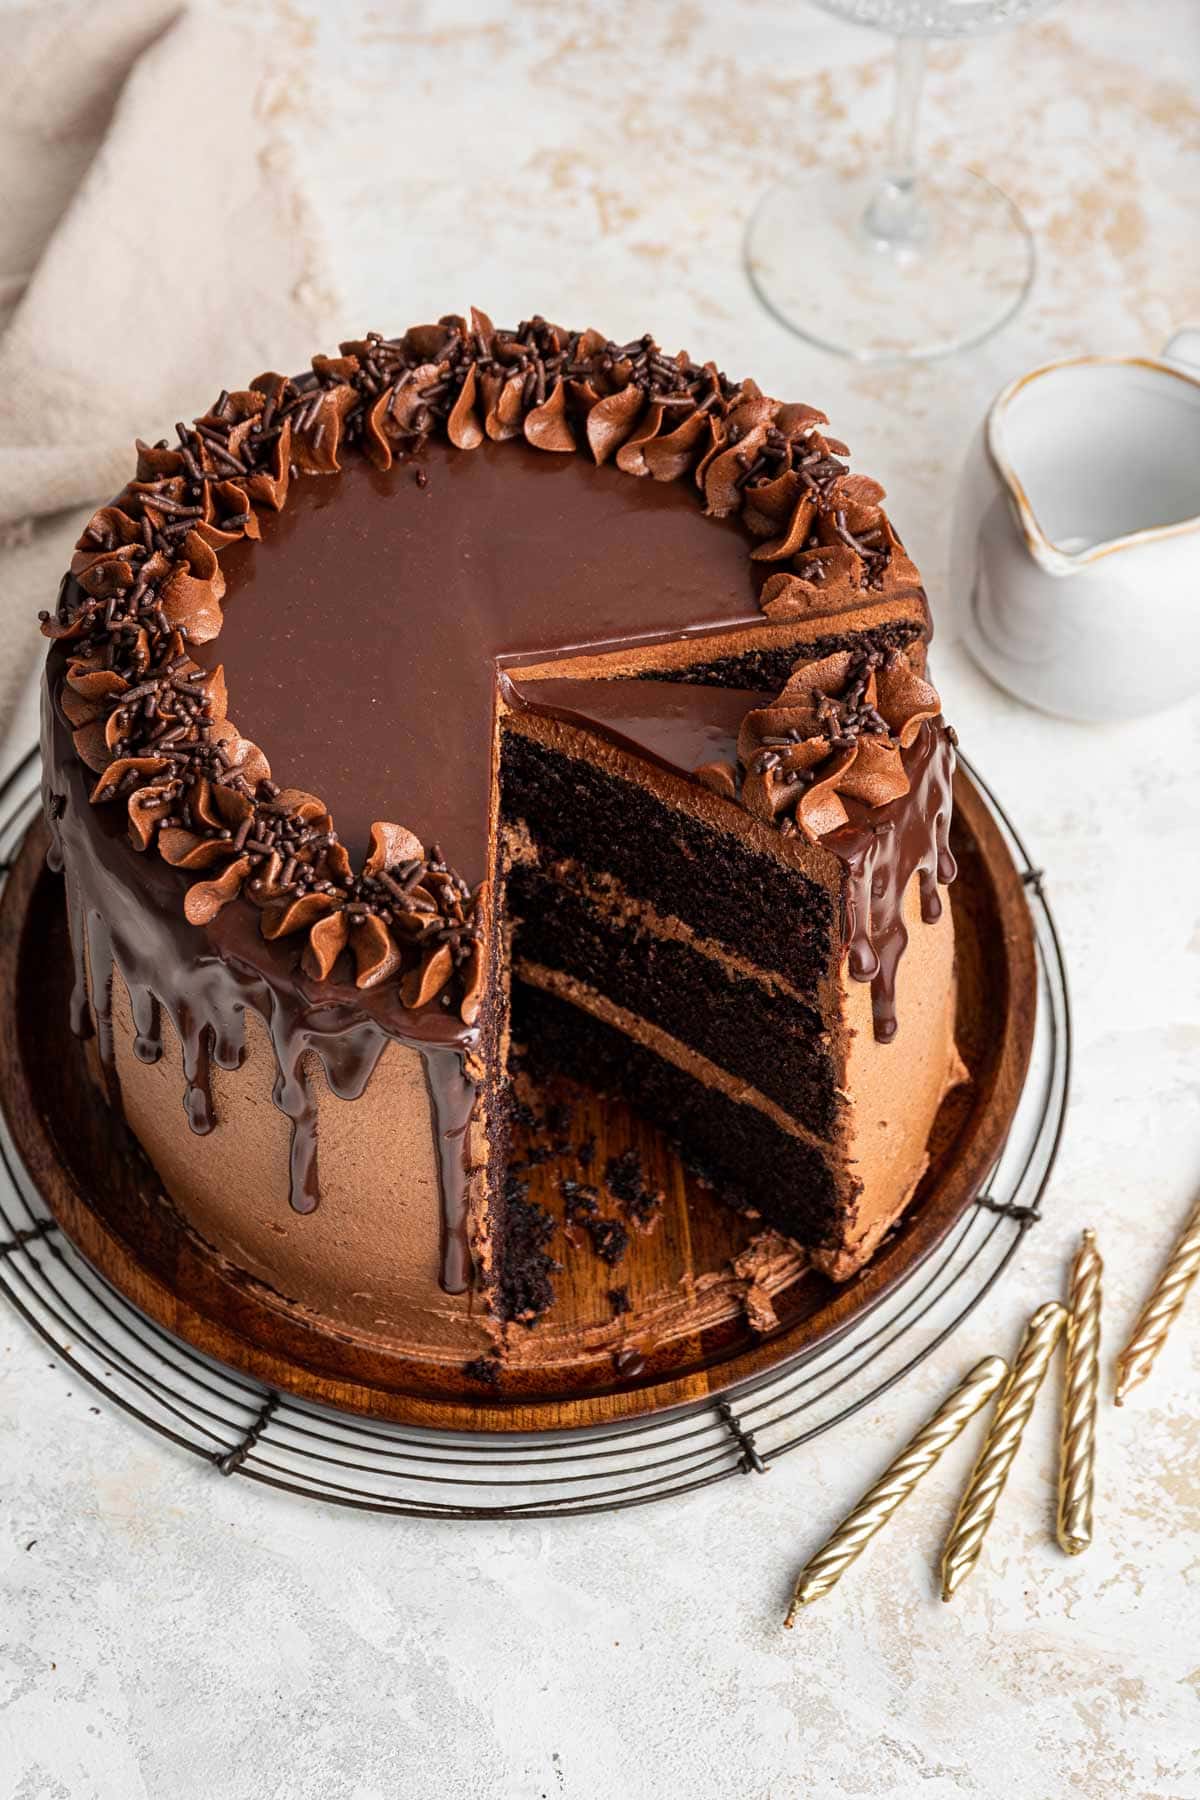
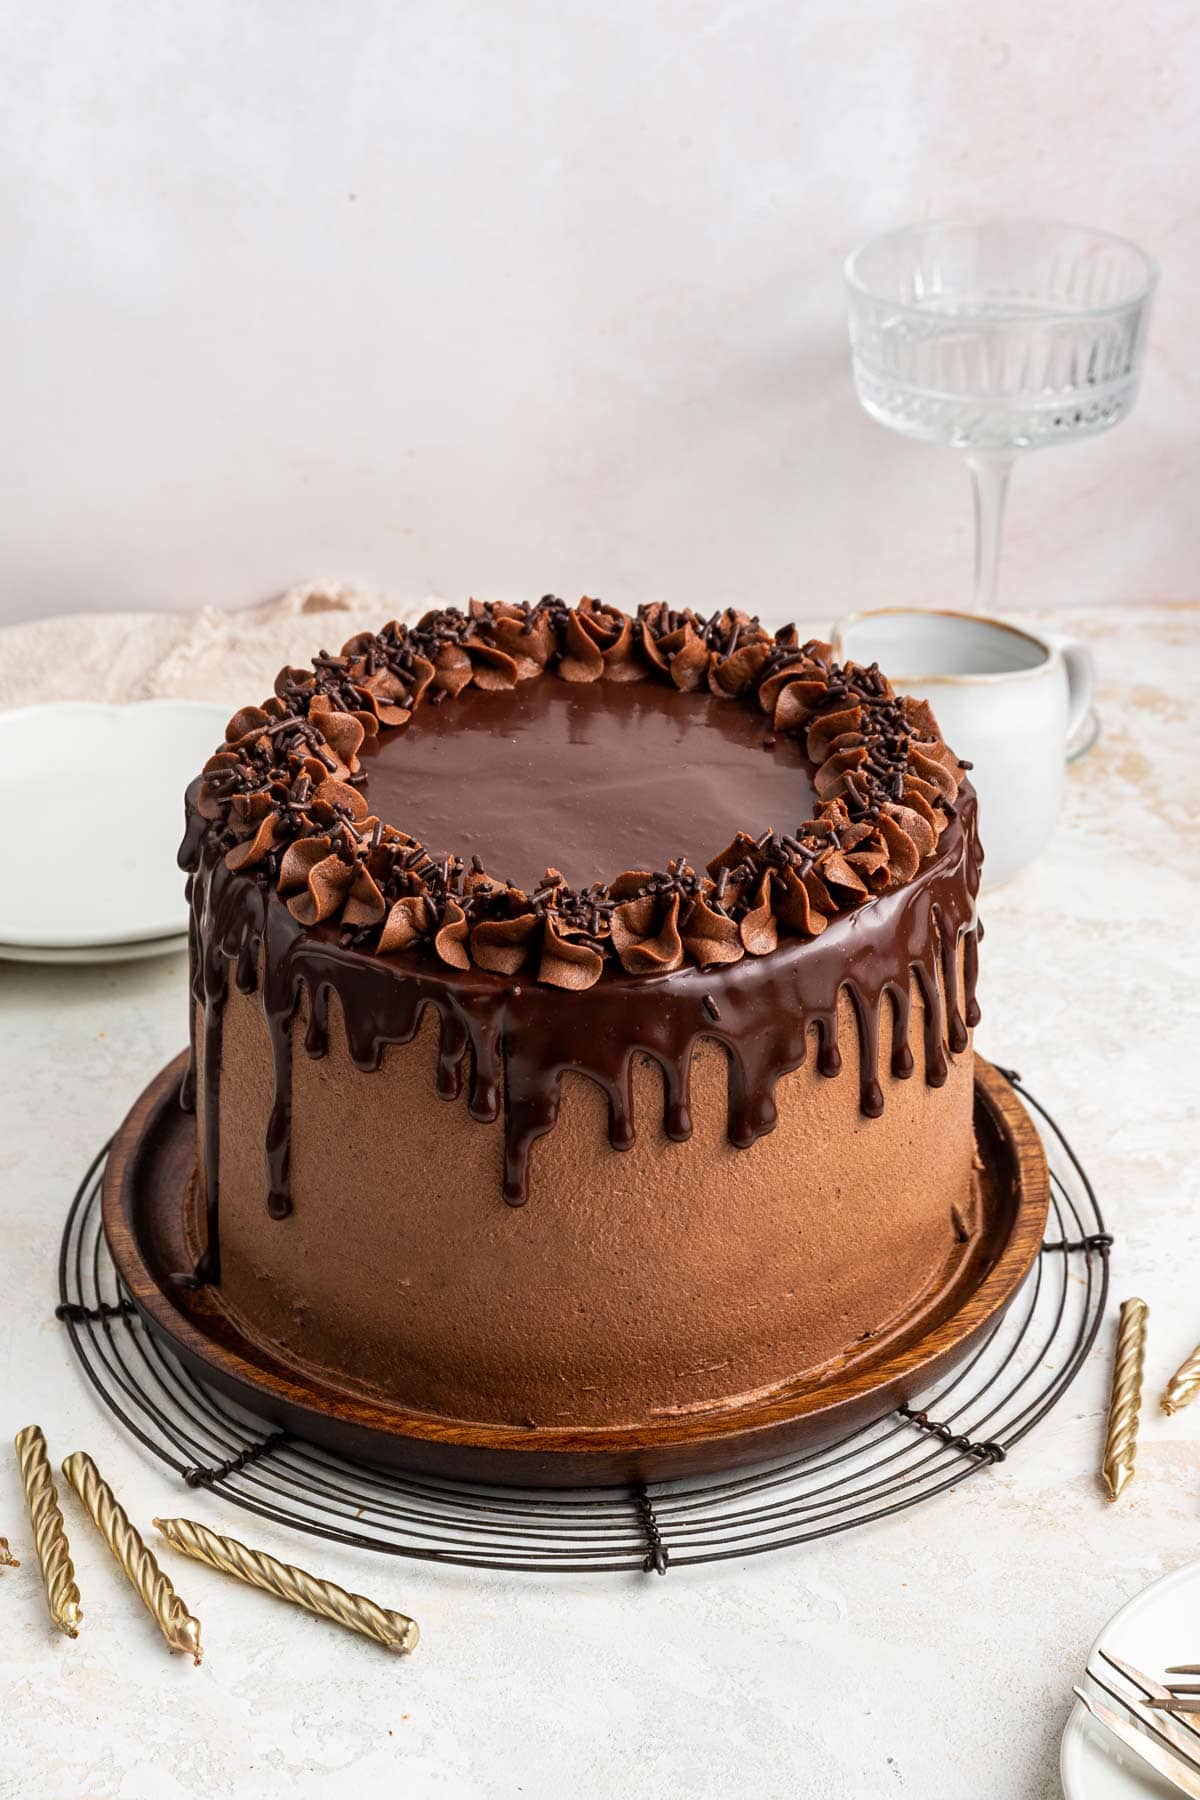
Next, pile some frosting on the top and smooth it out with a spatula. Wipe off the spatula with a paper towel as you go along the edges for a clean look — but for this particular cake, we’ll cover it with some chocolate ganache drizzle, so it doesn’t have to be perfect!
Chocolate Drizzle
For this particular chocolate layer cake, we’re topping it with a chocolate ganache drizzle. Chocolate ganache is SO easy to make — just microwave together chopped chocolate and heavy cream on low power and stir until melted — and really ups the chocolate factor on this cake.
To get the perfect drizzle, let the ganache cool a bit until lukewarm. Transfer into a piping bag (or a ziploc bag), snip off the corner, and let the chocolate ganache drip over the edge of the cake. Pour the rest of the ganache over the top of the cake, spread with a clean offset spatula, and decorate with sprinkles if desired.
Make-Ahead Chocolate Cake
Another reason this is my favorite chocolate layer cake? Everything can be made ahead of time! (And it’s just as delicious.) The layers of chocolate cake can be baked days (or months) in advance and the frosting can be made a day or two ahead of time.
Bake up to three days in advance and store in an airtight container, or wrap in aluminum foil and store in a freezer bag in the freezer for up to three months before frosting.
The frosting can be made up to two days in advance and stored in an airtight container in the refrigerator. Bring to room temperature before using to spread on the cake.
The entire cake can be assembled and decorated a day (or even two!) ahead of time before serving.
Storing Chocolate Cake
The sugar content in the buttercream frosting is high enough to delay bacterial growth, so the cake does not have to be refrigerated for short-term storage. This cake can be stored at room temperature for up to 3 days.
For longer-term storage, freeze individual slices of cake upright on a cookie sheet in the freezer. Once frozen solid, wrap the individual slice in a sheet of plastic wrap, followed by a sheet of aluminum foil, and store in a freezer bag for up to 3 months. To thaw, remove from the freezer bag, unwrap, and thaw at room temperature.
Tips and Tricks for The Best Chocolate Layer Cake
- To prevent the cake from sticking to the pans, spray the pans with nonstick baking spray (or butter and flour), line with parchment paper, and spray again. This is more effective than either buttering and flouring or parchment paper alone.
- For perfectly even cake layers, weigh the batter of the cake and divide it into three baking pans.
- For perfectly flat, non-domed cakes, use Bake Even Strips (or wet cloths soaked in water and wrapped around the outside of the cake pans).
- Cool cake layers completely before frosting — the frosting will melt if the cakes are even a little warm!
- Short on time? All components of this cake can be made ahead of time. The cake layers can be baked and frozen for up to 3 months. The buttercream frosting can be made up to two days ahead of time. The cake can be assembled a day or two before.
- Start frosting the cake with a crumb coat — a thin layer of frosting — which will help hold any crumbs from the side of the cake in place.
- To prevent the cut cake from getting stale, wrap leftover slices in plastic wrap or push wax paper against the exposed edge to minimize contact with air.
More Layer Cake Recipes
- Chocolate Oreo Cake
- Lemon Curd Cake with Blackberry Buttercream Frosting
- Strawberry Layer Cake with Whipped Cream Frosting
- Carrot Cake with Lemon Cinnamon Cream Cheese Frosting
- Chocolate Hazelnut Cake
- Vanilla Layer Cake with Blueberry Cardamom Curd
- Chocolate Peanut Butter Cup Cake
- All Cake Recipes »
Best Chocolate Layer Cake
Everyone needs a great homemade cake recipe, and this is the best chocolate layer cake! The recipe is easy to make and always turns out perfectly.
Ingredients
For the Cake:
- 2 3/4 cups (330 grams) all-purpose flour
- 3 cups (596 grams) granulated sugar
- 1 cup (84 grams) natural unsweetened cocoa powder
- 1 tablespoon baking soda
- 1 1/2 teaspoon baking powder
- 1 1/2 teaspoon salt
- 3 large eggs, room temperature
- 1 1/2 cups (341 grams) buttermilk
- 1 1/2 cups (341 grams) hot coffee
- 3/4 cup (149 grams) vegetable oil
- 1 tablespoon vanilla extract
For the Buttercream Frosting:
- 1 1/2 cups (339 grams) unsalted butter, room temperature
- 1 cup (84 grams) natural unsweetened cocoa powder
- 5 cups (568 grams) confectioners' sugar
- 1/2 cup (113 grams) heavy cream
- 2 teaspoons vanilla extract
- 1/2 teaspoon salt
For the Ganache
- 7 ounces (198 grams) dark chocolate, chopped
- 2/3 cup (151 grams) heavy cream
- chocolate sprinkles, for decorating
Instructions
- Preheat the oven to 350 °F. Grease and flour (or spray with nonstick baking spray) three 8-inch round cake pans. Line the pans with parchment paper, then spray or grease and flour again.
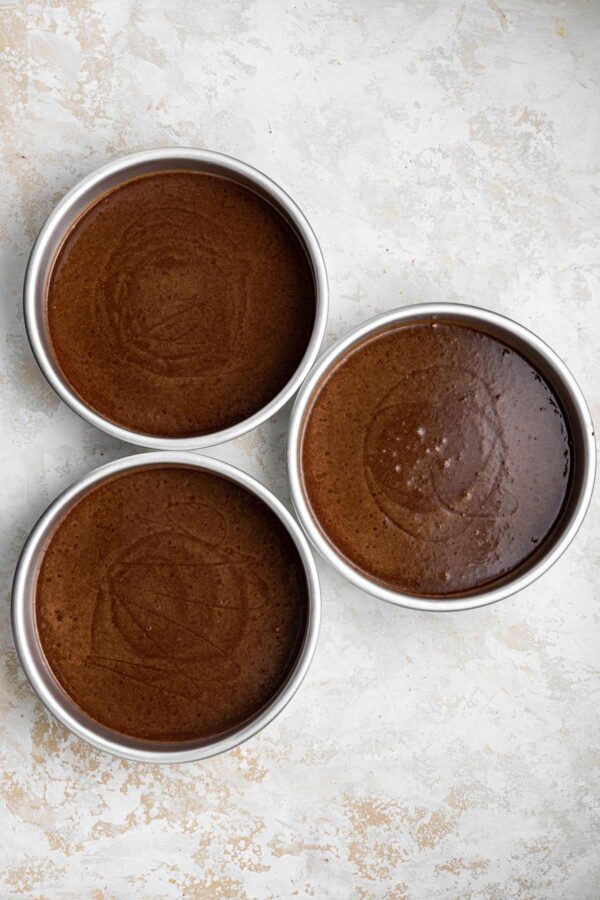
- Make the cake batter. Using a mixer, combine together the flour, sugar, cocoa powder, baking soda, baking powder, and salt in a large bowl. In a separate smaller bowl, whisk together the eggs, buttermilk, coffee, oil, and vanilla extract. Add the wet ingredients to the dry ingredients and mix on low speed until combined, about 2 minutes. The batter will be quite thin.
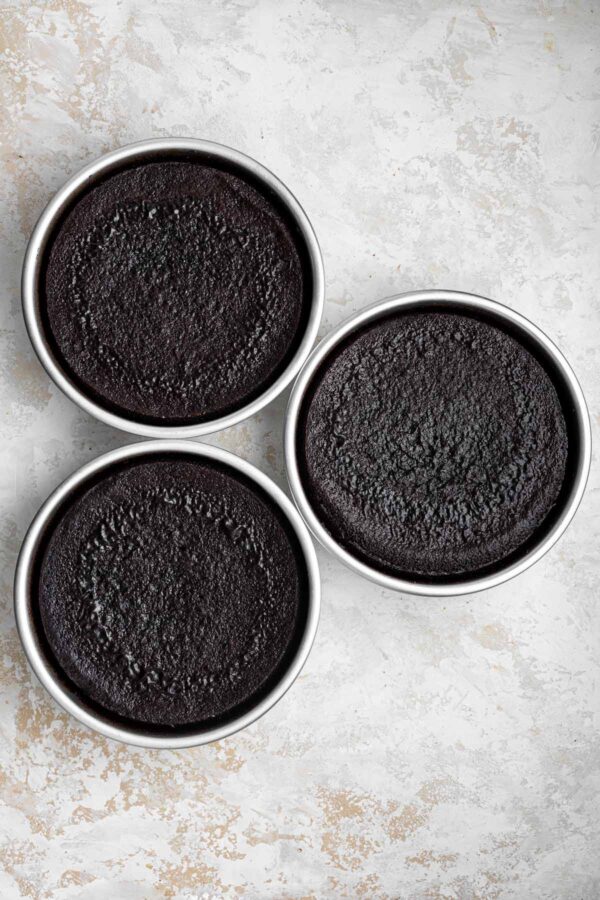
- Bake the cake batter. Divide the batter evenly among the three pans. Bake for 30 minutes, or until a toothpick inserted into the center of the cake comes out with a moist crumb. Cool the cakes in the pan for 20 minutes, then turn out onto cooling racks to cool completely before frosting.
- Make the frosting. To make the frosting, cream together the butter and cocoa powder using a mixer on medium high speed until well combined, 2 to 3 minutes. Add one cup of the confectioners sugar and one tablespoon of the heavy cream. Turn the mixer to high and mix for one minute. Add another cup of the confectioners sugar and tablespoon of the heavy cream, turn the mixer back on to high and mix for one minute. Repeat until all the sugar and cream have been added. Add the vanilla extract and salt and mix on high for one additional minute. If the frosting is too dry, add an additional tablespoon or two of heavy cream; if the frosting is too runny, add an additional tablespoon or two of confectioners sugar.
- Assemble the cake. Level the cakes if necessary. Cover the bottom layer of cake with 1 cup of the frosting. Top with a second cake layer and cover with another cup of the frosting. Place the final layer on top of the cake, face down, and frost with a thin layer of the cake. Refrigerate for 30 minutes to set the frosting, then use the remaining frosting to spread on the sides and top of the cake. Refrigerate to set the frosting.
- Prepare the chocolate ganache. Microwave the heavy cream on 50% power for 30 second increments or heat on the stovetop in a small saucepan until it just comes to a boil. Place the chopped chocolate in a glass mixing bowl and pour the cream over the chocolate. Allow this mixture to sit for 2 minutes to melt the chocolate, and then whisk from the center outside until the ganache is smooth. Set aside to cool, whisking occasionally, until the ganache has thickened but is still pourable, 10 to 15 minutes. Transfer the ganache into a piping bag, snip off the corner, and drip the ganache along the edge of the cake, encouraging the ganache to run down the sides. Pour the remaining ganche into the center of the cake. Decorate with chocolate sprinkles, if desired. Refrigerate until the ganache is set, at least 30 minutes.
Notes
- For even cake layers, weigh the batter of the cake and divide into three baking pans.
- For flat, non-domed cakes, use Bake Even Strips.
- Cool cake layers completely before frosting.
- All components of this cake can be made ahead of time. The cake layers can be baked and frozen for up to 3 months. The buttercream frosting can be made up to two days ahead of time. The cake can be assembled a day or two before.
- Leftover cake can be stored at room temperature for up to 3 days, refrigerated for up to 5 days, or frozen for up to 3 months.
Recommended Products
As an Amazon Associate and member of other affiliate programs, I earn from qualifying purchases.

This recipe was originally published October 18th, 2019 and was updated with new photos and helpful tips in September 2023.