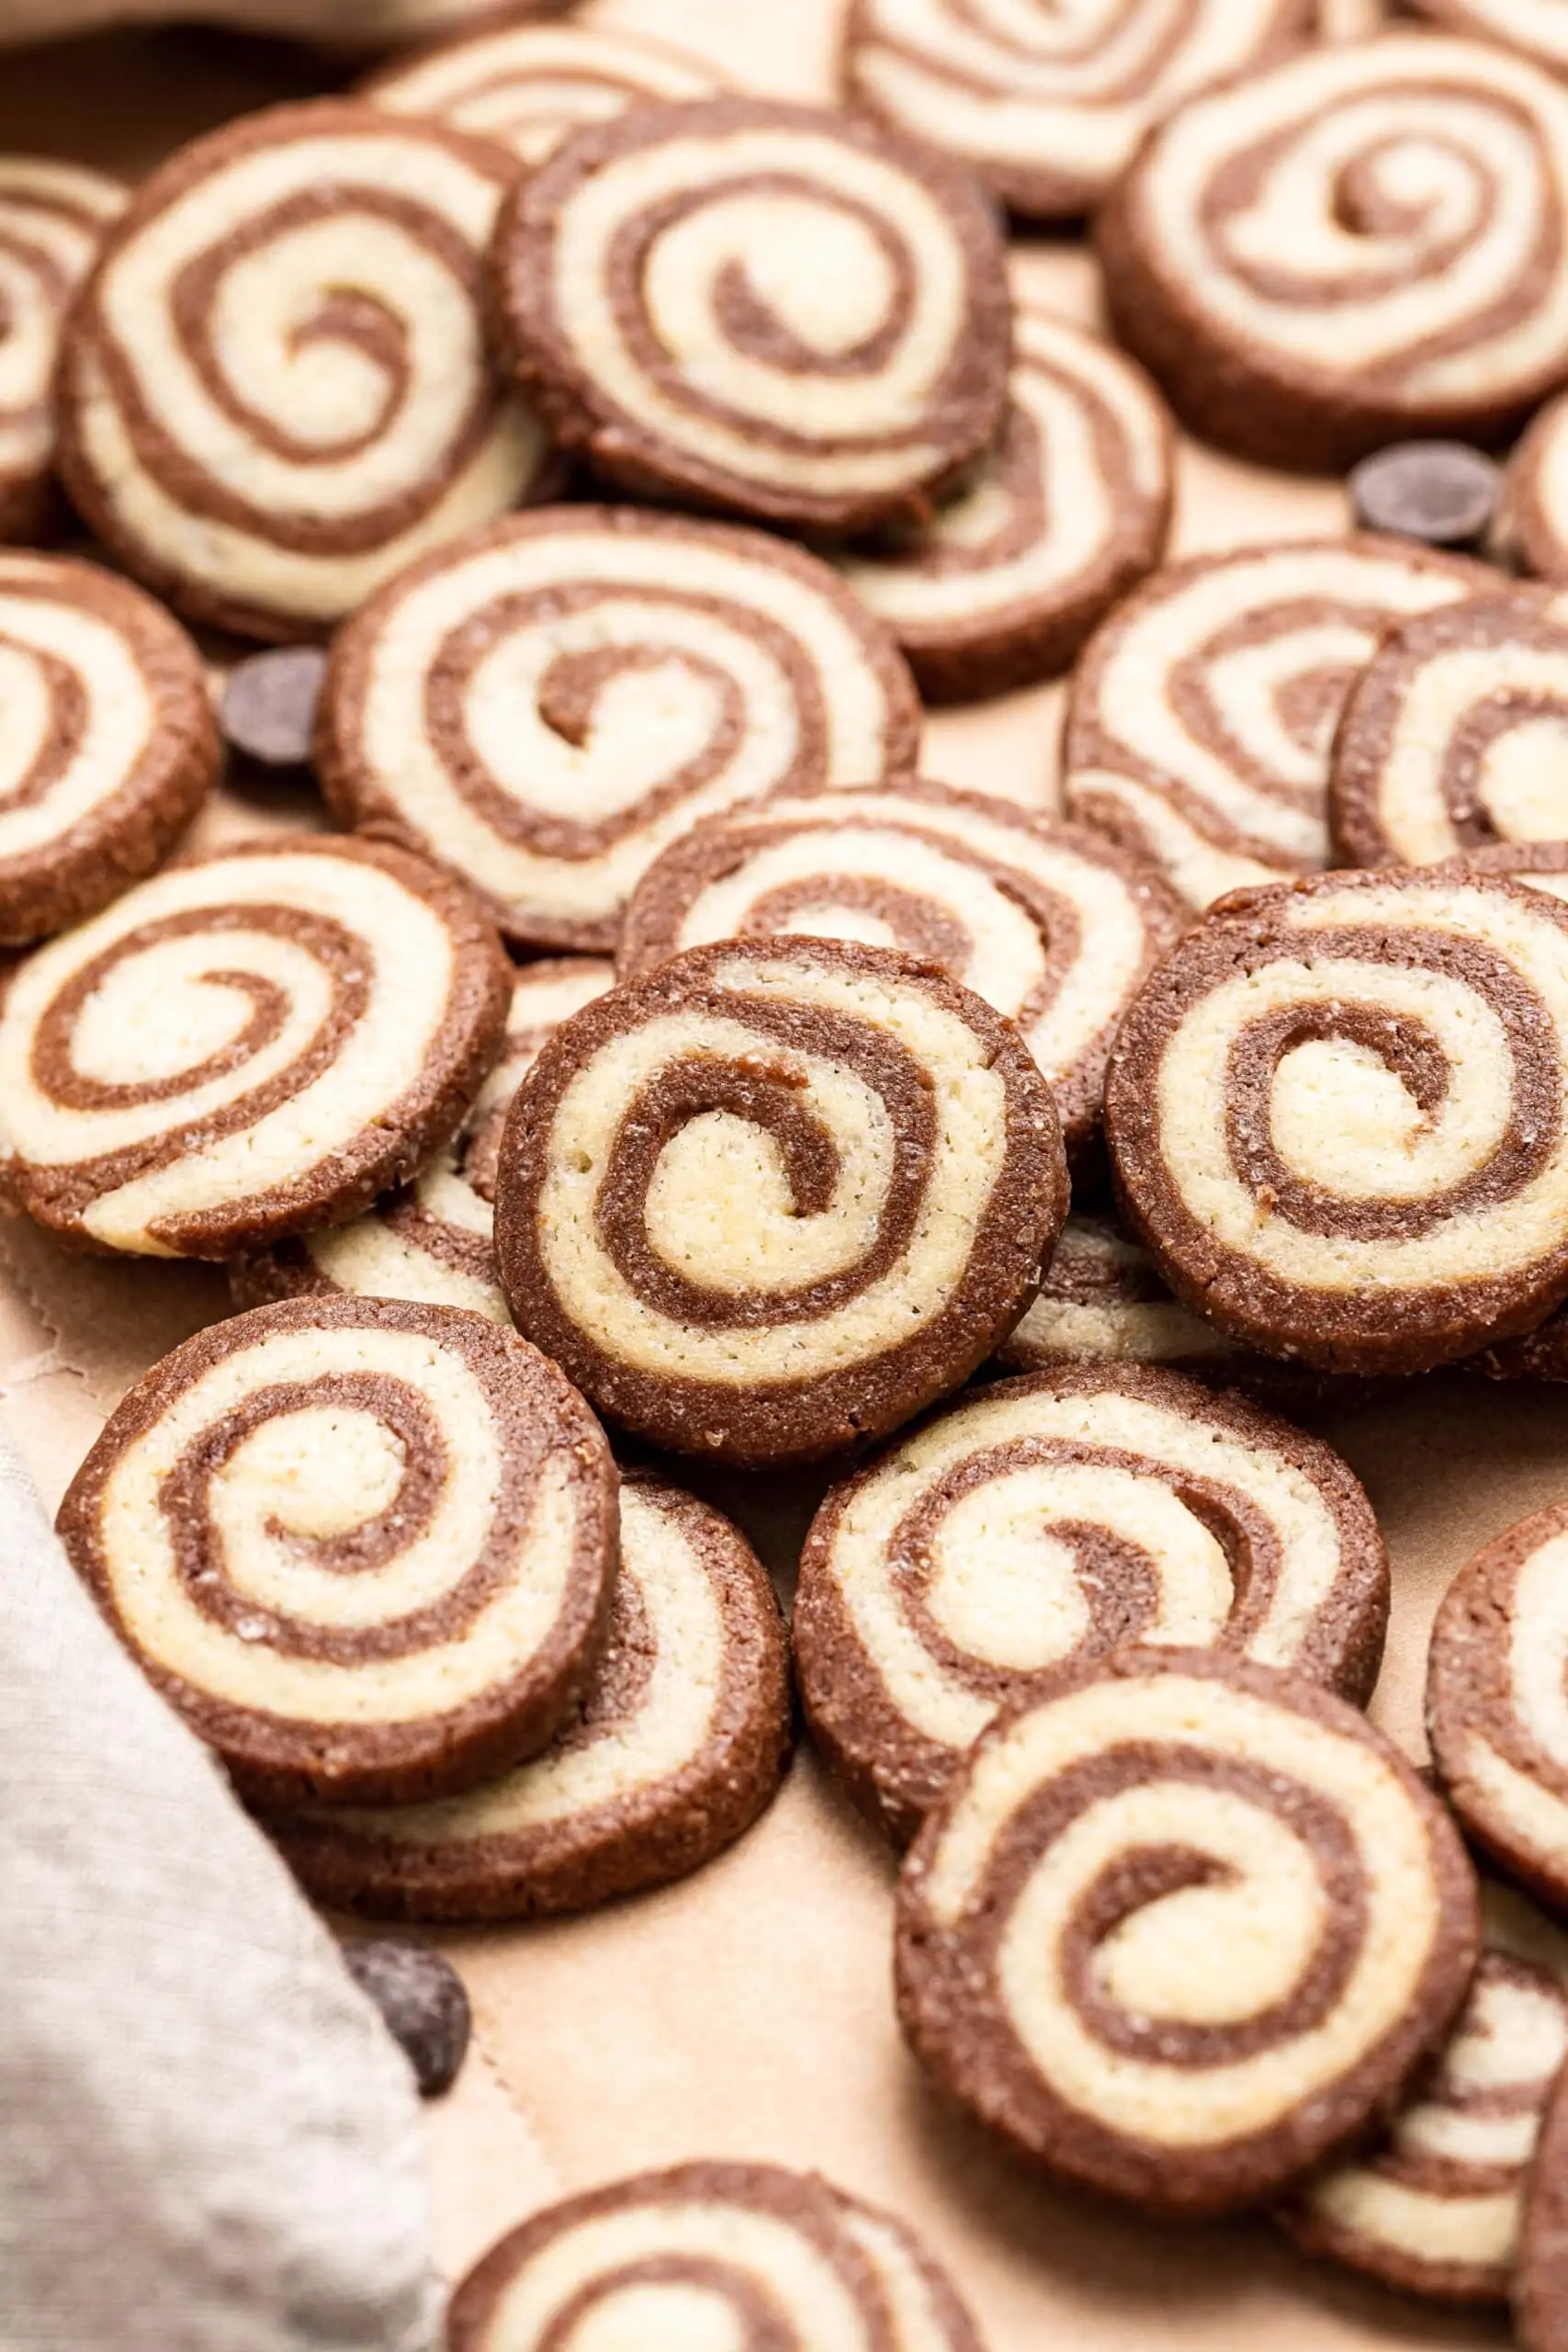
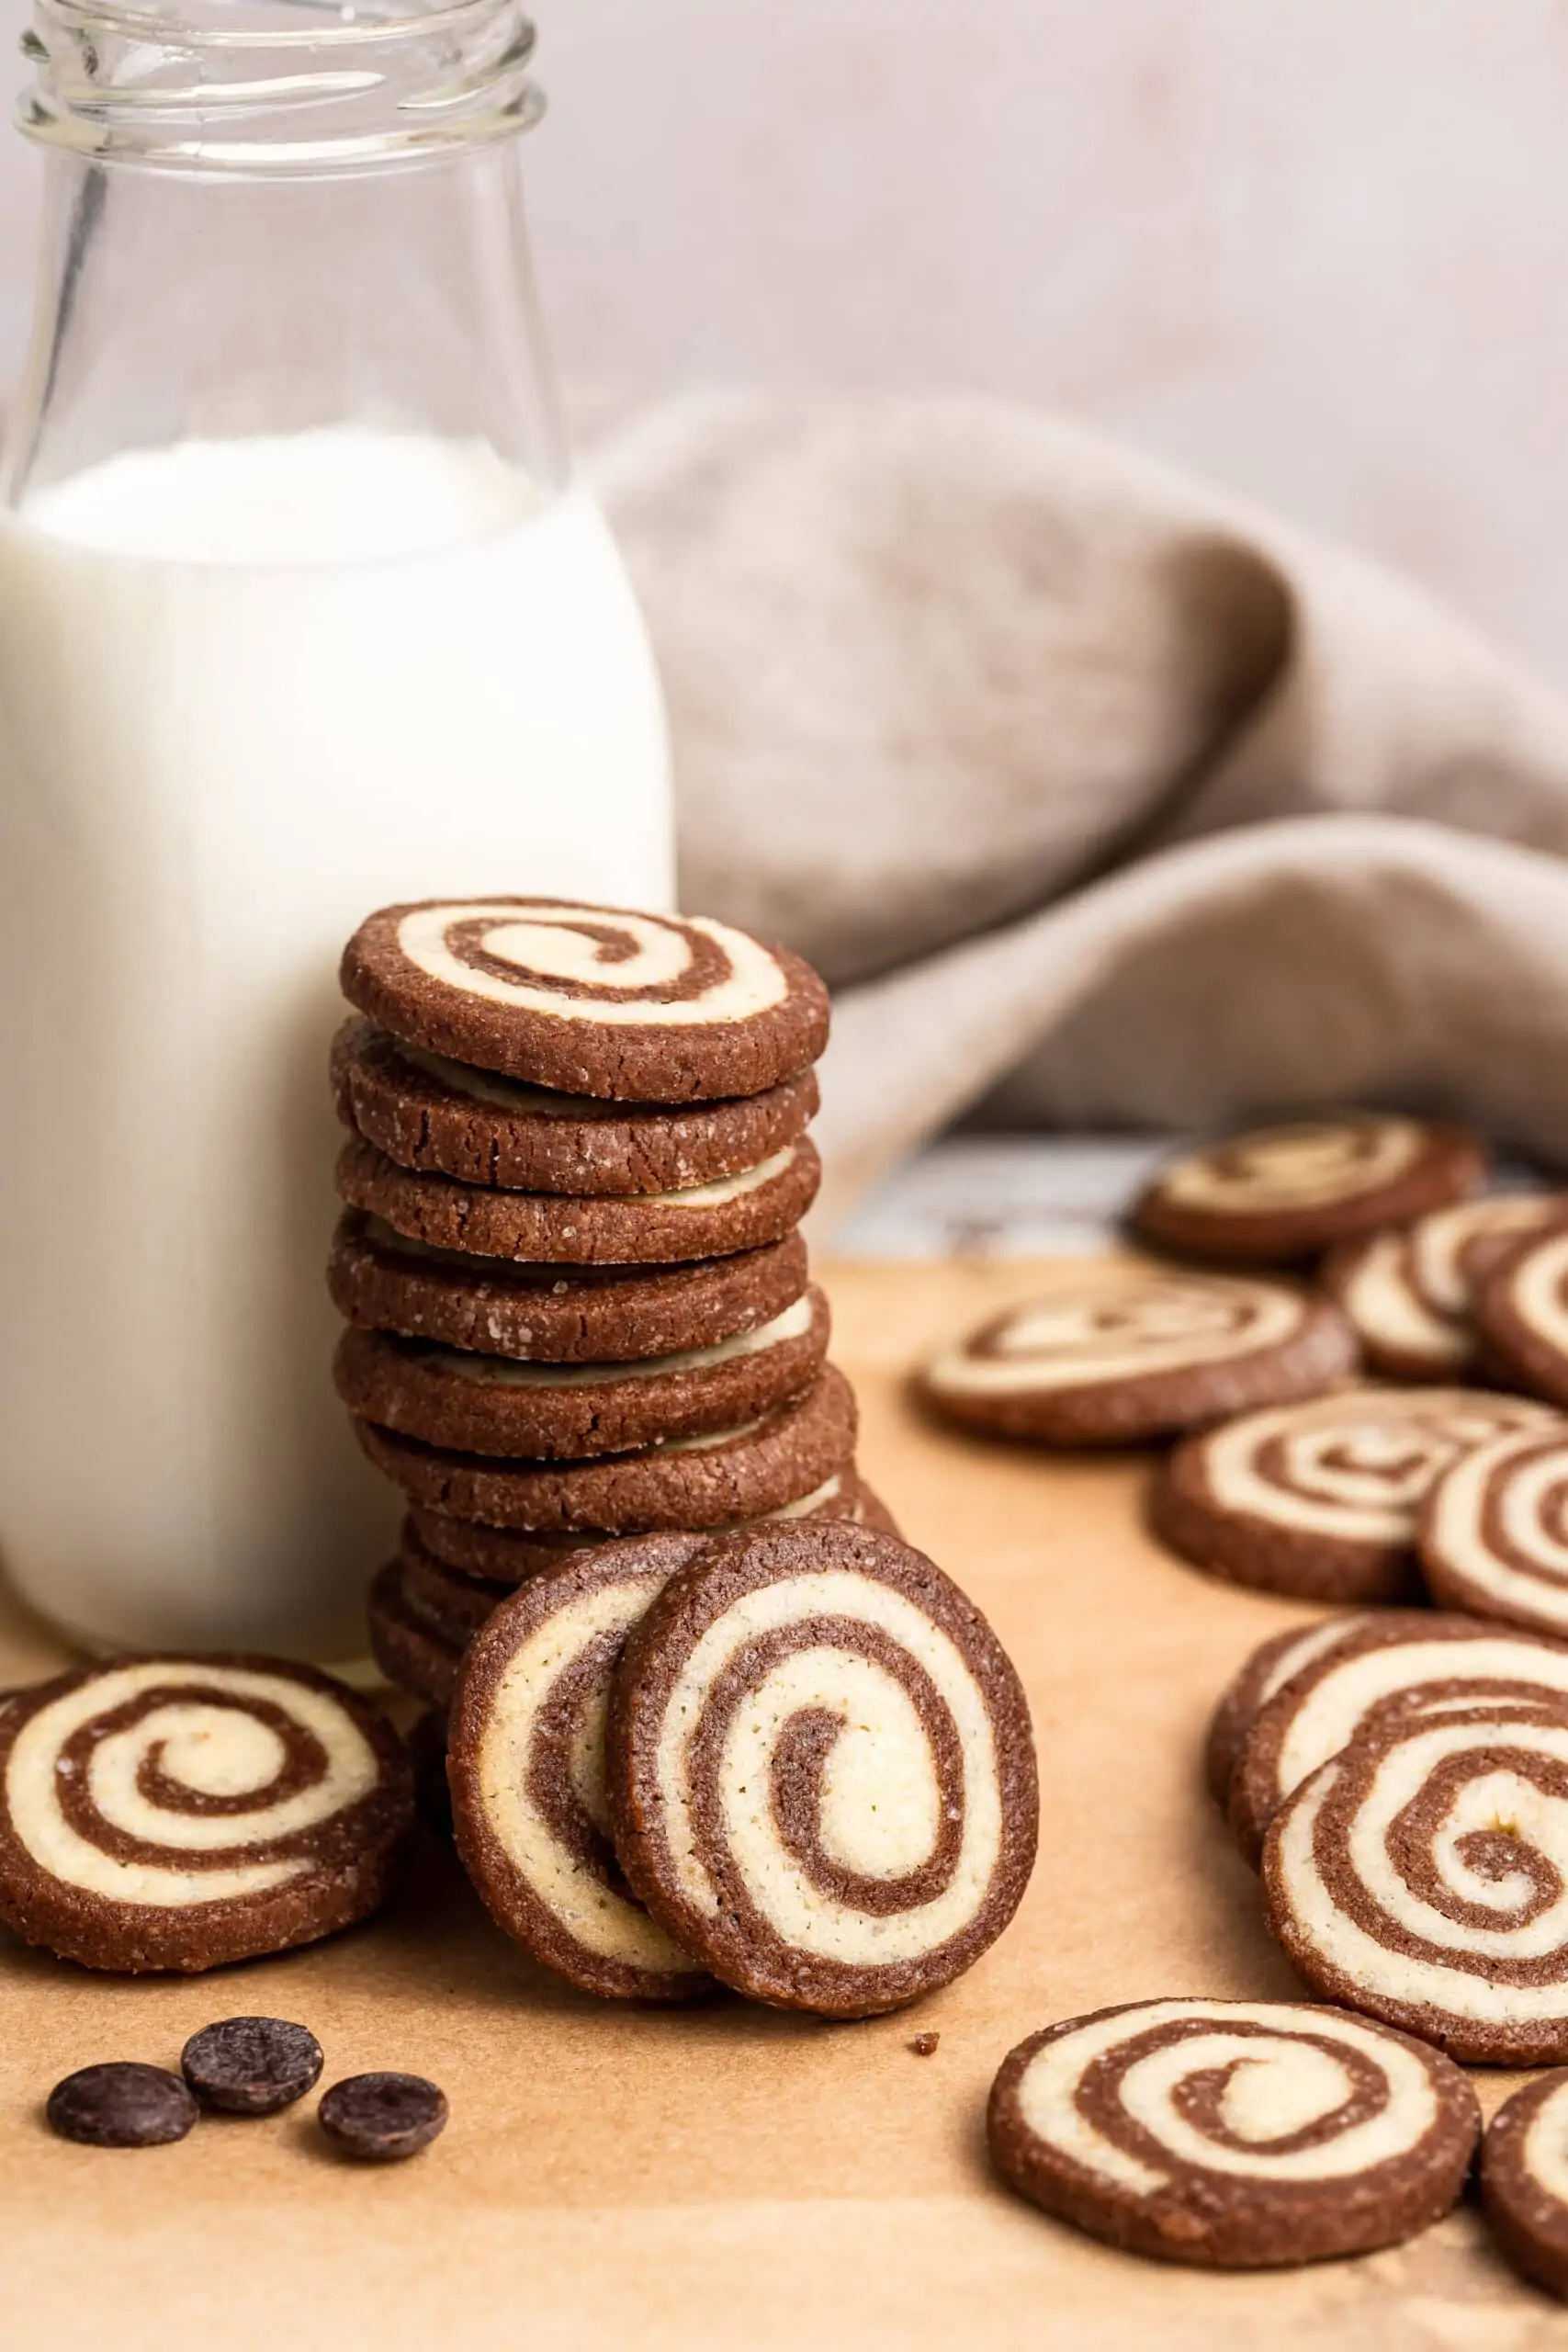
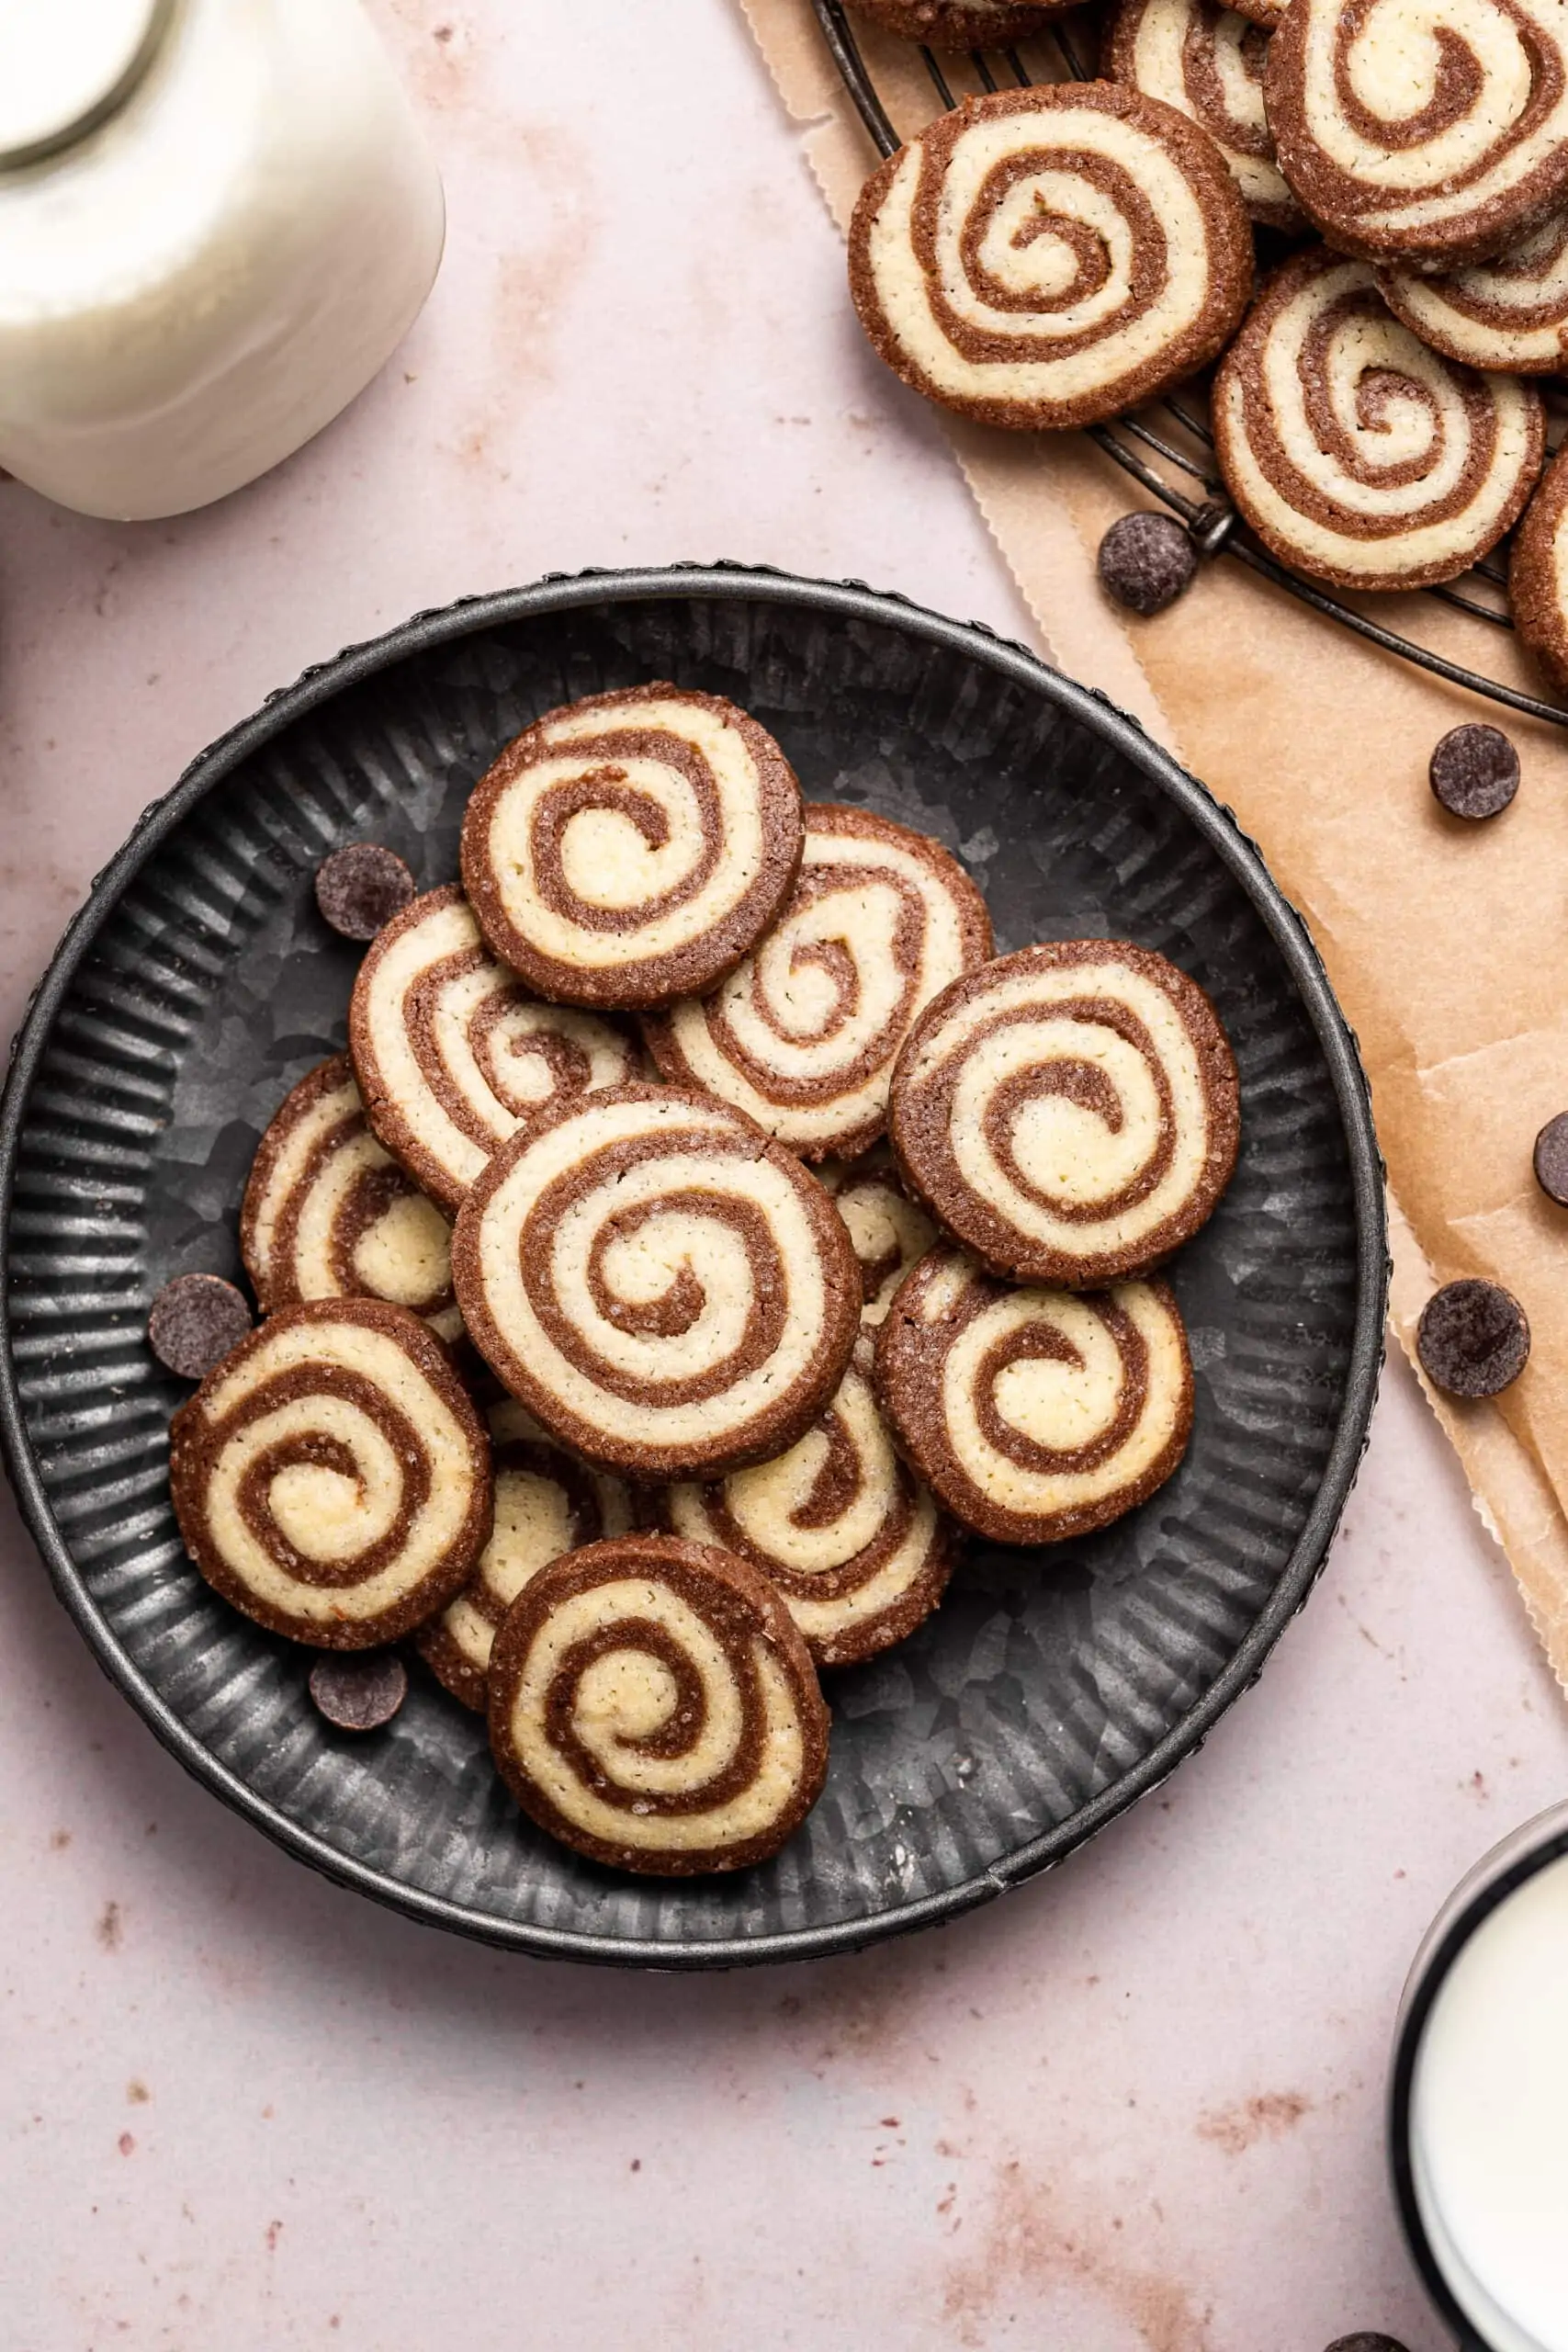
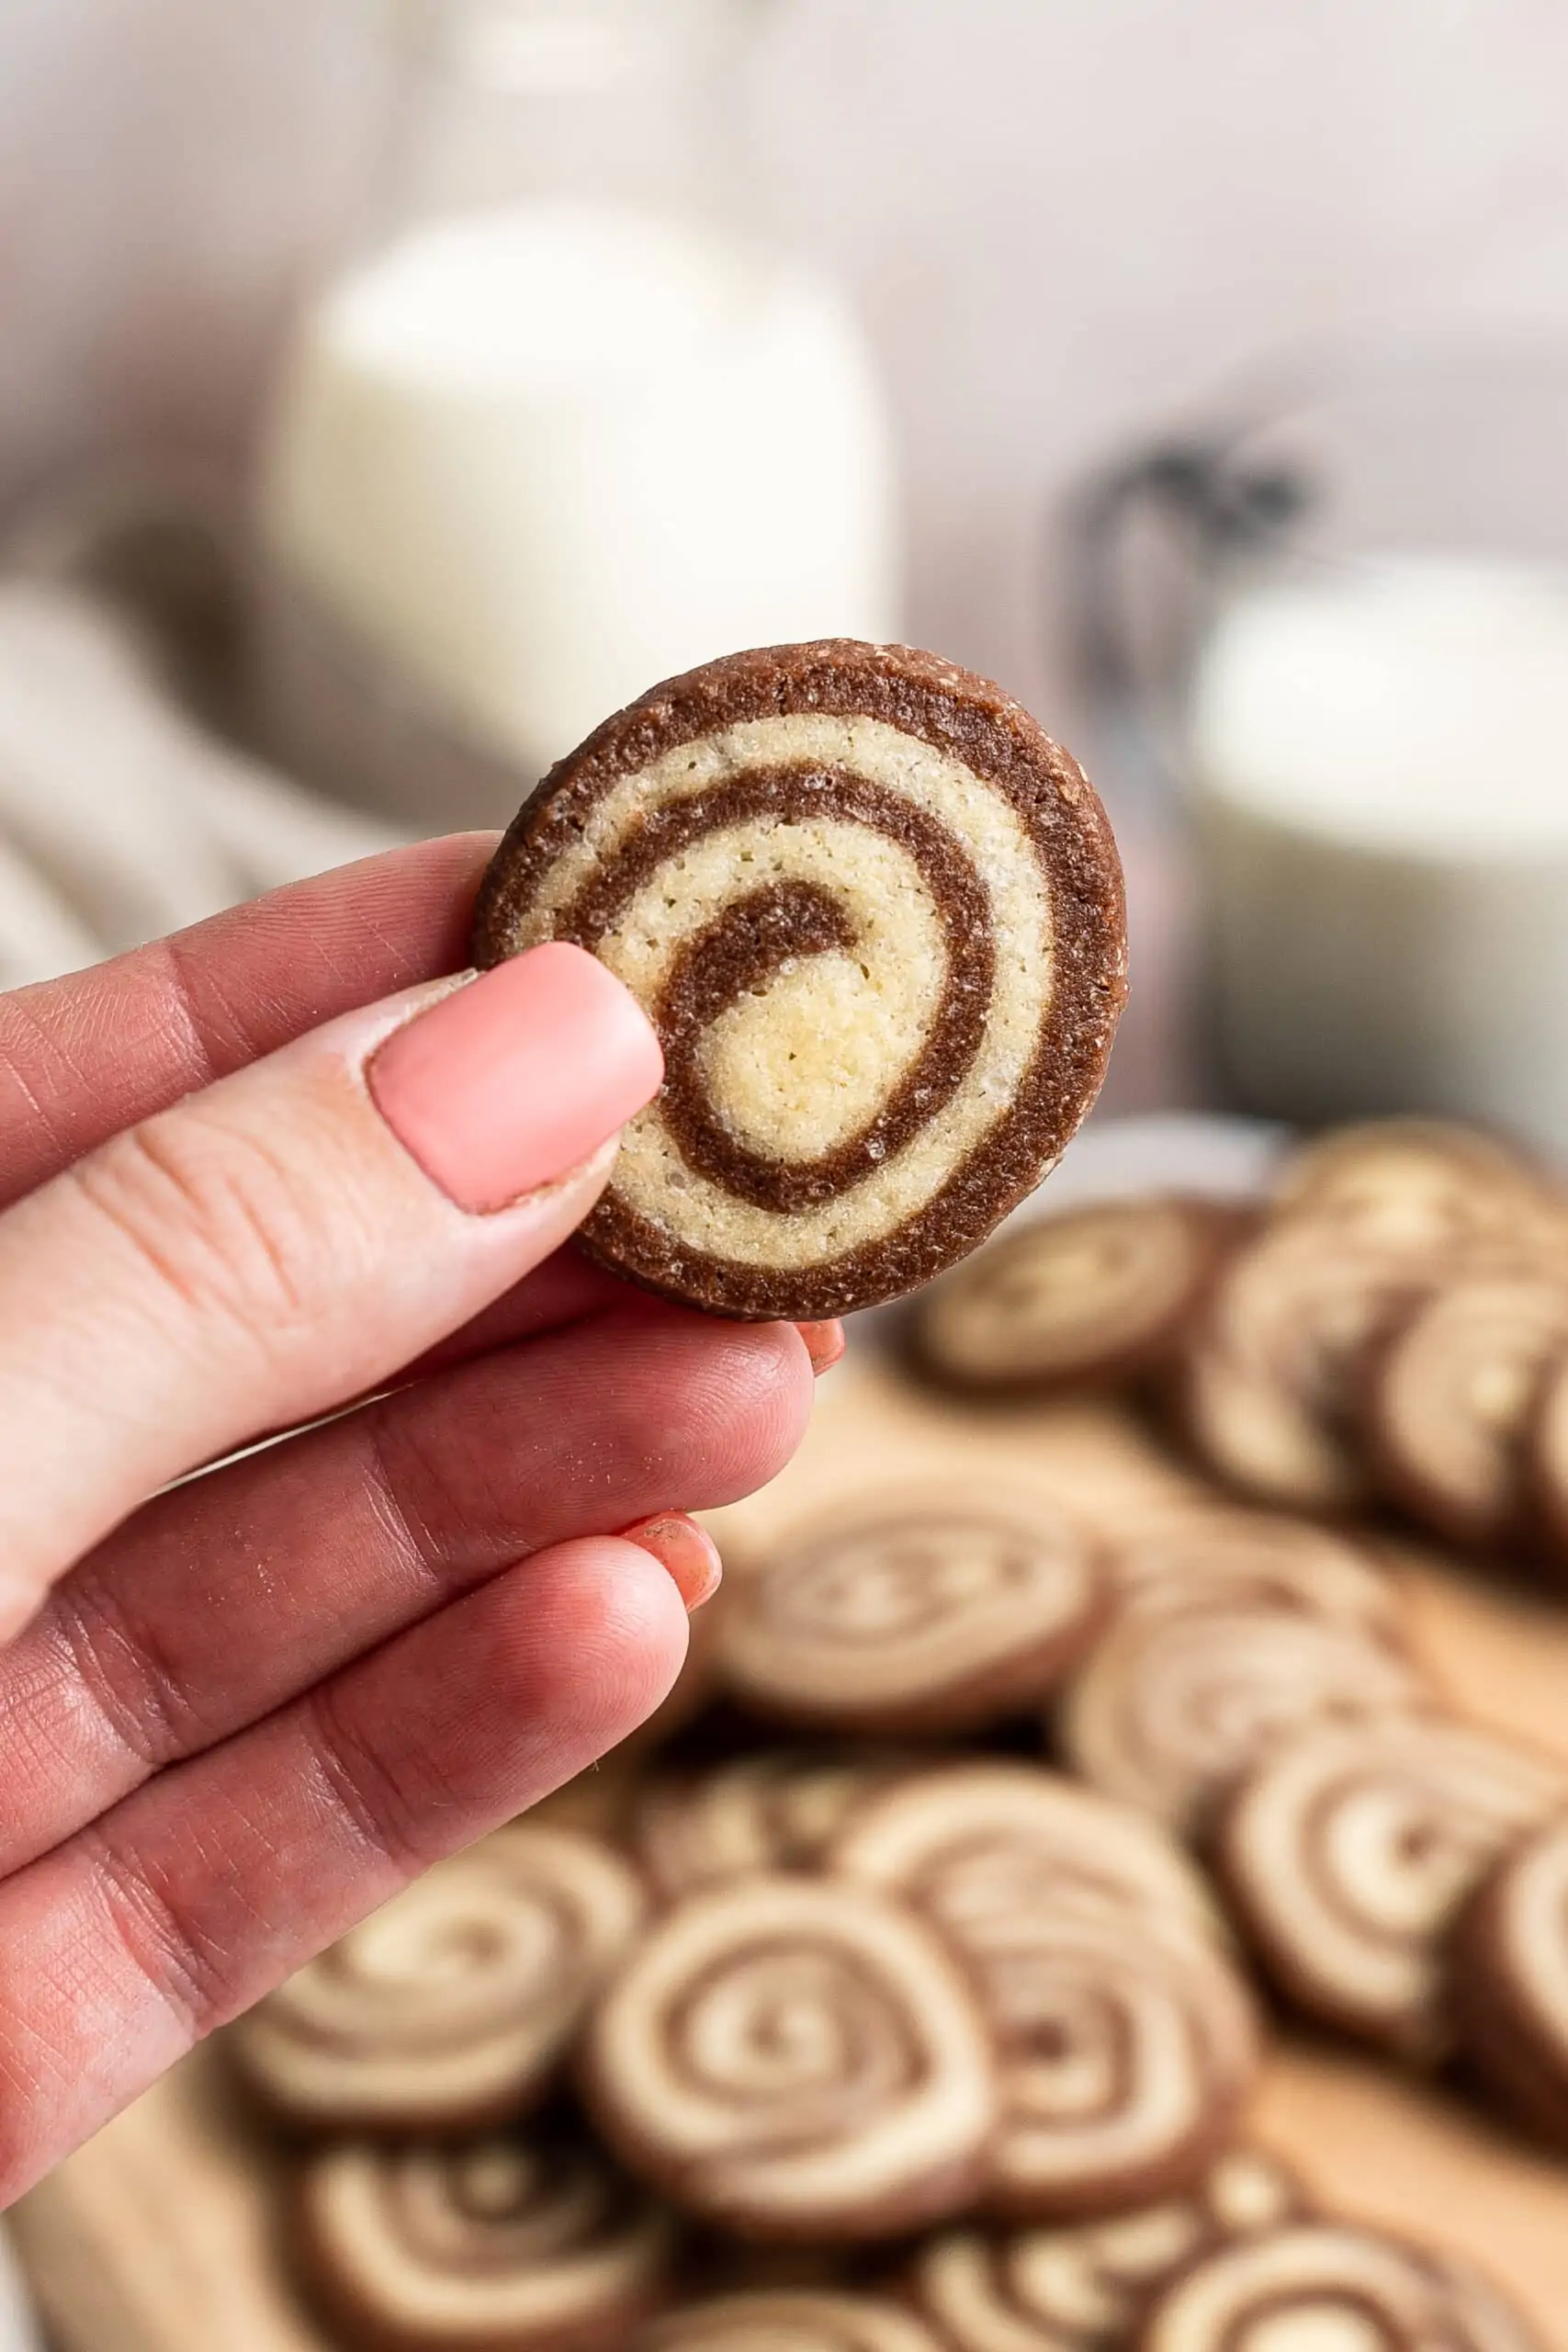
Chocolate Pinwheel Cookies
Chocolate Pinwheel Cookies are as soft and delicious as they are fun to make. Perfect any time of year, these easy slice and bake cookies stand out with their striking visual swirls.
I’m excited to once again participate in The Sweetest Season Cookie Exchange, a cookie-based fundraiser for pediatric cancer.
Just like in previous years, we’re helping to raise funds for Cookies for Kids’ Cancer, a nonprofit organization dedicated to raising funds for research to develop new, improved, and less toxic treatments for pediatric cancer.
For a little refresher, CLICK HERE to learn a little more about the organization, my own research background in pediatric cancer, and why you should consider donating to this great charity!
(And there’s a really great chewy chocolate mint cookie recipe on the other side of that link too, in case you need a little extra motivation to click.)
This year, rather than share a brand new recipe, I’m giving a little revamp to an old recipe.
My absolute most favorite cookies ever are my grandmother’s pinwheel cookies. They are the perfect combination of delicious, fun to make, and unique enough to stand out in a sea of chocolate chip cookie recipes.
And for me, they are full of wonderful nostalgic, childhood memories.
I first shared this recipe back in 2012, and I’ve had a lot of requests for step-by-step photos since then. It was high time to give my favorite cookies the attention they deserve!
How to Make Pinwheel Cookies
Think pinwheel cookies are hard? Think again! This is one of those recipes that seems so much harder than it really is.
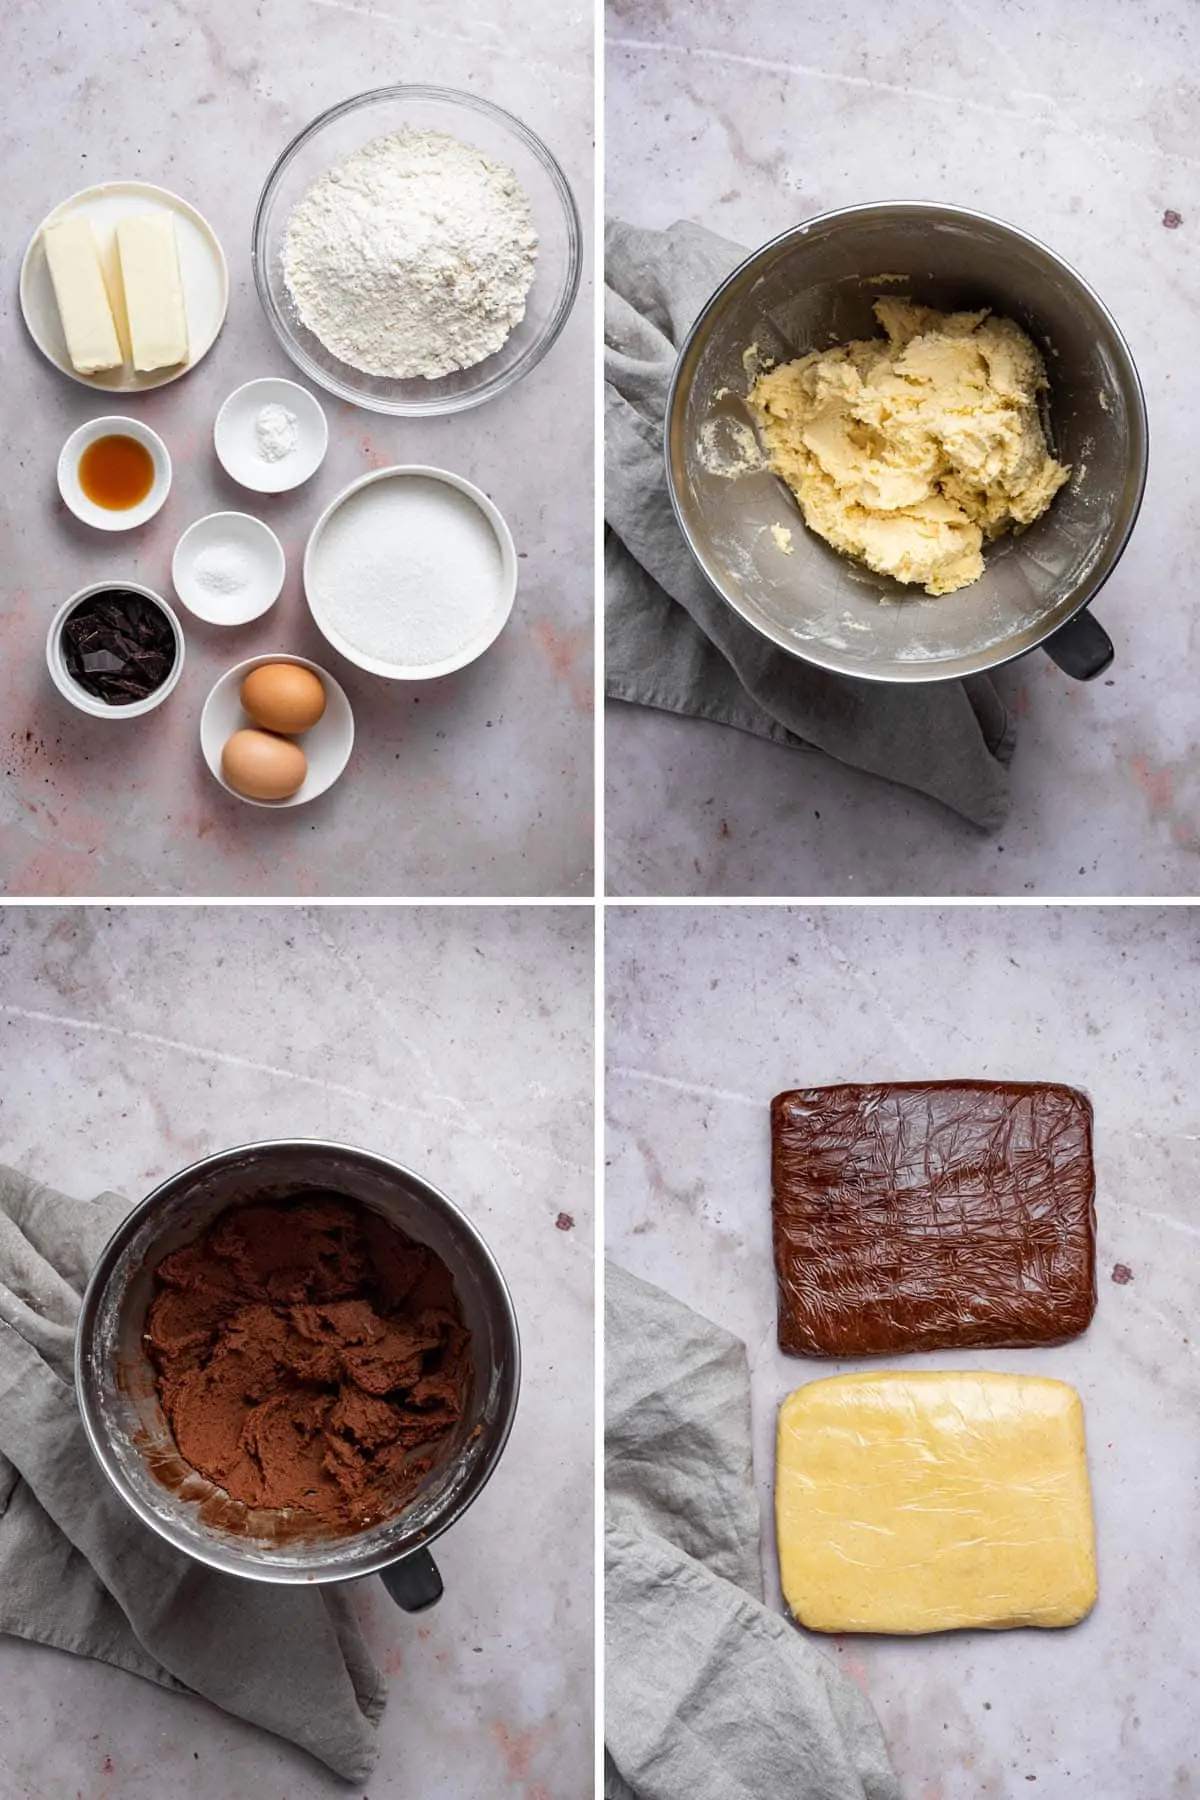
The dough is mixed together in a mixer, like any standard cookie dough. Once it comes together, split the dough in half and add melted chocolate to one half. Then refrigerate.
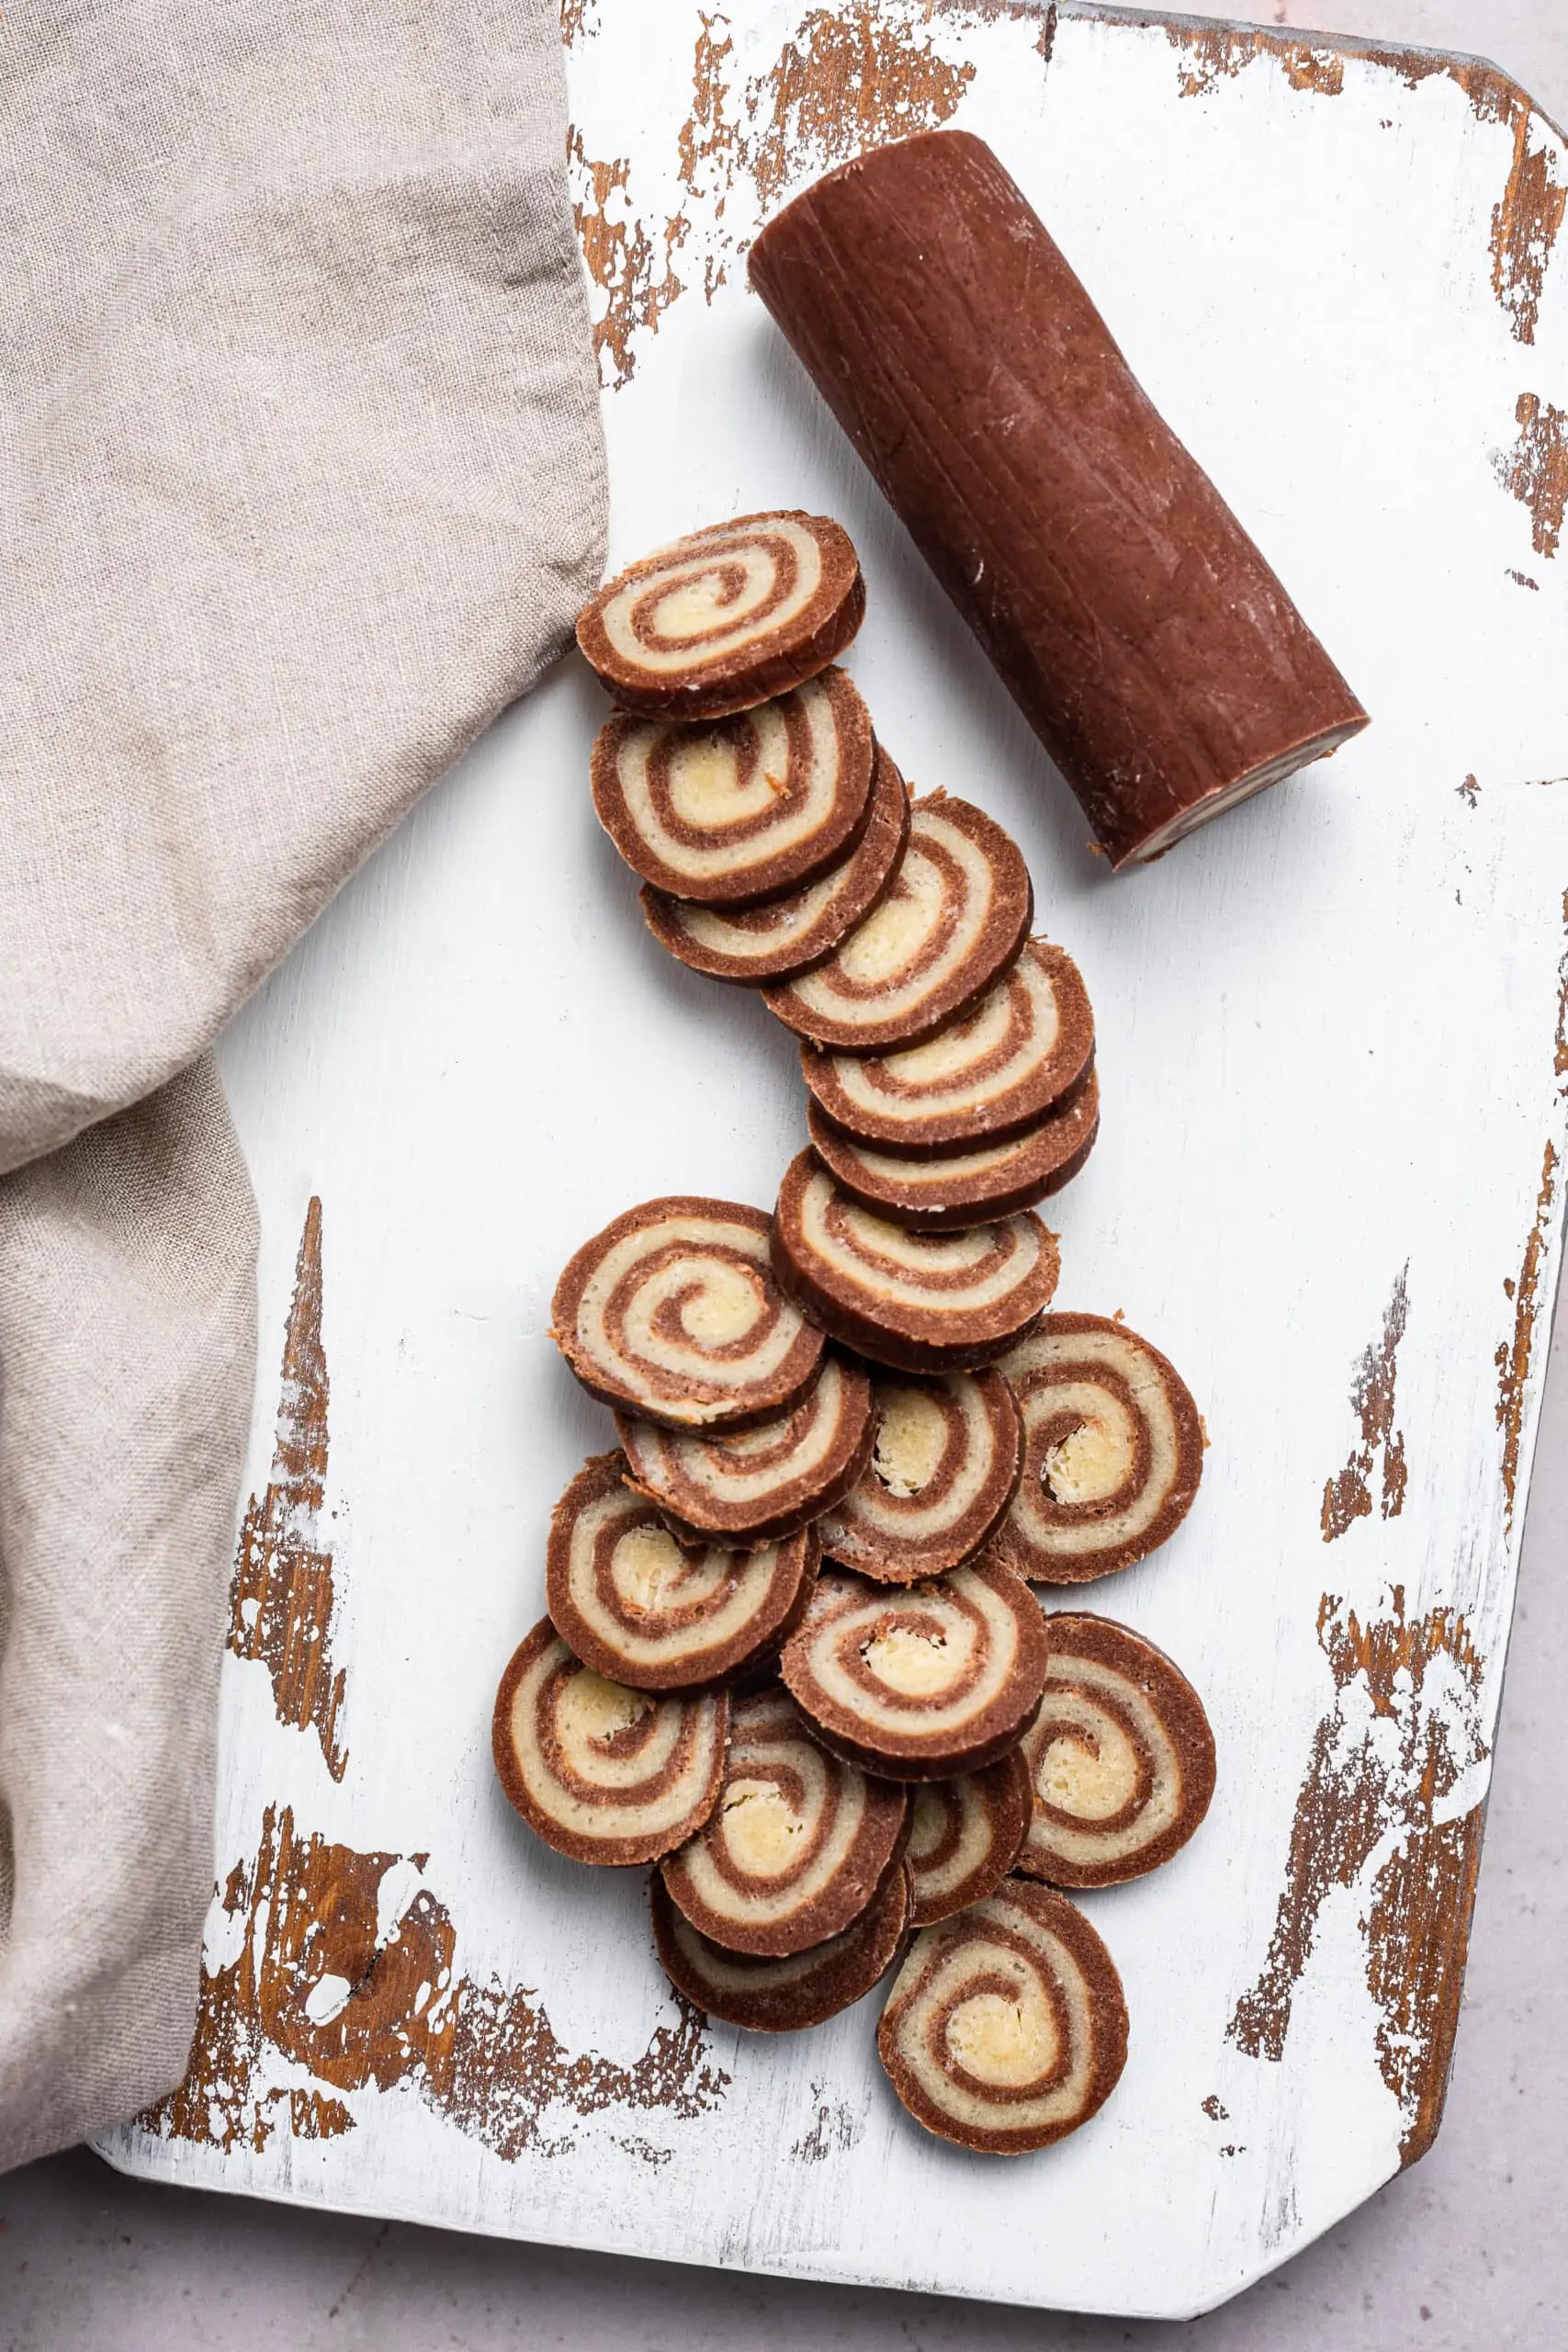
The key to getting good, defined pinwheel swirls is always working with cold dough. We’ll chill three times in this recipe:
- Chill the dough after mixing together. Form into rectangles, wrap in plastic wrap, and chill for at least 30 minutes.
- Chill the dough again after rolling it up into a pinwheel. This helps the dough keep its round shape — don’t forget to roll it a few times to ensure the bottom doesn’t flatten!
- Freeze the dough before slicing. This ensures the dough will slice well without squishing.
Because there’s so much chilling involved, these are perfect slice-and-bake cookies to break up and make over several days (or weeks – or months!).
The dough can be refrigerated at each step for quite a while, and the final rolled dough can even be frozen for months. I’ve been known to keep a few rolls of these in my freezer at all times, just in case the cookie bug strikes!
Use Melted Chocolate, Not Cocoa Powder
The most commonly asked question I get about these cookies is if the cocoa powder can be swapped for melted chocolate. The simple answer is no, but for a more in-depth explanation, it’s time for my favorite subject… kitchen chemistry!
Kitchen Chemistry
Cocoa powder contains only cocoa solids and no cocoa butter, meaning it does not contain any fat. Unsweetened chocolate contains cocoa solids and cocoa butter. The additional fat from the cocoa butter is essential to keep the cookie moist and chewy — more fat equals shorter gluten strands which equals a more tender cookie.
By using cocoa powder, the cookie has less fat than necessary for the ideal texture and will taste dry and crumbly.
This recipe calls for unsweetened chocolate, often called baking chocolate. This chocolate contains no added sugar and thus has a more deep chocolate flavor. Dark chocolate or semi-sweet chocolate can be used, but the chocolate-colored swirl will appear lighter and the chocolate flavor will be less pronounced.
How to Roll Pinwheel Cookies (Step-By-Step Photos)
I think the process of rolling up the pinwheel cookies can be a little intimidating for some people. Fret not: it’s easy! And here are some step-by-step photo instructions, because a picture is indeed worth a thousand words.
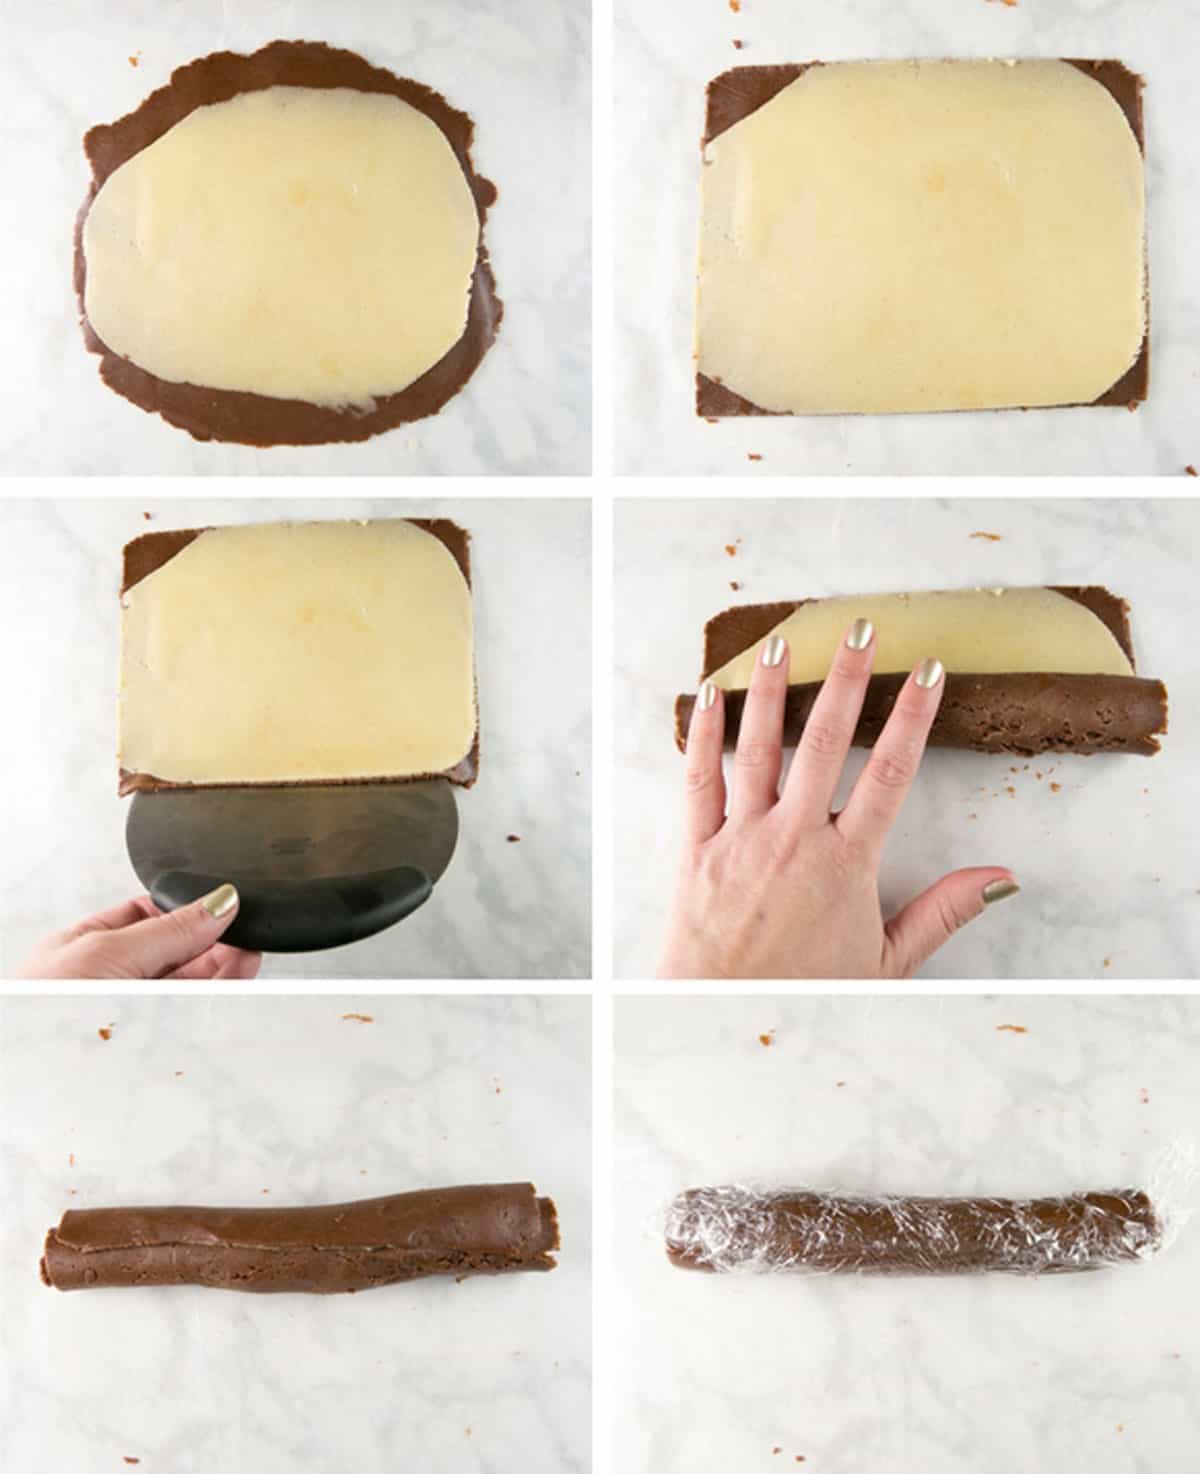
- Roll out the chocolate and vanilla dough separately, into a rectangular-ish shape roughly the same size. Stack the dough on top of each other (it does not matter which flavor is on top).
- Use a knife to cut the dough into a rectangle, roughly 6 inches by 7 inches.
- Lift the long edge of the dough up from the counter using a bench scraper or spatula.
- Start to roll the dough away from you, carefully rolling both sides of the dough.
- Roll the whole way and press the edge down to seal.
- Wrap in plastic wrap and transfer to the refrigerator.
Pinwheel Cookie Variations
I always like mine as chocolate and vanilla swirls, just the way my grandmother made them. But you can use this dough rolling technique to make any combination of colors or flavors!
Stick with just vanilla dough and a little food coloring for some festive cookies (red and green for Christmas, red and blue for the 4th of July, etc).
Paint a thin layer of fruit jam on top of the dough before rolling for a jam-filled pinwheel.
Maybe some orange zest in the dough and cranberry jam? Or how about adding coconut extract and flakes of coconut to the vanilla dough? Or if you’re like me and love lemon desserts, maybe a layer of lemon curd?
Want a three-colored pinwheel? Repeat the same process as above, just adding in a third layer of dough before rolling.
Love sprinkles? Roll the outside of the log, after freezing but before slicing, in small sprinkles, nonpareils, or colored sanding sugar.
The possibilities are endless!
Tips and Tricks for the Best Pinwheel Cookies
- For the best chocolate flavor, use unsweetened baking chocolate. Using dark chocolate, milk chocolate, or semi-sweet chocolate will result in a lighter color swirl and a muted chocolate flavor.
- Keep the dough cold! This dough can start to get sticky as it warms up. Make sure to chill before rolling the dough out and again before shaping it into the pinwheel.
- Freeze the dough before slicing. Frozen dough is easier to slice cleanly than refrigerated dough, and will help ensure the cookie doesn’t flatten into an oval while slicing.
- If the dough starts to crack while rolling into a log, let the dough sit at room temperature for 2-3 minutes to start to just soften before rolling the rest of the way.
- This recipe makes small cookies. For larger cookies pinwheel cookies, layer four rectangles of dough before rolling. Chocolate, vanilla, chocolate, vanilla, then roll. There will be two logs of rolled dough at the end instead of four.
- To keep things easy, make the dough ahead of time. The dough can be made and refrigerated for up to 3 days. The swirled logs can be frozen for up to 3 months. Baked cookies can also be frozen for up to 3 months.
- Store chocolate pinwheel cookies in an airtight container at room temperature for up to 2 weeks.
More Cookie Recipes:
- Oatmeal Chocolate Chip Cookies
- Black and White Cookies
- Toffee Crunch Cookies
- Sprinkle Sugar Cookies
- All Cookie Recipes »

Chocolate Pinwheel Cookies
Chocolate pinwheel cookies are as soft and delicious as they are fun to make.
Ingredients
- 3 cups (360 grams) all-purpose flour
- 1/2 teaspoon baking powder
- 1/2 teaspoon salt
- 1 cup (226 grams) unsalted butter, room temperature
- 1 1/3 cups(264 grams) sugar
- 2 large eggs, room temperature
- 2 teaspoons vanilla extract
- 2 ounces unsweetened chocolate, finely chopped
Instructions
- Sift together flour, baking powder, and salt in a large bowl.
- Using an electric mixer, beat butter until light and fluffy, about 3 minutes. Add in sugar and beat an additional 2 minutes more. Add eggs, one at a time, beating after each addition, followed by the vanilla. Add the flour mixture and beat on low until just combined.
- Divide the dough in half. Form half of the dough into a 4 by 4-inch square, wrap in plastic wrap, and set aside. Return the other half of the dough to the mixing bowl. Using a double boiler or a microwave on low power, melt the chocolate, stirring until smooth. Mix the melted chocolate into the dough just until combined. Form the chocolate dough into a 4 by 4-inch square, wrap in plastic wrap, and place both chocolate and vanilla doughs into the refrigerator for 30 minutes (or up to 3 days).
- Cut each dough into four even strips. Roll out one strip of vanilla dough between two sheets of parchment paper, into a roughly 6-by-7 inch rectangle. Repeat with a strip of the chocolate dough. Peel off the top sheet of parchment paper from each dough and flip the vanilla dough over onto the chocolate dough. Trim excess dough into a rectangle and run a rolling pin lightly over the dough to ensure they stick together. Peel off the top sheet of parchment paper, then roll the dough into a log. Wrap in plastic wrap and refrigerate. Repeat with remaining strips of dough to form 4 logs.
- Refrigerate logs for 1 hour, then remove from refrigerator and roll each log on the counter several times to prevent the bottom from flattening. Transfer to the freezer for 2 hours, or up to 3 months. Keep dough frozen until ready to slice and bake.
- Preheat oven to 350 °F and line a baking sheet with parchment paper. Using a sharp knife, slice dough into 1/4-inch thick slices and place 1 1/2 inches apart on the prepared baking sheet. Bake until vanilla dough is slightly golden, 9 to 11 minutes. Cool cookies on a wire rack.
Notes
- For the best chocolate flavor and color, use melted unsweetened baking chocolate.
- Keep the dough cold! As the dough warms up, it starts to get sticky.
- Freeze the dough before slicing for perfect circles.
- For larger pinwheel cookies, combine four rectangles of dough in a layer before rolling. There will then be two logs of rolled dough instead of four.
- Store the cookies in an airtight container at room temperature for up to 2 weeks or freeze for up to 3 months.
Recommended Products
As an Amazon Associate and member of other affiliate programs, I earn from qualifying purchases.
Nutrition Information:
Yield: 24 Serving Size: 2 cookiesAmount Per Serving: Calories: 191Total Fat: 9.5gCarbohydrates: 24gProtein: 2.5g

This recipe was first published in July 2012 and updated in December 2021.