Cherry Almond Pie
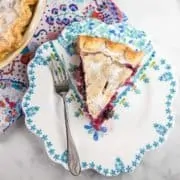
Skip the canned filling and make this Cherry Almond Pie entirely from scratch. Fresh summer cherries, a star-spangled crust, and a scoop of vanilla ice cream make this the ultimate summer pie!

It’s July. We’re at peak summer produce, we’re about to celebrate the 4th of July, and I’m doing a yearlong “Pie of the Month” series. The choice is obvious.
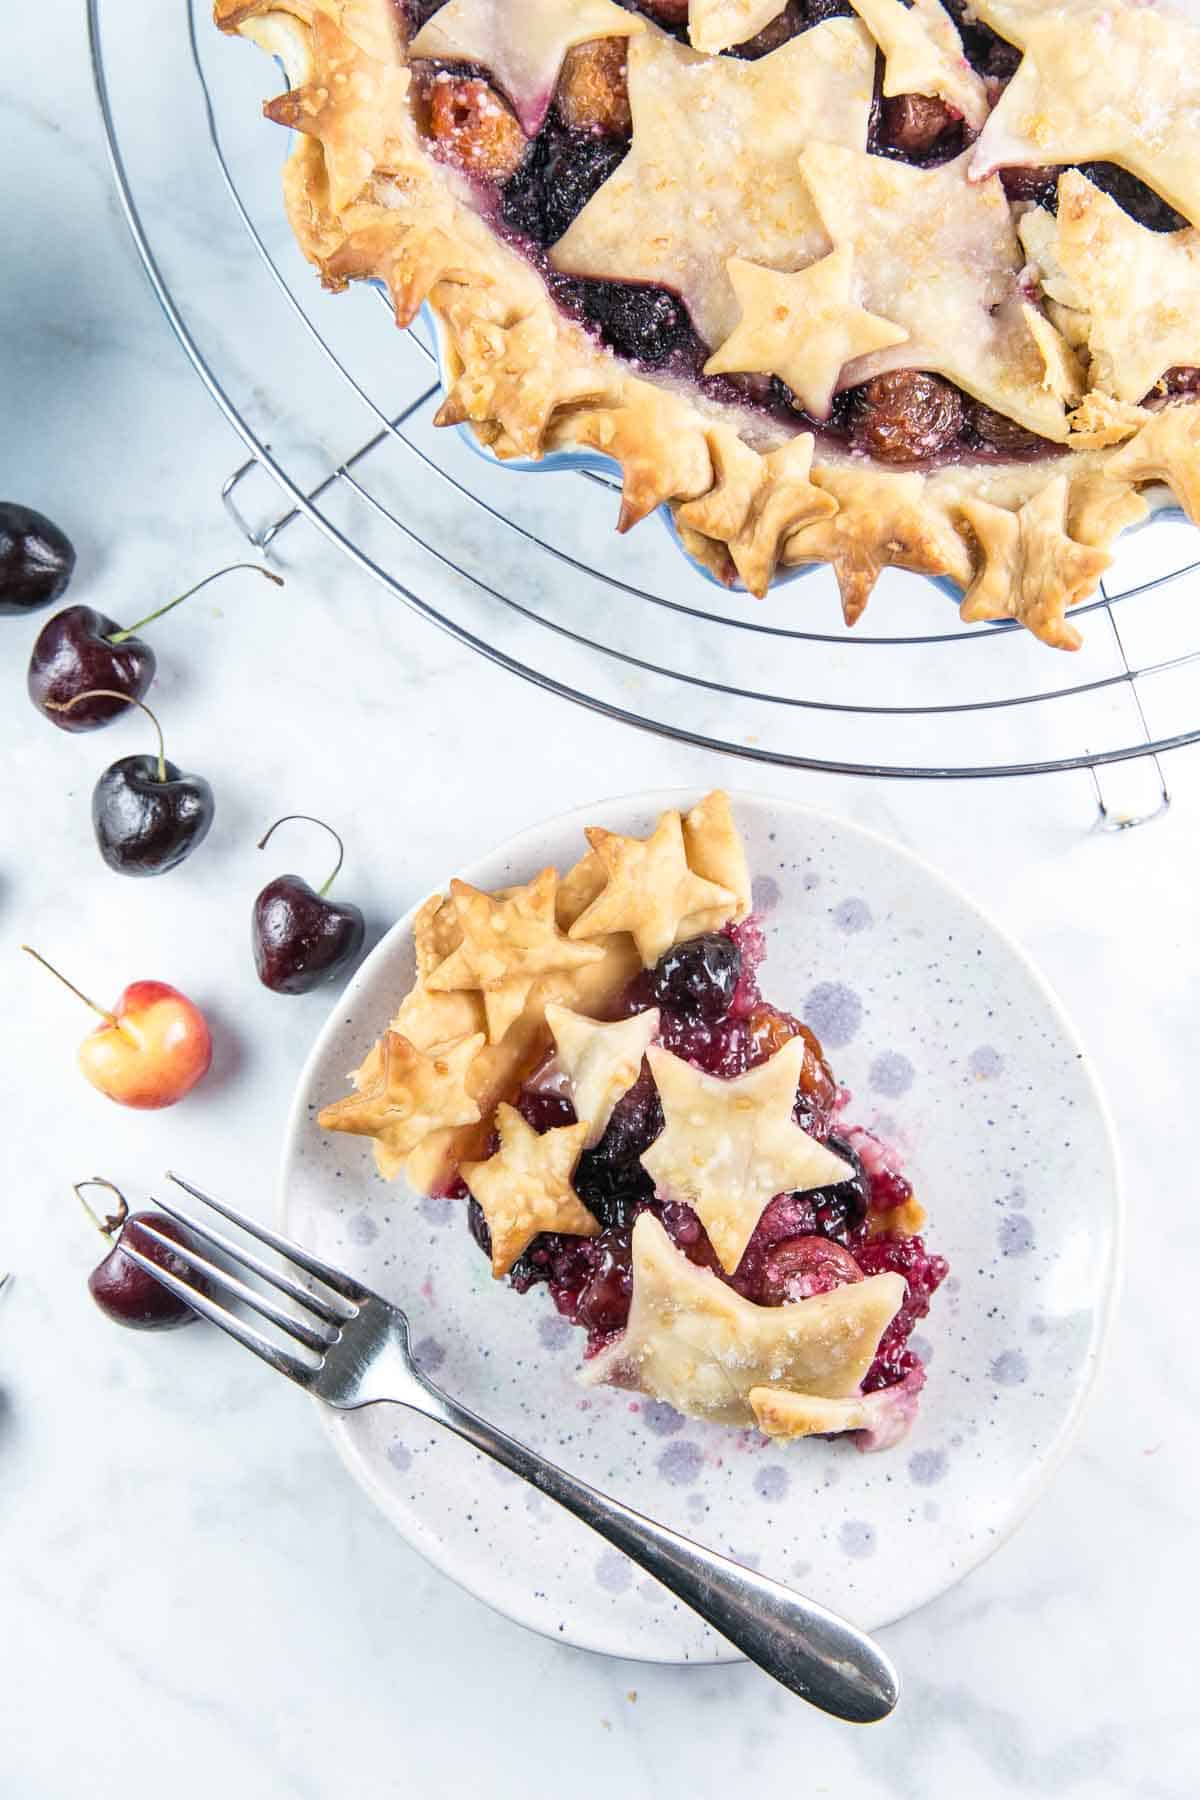
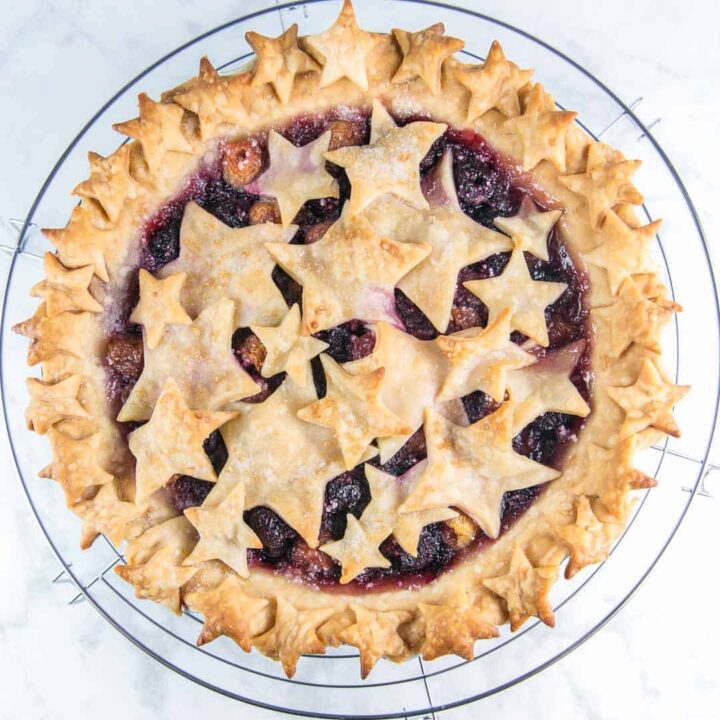
What could possibly be more all-American and summery than a star-spangled cherry pie?
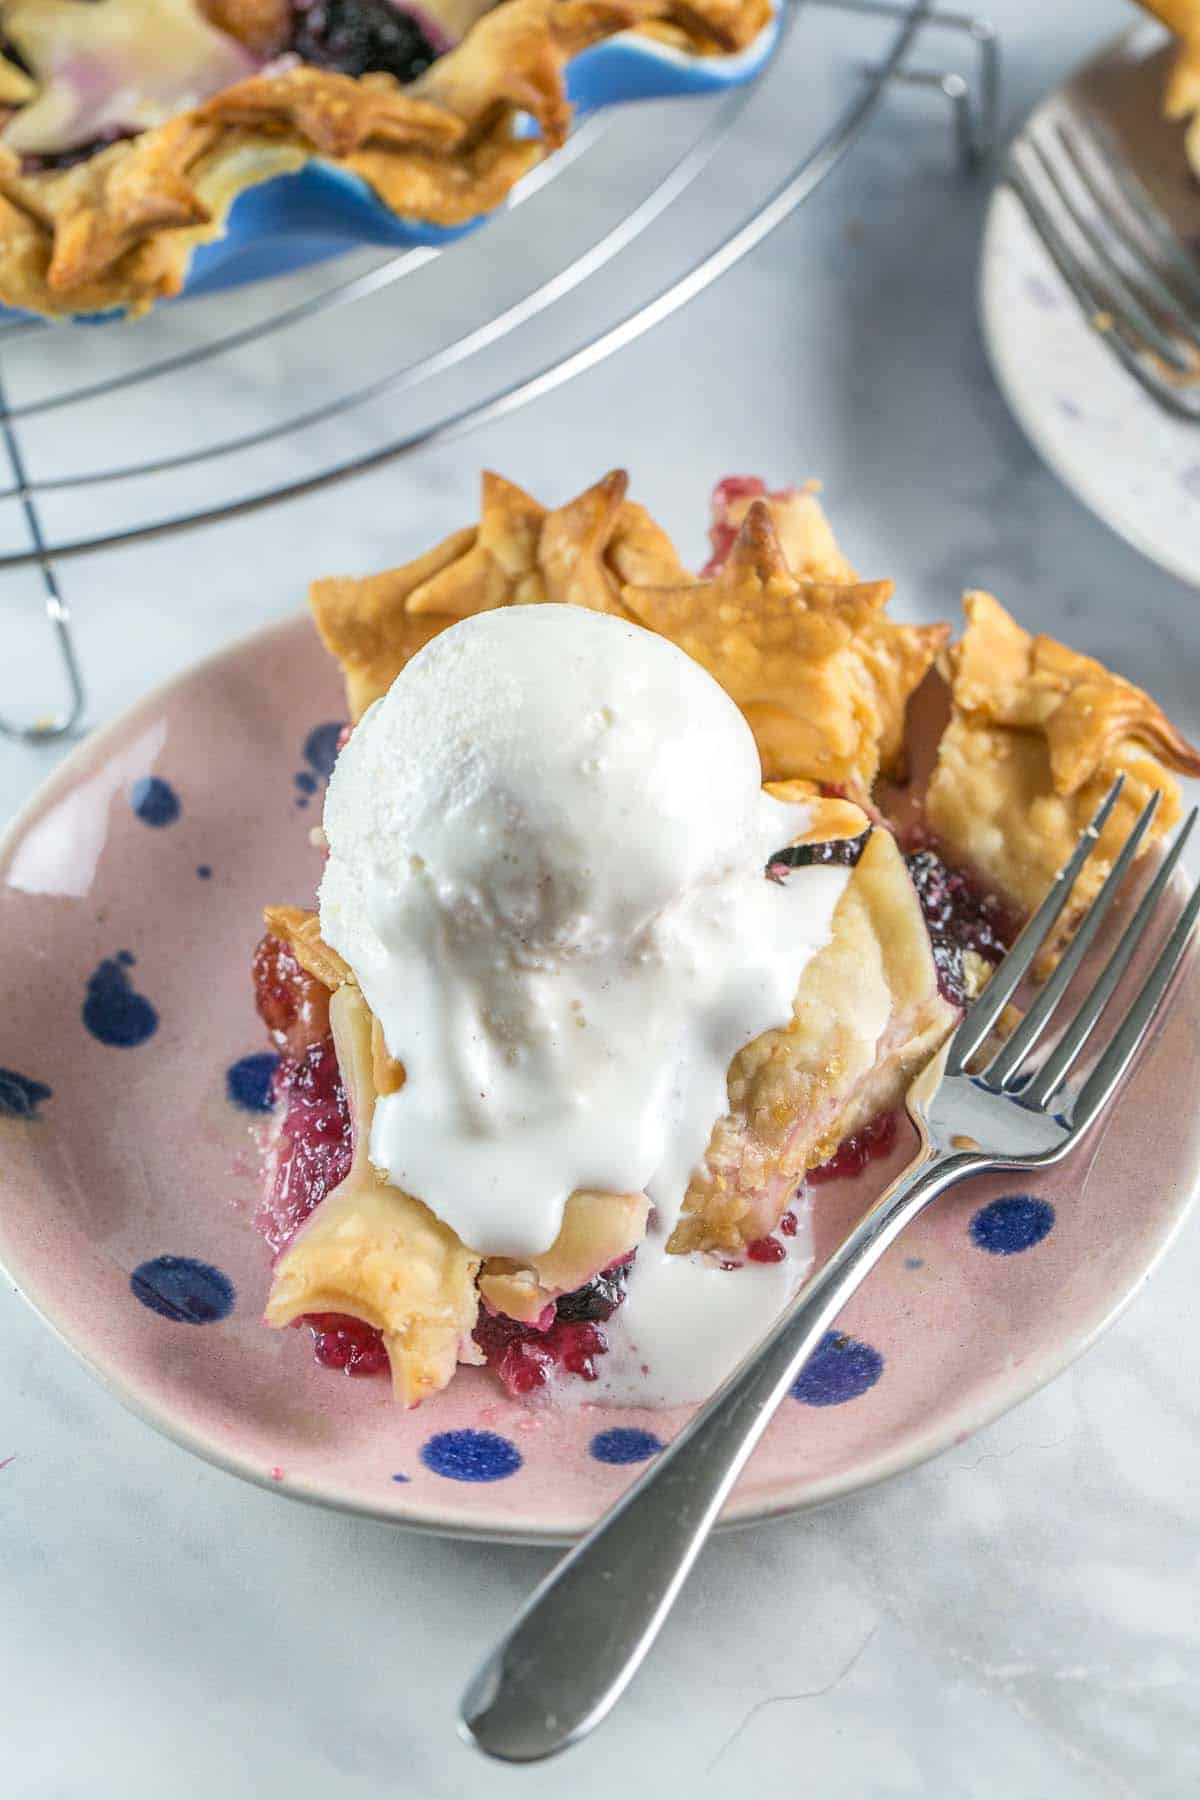
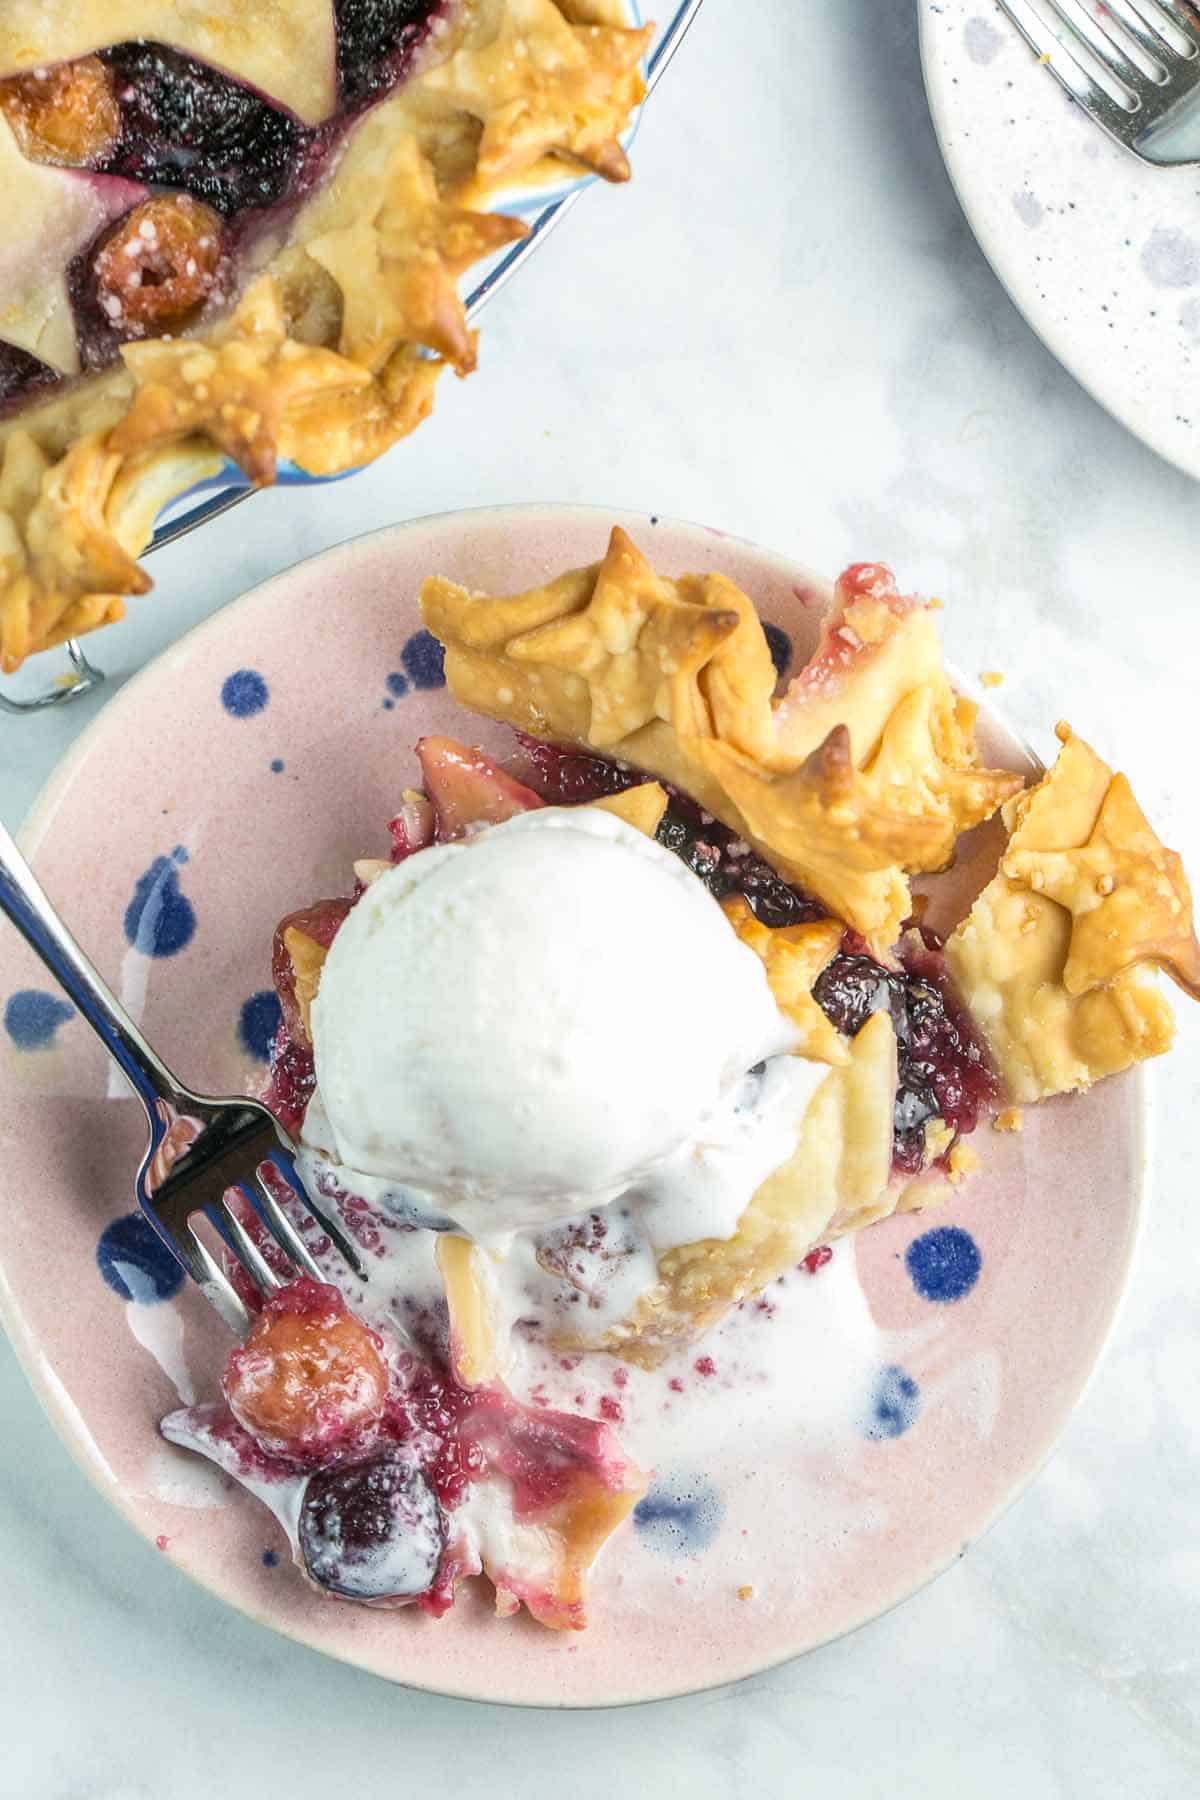
Nothing, that’s what. A cherry pie with a big scoop of ice cream on top is about as perfect as a summer dessert comes.
I really, really love the almond + cherry flavor combination, so this is actually a cherry almond pie. It’s amazing what a difference a little almond extract makes! (Not into almond? Leave it out! This is also a perfect plain cherry pie!)
Even my husband, who doesn’t generally like fruit pies, commented on how much he liked this cherry almond pie.
So let’s talk logistics. Step aside, strangely gelatinous canned cherry pie filling. We’re making a real cherry pie from scratch today.
Best Pie Crust
Any great pie starts with a stellar crust that is buttery, tender, and perfectly flaky.
While there are tons of recipes out there, I always use my favorite, which works so well that I’ve deemed it a “No Fail Pie Crust.” You can find alllll the tips and tricks you need in that post. My recipe uses both butter (for delicious flavor) and shortening (for perfect flakes).
The key to achieving that flakey texture lies in ensuring that the fat (i.e., butter and shortening) is COLD. By cutting the cold butter and shortening into small cubes and cutting it evenly into the flour, you create pockets of fat that will later melt during butter, resulting in a light and airy crust.
Homemade Cherry Pie Filling
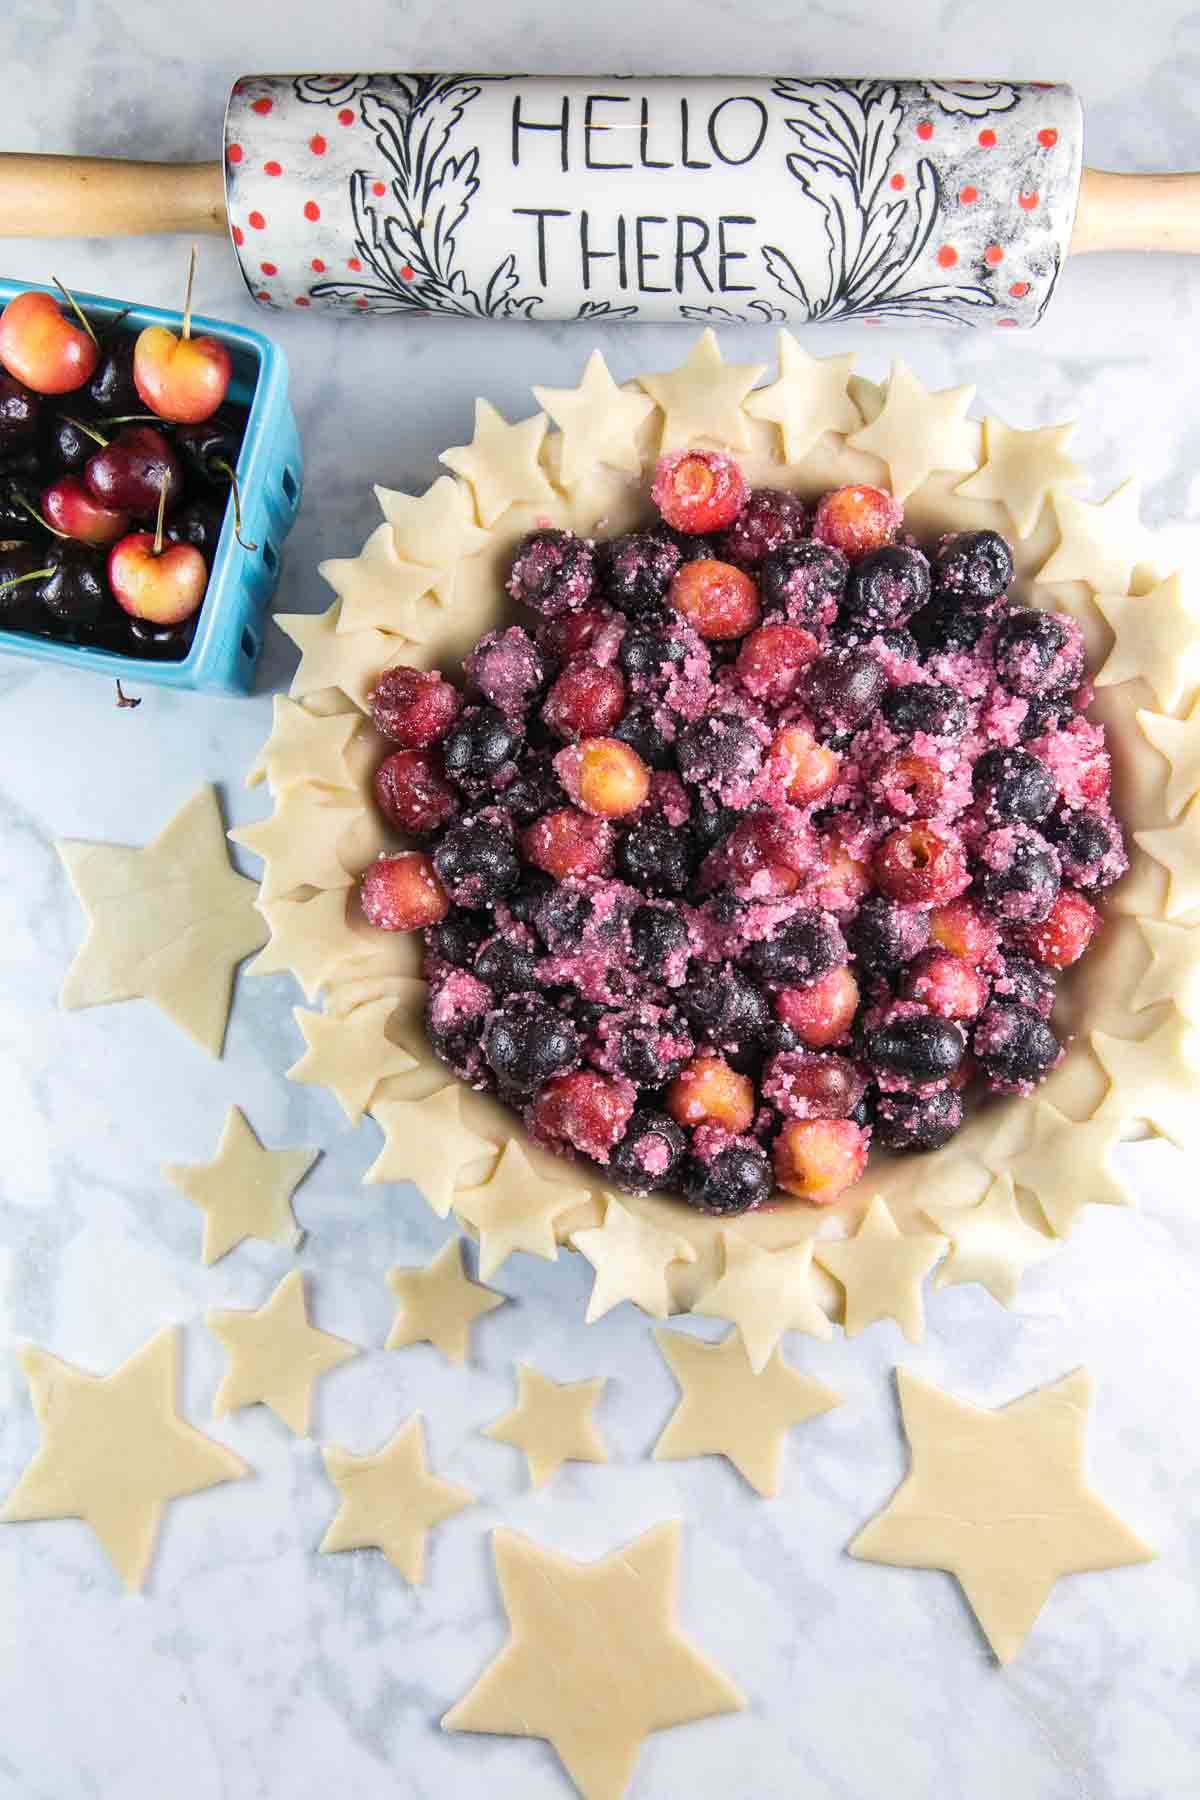
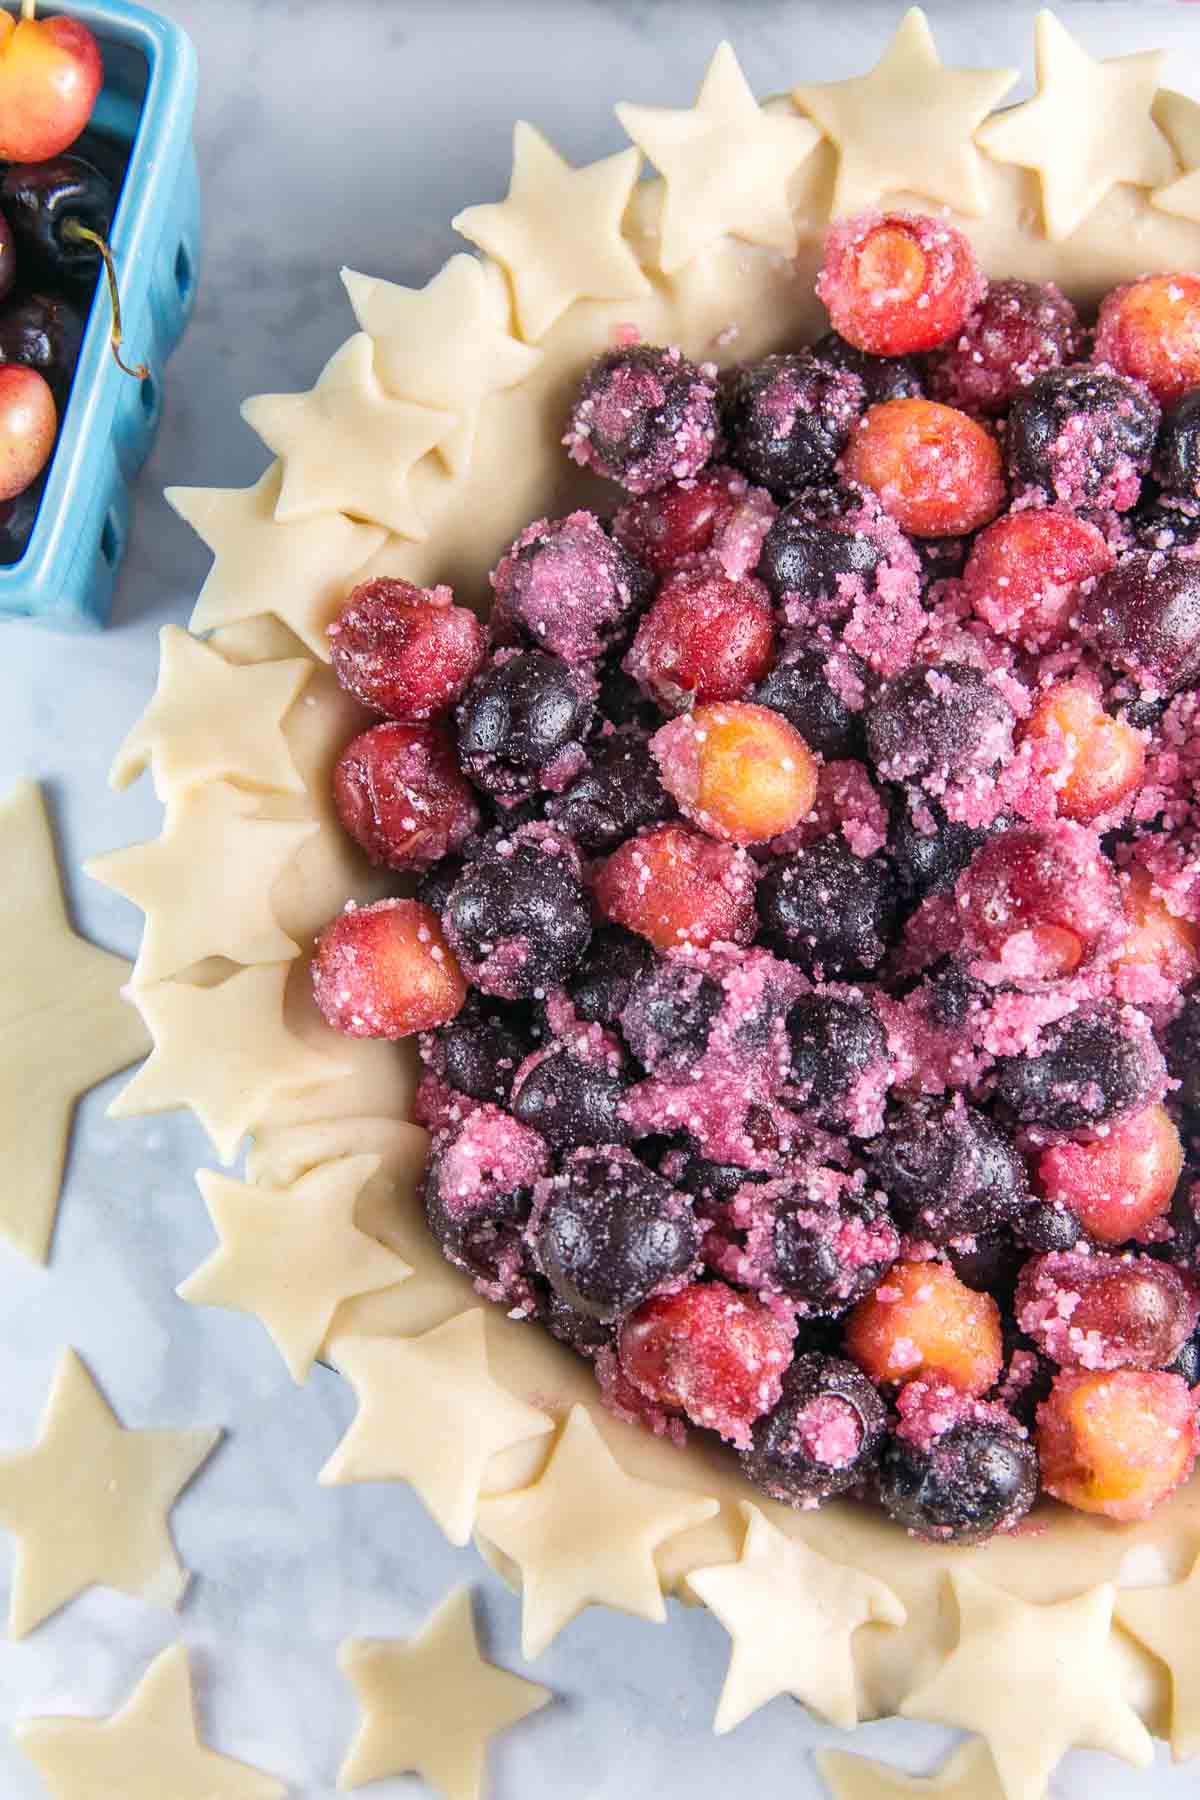
Fresh cherries are the shining stars of this pie. Because we’re using fresh cherries, this means you’re going to be pitting a lot of them. I recommend this four-at-a-time cherry pitter (Amazon links are affiliate). This is no time for pitting one cherry at a time!
Choose fresh, ripe, juicy cherries. I used a variety of both sweet Bing cherries and Ranier cherries for this pie because I love the visual contrast in color. Sour cherries are also abundant at farmers’ markets this time of year and are perfect for pie baking; just increase the sugar by 1/4 cup.
Because we’re using fresh cherries, the cherry pie takes on the color of the actual cherries. In this case, the dark almost black from the Bing cherries and the pale orange of the Ranier cherries. If you want to mimic the bright red color of canned cherry pie filling, stick with lighter-colored cherries and add a few drops of red food coloring.
We’re also going to infuse the cherry pie filling with a little almond extract. The almond extract amplifies the cherries’ natural sweetness, adding just a little nutty undertone. Don’t be afraid to experiment with other extracts (like vanilla) or slices to create your own unique twist!
Thickening a Pie
I mentioned on my blueberry rhubarb pie recipe that I like to use instant tapioca to thicken fruit pies. It thickens beautifully, never feels gummy, and doesn’t leave the filling cloudy and opaque. Instant tapioca pearls can be pretty large, however. To make sure the filling isn’t lumpy, I like to break it down a bit in a food processor (or a spice grinder/coffee grinder, if you have one!).
Unlike other thickeners, such as cornstarch or flour, tapioca creates a glossy, translucent filling with a smooth mouthfeel. The tapioca granules absorb the juices released by the cherries during baking, creating a gel-like consistency that holds the filling together.
Additionally, tapioca’s ability to withstand high temperatures without breaking down ensures that your pie filling will maintain its integrity even after it’s baked to perfection.

Assembling Cherry Pie
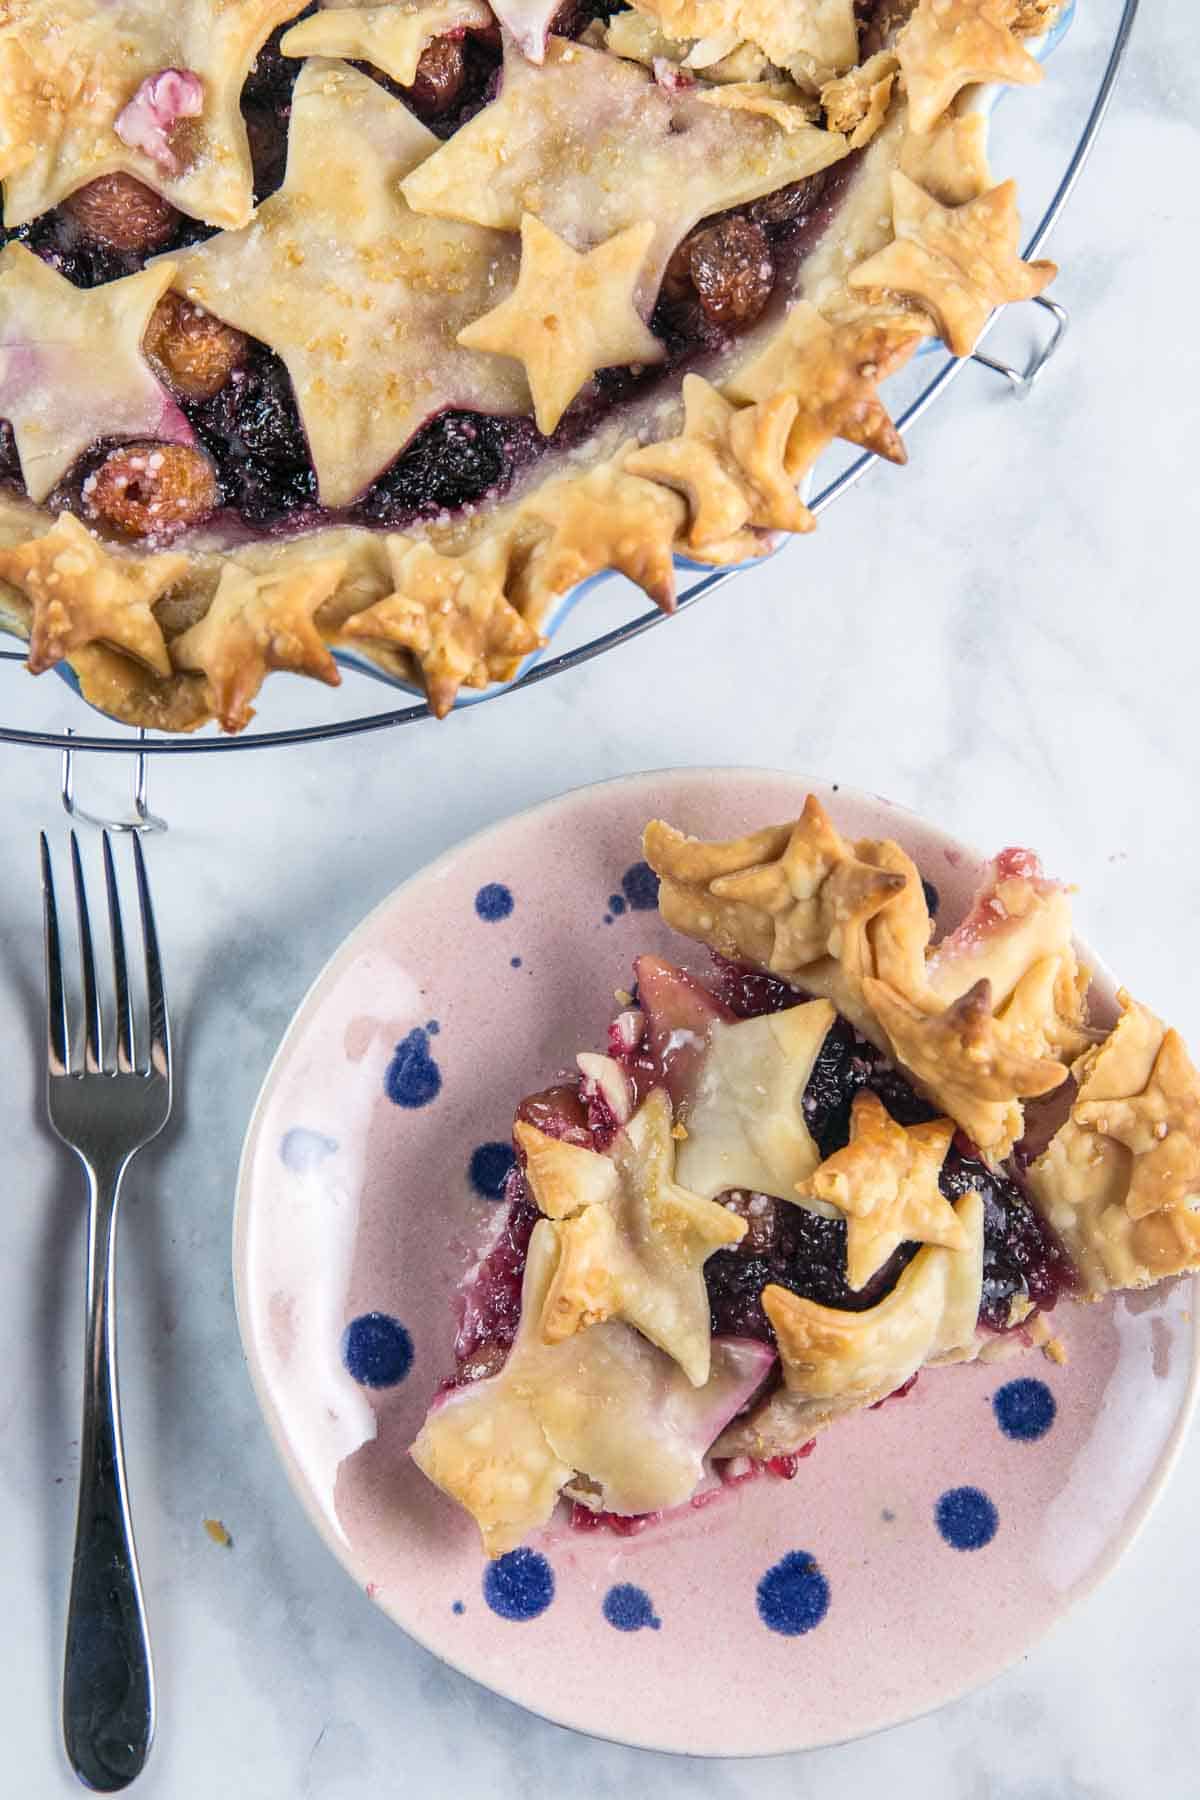
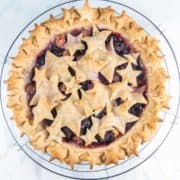
Now that we have our flaky crust and flavorful filling ready, it’s time to assemble the pie and bring it to life! Roll out the bottom crust and gently place it into your pie dish. Fill the crust with the cherry filling, making sure to distribute it evenly. Next, we’ll add a touch of whimsy by using star-shaped cutouts for the top crust. Place the cutouts on top of the filling, allowing some of the vibrant red cherries to peek through.
You can, of course, top this pie with a full double crust. Or a lattice crust, which is probably the most traditional for cherry pies.
But I couldn’t resist breaking out some star cookie cutters and making this a star-spangled cherry almond pie, worthy of a patriotic celebration. (Or basically any time between Memorial Day and Labor Day, or Christmas, or a birthday… so really, a star-topped pie is perfect all the time.)
Let Your Pie Rest Before Slicing!
I know, I know. It’s so hard to resist slicing into a freshly-baked, still-warm slice of pie. But if you want a picture-perfect pie slice and an ideal filling, let your pie rest overnight before cutting into it!
When the pie is baked, the starches in the filling (in our case, tapioca) absorb moisture and swell, creating a network that trips liquid and thickens the filling. You know a pie is done when the filling is rapidly bubbling and making a thumping sounds as it pushes up against the top crust.
Once the pie is baked, however, we have to let it fully rest and cool before slicing. Why does this matter, since the filling has already gelatinized? It’s time for my favorite subject… kitchen chemistry!
Kitchen Chemistry
While a pie cools, the starches and proteins in the pie continue to set and solidify. This allows the starch gel to create the firm and stable structure it needs, progressing from thickened to structured. Slicing a pie too soon results in a runny filling, as it hasn’t had sufficient time to set and hold its shape.
Recommended Tools for the Best Cherry Pie
- Pie Plate: While ceramic pie plates look prettier, glass is the best option since you can directly check the bottom to ensure the crust is cooked through and browning on the bottom.
- Cherry Pitter: This cherry pitter lets you pit up to 6 cherries at once!
- Rolling Pin: My favorite rolling pin – perfect to make sure you roll your dough to an even thickness!
- Star Cookie Cutters: This set contains all the different sizes I used to make the star crust for the cherry pie.
Tips and Tricks for the Best Cherry Almond Pie
- To make this a gluten-free cherry pie, use this recipe to make the pie crust. The cherry filling is naturally gluten-free.
- After you’ve made the pie dough, refrigerate it for at least 30 minutes before rolling it out. Chilled dough is easier to handle and results in a flakier crust.
- Once you roll out the pie crust and press it into your pie plate, freeze the pie plate for 15 minutes while you make the cherry filling. This helps the fat in the dough remain solid, which is crucial for achieving a tender and buttery texture.
- Cherry pie can be stored at room temperature for up to 2 days, refrigerated for up to 5 days, or frozen for up to 3 months.
- Before serving, refresh a slice of pie in the oven at low temperature (around 325 °F) for 5 to 10 minutes to restore the crispness of the crust and warm the filling.
More Cherry Desserts:
- Chocolate Cherry Cheesecake
- Cherry Pie Bars
- Three Layer Chocolate Cherry Cake
- Chocolate Chip Cherry Pound Cake
- Chocolate Chip Cherry Upside-Down Cake
- Cherry Chocolate Chunk Muffins
2018 Pie of the Month Series
-

- Chocolate Oatmeal Molasses Pie
-
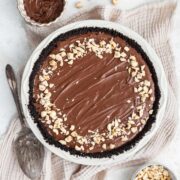
- No Bake Nutella Pie
-
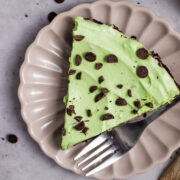
- No Bake Mint Chocolate Chip Pie
-
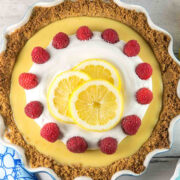
- Creamy Lemon Pie
-
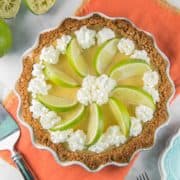
- Tequila Lime Margarita Pie
-
- Blueberry Rhubarb Pie
-
- Cherry Almond Pie
-
- S’mores Pie
-
- Chocolate Shoofly Pie

-
- Caramel Pear Pie
-
- Bourbon Buttermilk Pie
-
- Cranberry Curd Pie

Cherry Almond Pie
Skip the canned filling and make this cherry almond pie entirely from scratch with fresh summer cherries.
Ingredients
- 1 full recipe (2 crusts) unbaked No Fail Pie Crust
- 4 1/2 cups (580 grams) fresh whole cherries, pitted
- 1 cup (198 grams) granulated sugar
- 4 tablespoons (28 grams) instant tapioca, ground in a food processor or spice grinder
- 1/2 teaspoon salt
- 2 tablespoons lemon juice
- 1 teaspoon almond extract
- 2 tablespoons (28 grams) butter
- coarse sugar, for sprinkling
Instructions
- Preheat the oven to 400 °F.
- Fit one pie crust (half of the No Fail Pie Crust recipe) into a 9-inch pie plate and press the crust along the edges of the plate, fluting the edges. Place the pie plate in the freezer for 15 minutes to allow the dough to firm up.
- Roll out the other pie crust to 1/6″ thickness. Cut out 26-28 small (approximately 1-inch) stars and various larger stars with the remaining crust. Place these cut-out stars in the refrigerator.
- In a large bowl, mix together the cherries, sugar, tapioca, salt, and lemon juice. Place the bowl in the refrigerator for 10 minutes.
- Remove the pie crust from the freezer and the cherry mixture from the refrigerator. Transfer the cherries into the pie crust. Cut the butter into small pieces and dot the butter on top of the pie filling.
- Brush the edges of the pie with water, then gently press small stars along the edge of the crust. Cover the top of the pie with the remaining cut-out star shapes. Brush these with water and sprinkle with coarse sugar.
- Bake at 400 °F for 20 minutes. Turn the temperature down to 375 °F and bake an additional 30 to 35 minutes, until the filling starts to bubble up between the star crust. If the crust is browning too quickly, tent it with aluminum foil for the last 15 minutes of baking.
- Allow the pie to rest for at least 4 hours, preferably overnight, before serving.
Notes
- To make this a gluten-free cherry pie, use this recipe to make the pie crust. The cherry filling is naturally gluten-free.
- Cherry pie can be stored at room temperature for up to 2 days, refrigerated for up to 5 days, or frozen for up to 3 months.
- Before serving, refresh a slice of pie in the oven at low temperature (around 325 °F) for 5 to 10 minutes to restore the crispness of the crust and warm the filling.
Recommended Products
As an Amazon Associate and member of other affiliate programs, I earn from qualifying purchases.